Toolbox is a utility by UDI DSP.
01 What Toolbox is
Toolbox is six effects running side by side, summed — warmth, compression, ducking, clipping, a bit crusher and a chorus, flanger or phaser — with a dynamic EQ and a filter that you can put before them or after them.
Most plugins with several effects chain them: each one processes what the last one handed it. Toolbox doesn’t. Every lane hears the same signal, and each adds only what it changes, as much of it as you blend in. That is how parallel compression and parallel saturation have always worked on a mixing desk, and here it is how everything works. You can drive a lane hard and add only a trace of it, and a lane you switch off can never change what another one is doing.
A freshly inserted Toolbox does nothing at all. Every lane starts off, MIX starts at 100 %, and what comes out is exactly what went in, to the bit. Turn on what you came for.
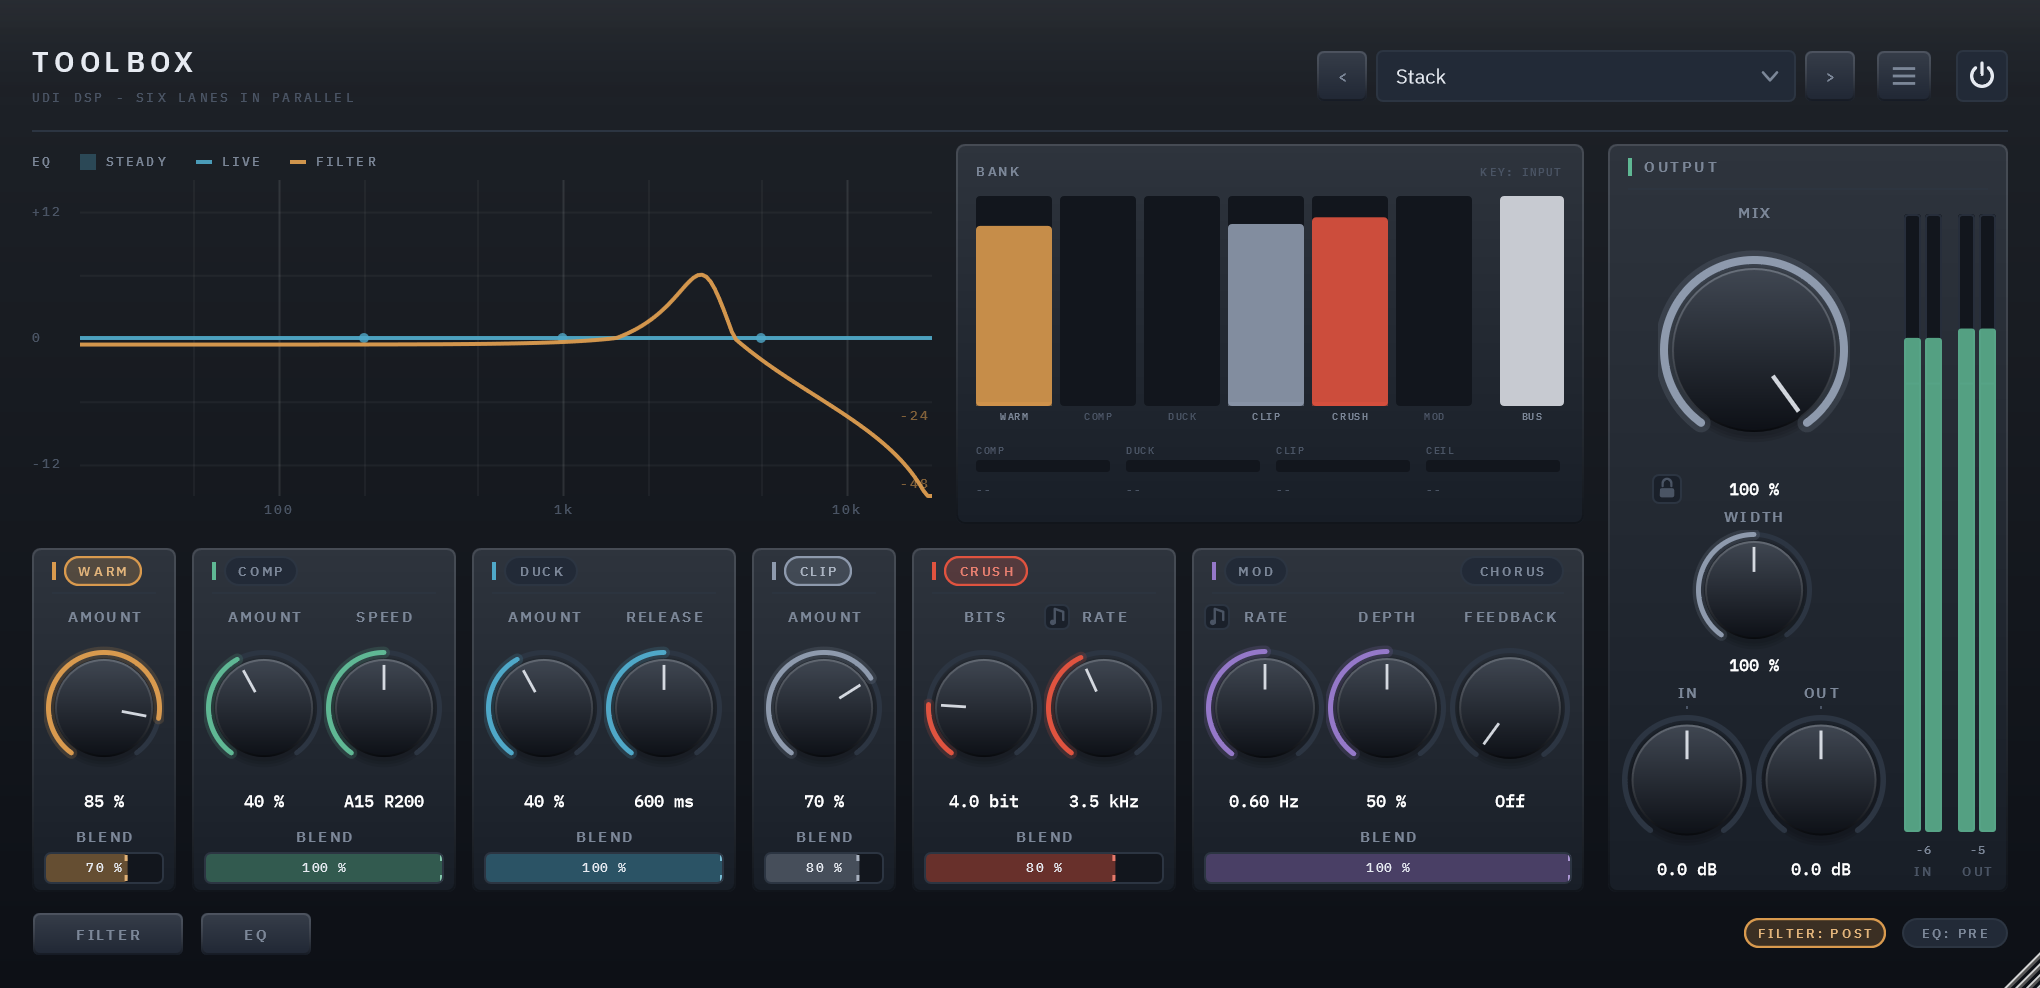
At a glance
- Six lanes in parallel — WARM, COMP, DUCK, CLIP, CRUSH and MOD, each with its own BLEND fader into one sum.
- A lane’s name is its switch — click it to turn the lane on or off; Alt-click it to hear that lane alone.
- A dynamic EQ and a filter, before or after — each on its own page, each placed Pre or Post the bank with one click.
- Parallel compression by design — COMP squashes as hard as you like and blends under the dry signal, with its level matched for you.
- A ducker with a real sidechain — patch a kick into it and put Toolbox on the bass.
- Lo-fi that stays musical — CRUSH reduces bits and sample rate, with the kind of filter a real converter puts in front of its sampler, and can come and go in time with your song.
- Chorus, flanger and phaser — following the song’s tempo if you want.
- Width that can’t collapse in mono — WIDTH changes the sides and leaves the mono sum exactly where it was.
- A ceiling you never set — an always-on guard at the end, so six lanes stacking can’t run the output away.
- Off means off — at its defaults Toolbox is its input to the bit, with zero latency.
02 The ideas behind Toolbox
You don’t need any of this to use Toolbox, but each idea explains why a control behaves the way it does.
Six lanes that add, not a chain that replaces
In a chain, an effect replaces the signal with its own version of it. In Toolbox’s bank every lane is handed the same signal, and what it adds to the output is only its difference from that signal — how far it moved the sound — scaled by its BLEND:
output = input + BLEND × (what the lane made of it − input), for every lane at once
Three things follow, and they are the whole point of the bank:
- BLEND at 0 means the lane adds nothing, however hard it is working. So you can drive a lane into the ground and dial in as little of the result as you want. Compressing hard and blending it under the dry signal is parallel compression; driving WARM hard at a low blend is parallel saturation.
- Switching a lane off can’t change any other lane. Nothing downstream is waiting on it.
- The order of the lanes doesn’t matter. A sum is a sum. The lanes are laid out in the order you’d reach for them — colour, then dynamics, then the two effects — not in an order the sound depends on.
Before the bank, or after it
The dynamic EQ and the filter are too big for a lane, so each has its own page — and each can sit before the bank (Pre) or after it (Post), set independently. It’s a real choice:
- Pre shapes what the lanes receive. Take out a resonance before it gets compressed; filter something before you crush it.
- Post cleans up what the lanes made. Roll off the top of a distortion; tame a band the saturation brought forward.
When the EQ and the filter land on the same side, they run one after the other, EQ first — not side by side. That matters more than it sounds. Summed side by side, a filter stops filtering wherever the EQ boosts: a low-pass set to darken a sound would quietly let the highs straight back the moment you added air on the EQ. In series, the filter keeps doing what its name says.
A ceiling you never set
After the lanes, the EQ and the filter sits a safety ceiling: a gentle limiter you can’t turn off, can’t adjust, and won’t normally hear. It exists because CLIP is an optional lane here. In Clearlight, a clipper sits permanently at the end and bounds the output; with CLIP optional, nothing else would, and six lanes summing — with a boosting EQ among them — can reach a long way past full scale.
It’s there to stop a runaway, not to master: it leaves everything below about +9 dBFS untouched, and nothing leaves it louder than +12 dBFS. It sits before MIX, WIDTH and OUT (chapter 03), so it doesn’t hold back what they add — and anything over 0 dBFS will still clip once it reaches your speakers or a 24-bit file. Keep an eye on the output meter.
If the CEIL reading on the display is moving, something upstream is louder than you think. That’s information, not a fault.
Off means off
Every part of Toolbox has a setting where it isn’t there at all, not merely quiet: a lane that is off, the EQ with every band at zero, the filter’s type at Off, WIDTH at 100 %, CRUSH with both knobs at Off. At its defaults Toolbox returns its input to the bit.
03 Signal flow
Every lane in the bank hears the same signal — whatever comes out of the Pre side — and the bank’s output is that signal plus each lane’s blended difference.
The dry signal MIX blends against is taken after the IN trim, so turning IN up doesn’t change the balance between dry and processed.
DUCK listens to the sidechain input when your host has something patched into it, and to Toolbox’s own input when it doesn’t.
WIDTH acts on everything you hear, the dry signal included, after MIX and before OUT.
04 The panel
Across the top
The name on the left; on the right, the preset field with its < and > steps, the menu, and POWER, which bypasses Toolbox.
The two displays
With up to eight things acting at once, one combined display would be unreadable. So there are two, split by the kind of information.
The frequency display (left) draws the EQ’s curve and the filter’s response, both computed from the same maths the audio uses — the picture is what the sound is doing. The EQ has two layers: its steady shape filled against 0 dB, and the live curve bold over it, so you can watch a dynamic band move. The filter’s cuts use a deeper scale of their own, labelled on the right in the filter’s colour.
The BANK display (right) shows what each lane is contributing to the sum — not its output level — as six bars in the same order as the lanes below them, feeding one BUS bar, so you can see when several lanes are stacking. A lane that is on but adding nothing shows a thin line at the foot of its bar, so “on and silent” is never mistaken for “off”. Top right, KEY says what DUCK is listening to: SIDECHAIN or INPUT. While a lane is soloed, its name appears in red beside BANK.
Underneath are four gain-reduction readings: COMP, DUCK, CLIP — and CEIL, the safety ceiling, which has no other meter anywhere.
The lanes
One row of six lanes. Each lane’s name is its on/off switch (lit when on), its controls sit side by side, and its BLEND fader runs along the bottom — the same place in every lane, because it’s the same thing in every lane.
OUTPUT
On the right, beside the displays and the lanes: MIX on top, WIDTH under it, IN and OUT side by side, and the input and output meters. The small padlock beside MIX’s value locks MIX, IN and OUT while you try presets (chapter 05).
The footer
FILTER and EQ open their pages, taking the lanes’ place; click again to come back. On the right, FILTER: PRE/POST and EQ: PRE/POST move each one to the other side of the bank without opening its page.
The displays are a little shorter while a page is open, to give it room. The window itself never changes size.
Panel size and tooltips
Panel Size in the menu picks 75, 100, 125 or 150 %, and every new Toolbox on this computer opens at that size. Dragging the bottom-right corner resizes just the one you’re in, anywhere from 75 to 150 %. Either way, your project remembers the size each Toolbox was left at. Show Tooltips in the same menu turns on a line of help for every control.
05 Controls
Switching a lane on and off
Click a lane’s name to switch it on or off. A lit name is a lane that’s on.
Solo
Alt-click a lane’s name to hear the bank with only that lane in it. Alt-click it again to hear them all; Alt-click another lane to move the solo there.
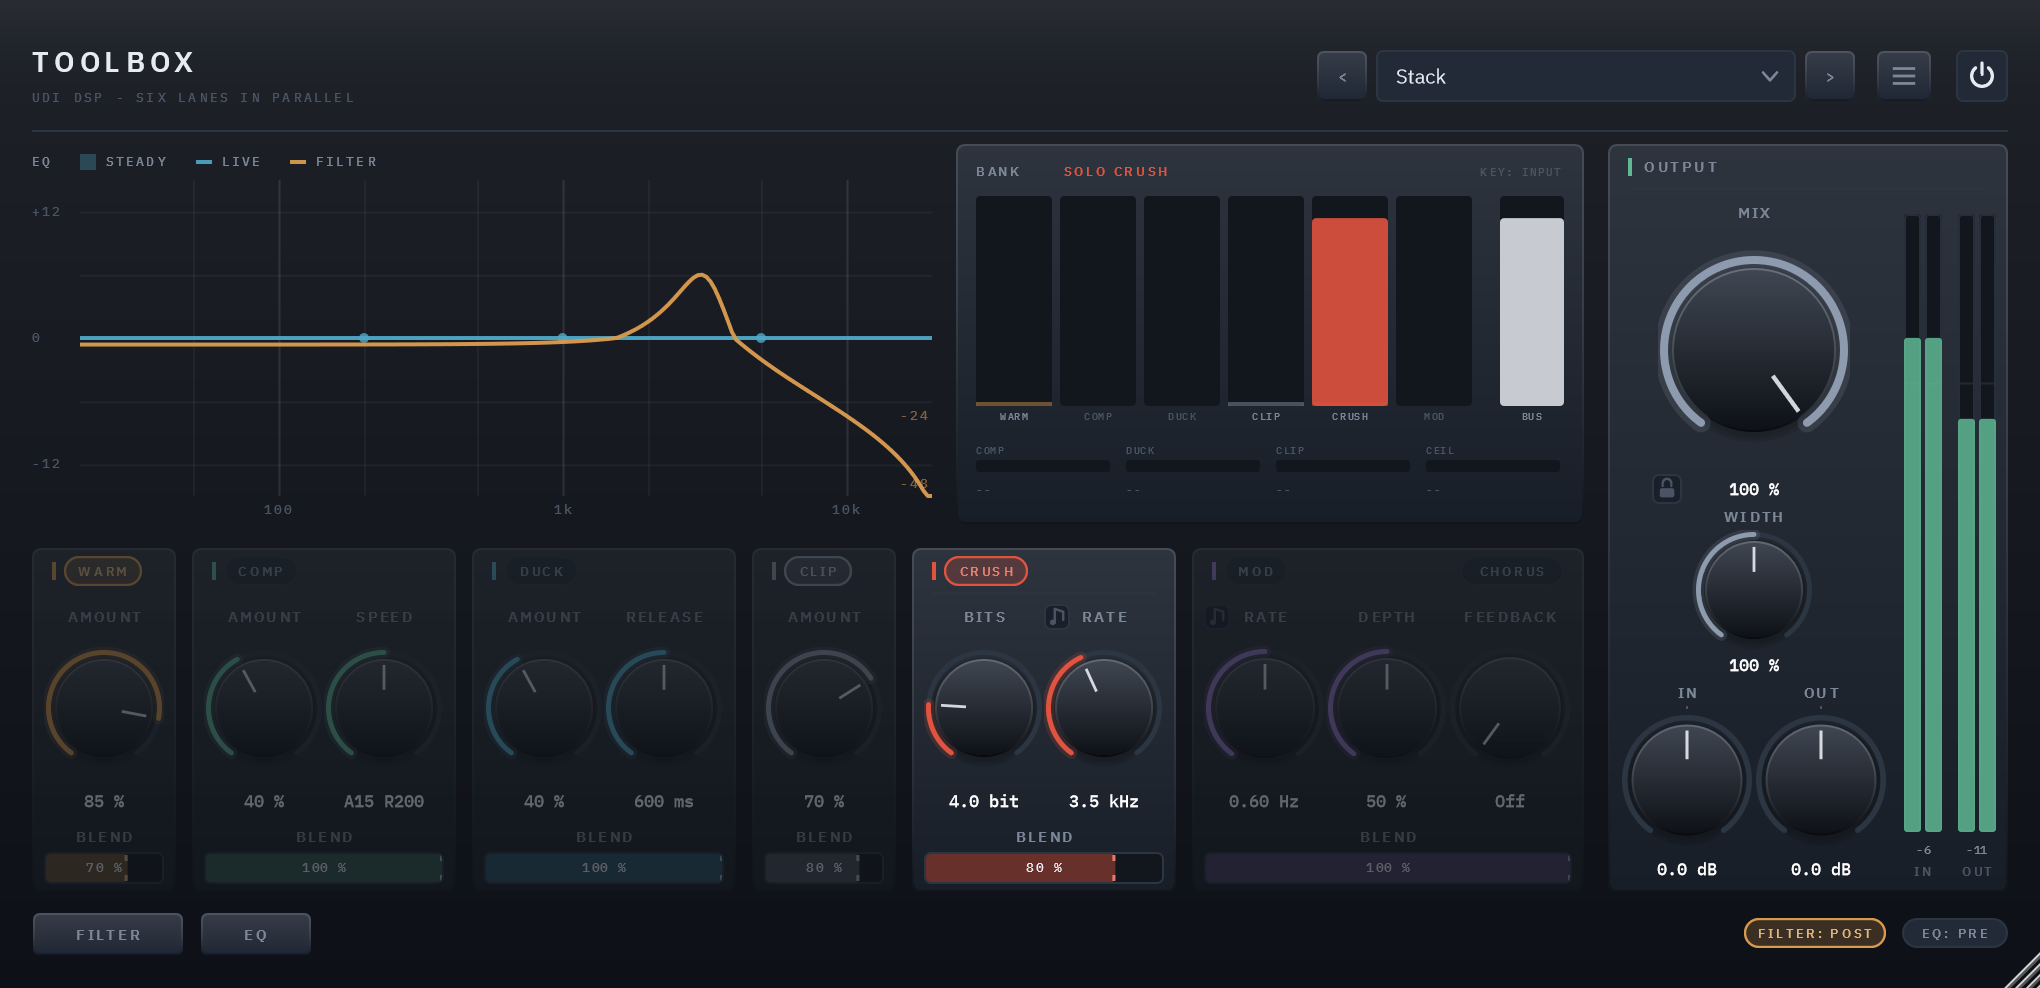
- The other lanes dim while they’re not being heard. They still turn, so you can set them first.
- A soloed lane plays even if it’s switched off — soloing is how you audition a lane.
- The other lanes fade out rather than cutting, so a solo never clicks.
- A solo is a way of listening, not part of a sound: it’s never saved with a session or a preset, never automated, and it clears when you load a preset or close the panel.
BLEND
The fader along the bottom of every lane: how much of that lane joins the sum, 0 to 100 %. Drag it; double-click it to return to 100 %.
At 0 a lane adds nothing, however hard it’s working. At 100 % the lane’s own sound is heard in full over the signal it was given.
WARM
Tube-and-tape warmth: even harmonics from an asymmetric bias, a gentle low-mid bell, and a tape tilt on top.
- AMOUNT — how hard it’s driven. 0–100 %, default 35 %.
Heavy AMOUNT at a low BLEND is parallel saturation: density without losing the transients.
COMP
A compressor with its makeup gain matched for you, so turning it up makes the sound squashed, not louder.
- AMOUNT — threshold and ratio together: further up is harder. 0–100 %, default 40 %.
- SPEED — how quickly it grabs and lets go: attack and release together, from a 60 ms attack and 800 ms release on the left (slow, for glue) to 3.8 ms and 50 ms on the right (fast, for pump). The middle, and the default, is 15 ms and 200 ms, the compressor’s own. The readout shows both, A for attack and R for release: A15 R200.
Set AMOUNT high and BLEND low for the classic parallel — “New York” — compression: the transients of the dry signal with the density of the squashed one under them.
DUCK
Pushes the signal down while something else is playing.
- AMOUNT — how far it ducks. 0–100 %, default 40 %.
- RELEASE — how long the signal takes to swell back once the key stops: short pumps, long breathes. 50 ms to 2 s, default 600 ms.
What it listens to. With something patched into Toolbox’s sidechain input, DUCK keys off that. Put Toolbox on a bass, send the kick to its sidechain, and the bass makes room for every kick. How you patch a sidechain depends on your host; look for a sidechain or “key” input on the plugin’s routing. With nothing patched, DUCK keys off Toolbox’s own input, where it acts as a gentle downward compressor — coherent, but not what the lane is for. The BANK display’s KEY reading says which.
CLIP
A soft-knee clipper.
- AMOUNT — how hard it’s driven. 0–100 %, default 30 %.
CLIP is optional here, unlike Clearlight’s — which is why the safety ceiling exists (chapter 02).
CRUSH
Bit-depth and sample-rate reduction: the lo-fi pair.
- BITS — word length, from 16 down to 1. Reads Off at 16. Default 8.
- RATE — samples and holds, from Off at the top down to 250 Hz. Default Off. The note button beside RATE’s name syncs CRUSH to the song instead (below).
Zero is one of the codes, as it is in a real converter, and that decides how quiet material behaves. The fewer the bits, the louder a sound has to be to get past zero: anything under −6 dBFS goes silent at 1 bit, under −12 at 2, under −18 at 3 — about 6 dB more for every bit. On a quiet source, raise BITS until it comes through; the crush you hear is always relative to how loud the source is. (That silence is also what keeps a quiet noise floor from being blown up into full-scale noise.)
RATE has a filter in front of it, the way a real converter does. It keeps the folding musical rather than harsh, and it darkens the sound as the rate falls — which is how old samplers actually behave.
Synced, the crush comes and goes in time. The note button cycles Free, Straight, Triplet and Dotted. In the synced settings RATE picks a note value from 1/32 to 8 bars, and the crush comes in for the second half of every one: the beat stays clean and the crush lands in between. At 1/4 that’s every off-beat eighth; at 1 bar, beats 3 and 4. Unlike MOD’s sweep, it’s locked to your song while the transport runs, so it always lands on the same beats; stopped, it keeps time by itself. Each change is a 3 ms fade rather than a cut.
The crush that comes in is the one you set: BITS, and the rate RATE had in Free. So set the sound in Free, then sync it — if RATE was at Off, only the bits come and go. (A synced RATE can’t be a sample rate: one sample per note value would be far below 250 Hz.)
With BITS and RATE both at Off, CRUSH adds nothing at all, at any sample rate.
MOD
Chorus, flanger or phaser — three different machines, not one knob’s travel.
- TYPE — the pill at the right of MOD’s name. It reads the type, and a click moves to the next: Chorus (a long, gently swept delay), Flanger (a short delay with feedback, the jet), Phaser (a sweep of phase-shifting stages, no delay at all). Changing type crossfades, so it never clicks.
- RATE — how fast the sweep runs: 0.02 to 8 Hz when free, default 0.60 Hz. The note button beside RATE’s name syncs it to the song: it cycles Free, Straight, Triplet and Dotted, and in the synced settings RATE picks a note value from 1/32 to 8 bars. A synced sweep runs at the song’s tempo but starts where it starts — it isn’t locked to the bar line.
- DEPTH — how far the sweep travels. 0–100 %, default 50 %.
- FEEDBACK — sharper, more resonant notches. Off to 100 %, default Off. Each type stops short of the point where it would run away: a chorus only thickens, a flanger reaches a full jet.
MOD’s BLEND is its mix. At the top, a chorus becomes a vibrato.
The right channel’s sweep runs a quarter cycle ahead of the left, which is what makes these effects wide. Like every stereo modulation effect, that isn’t mono-safe: summed to mono, the moving notches partly cancel.
OUTPUT
- MIX — the whole plugin against the dry input. 0–100 %, default 100 %. At 50 % you’re processing the entire rack in parallel.
- WIDTH — stereo width: Mono at 0, untouched at 100 % (the default), the sides doubled at 200 %. The mono sum never changes at any setting — what widening adds, mono takes away again exactly — so widening can’t make a mix fall apart on a mono speaker. At 200 %, a signal that is entirely side comes out up to 6 dB louder; watch OUT.
- IN and OUT — level trims, −24 to +24 dB, default 0 dB. IN is before everything; OUT is after everything.
- The padlock — the small button beside MIX’s value, open by default. Closed, loading a preset leaves MIX, IN and OUT where you have them, so you can step through presets at your own blend and level; everything else in the preset loads as usual, WIDTH included. A preset you save still stores all three, and moving them while it’s closed doesn’t mark the preset as changed. The lock belongs to this Toolbox: it’s saved with your project, never in a preset.
- The meters show the level coming in and going out.
POWER
Bypasses Toolbox. Bypassed, the input passes through untouched, to the bit.
06 The Filter page
Open it with FILTER in the footer. The pill at the right of FILTER’s title reads Pre or Post — where the filter sits — and a click moves it; it’s lit on Post.
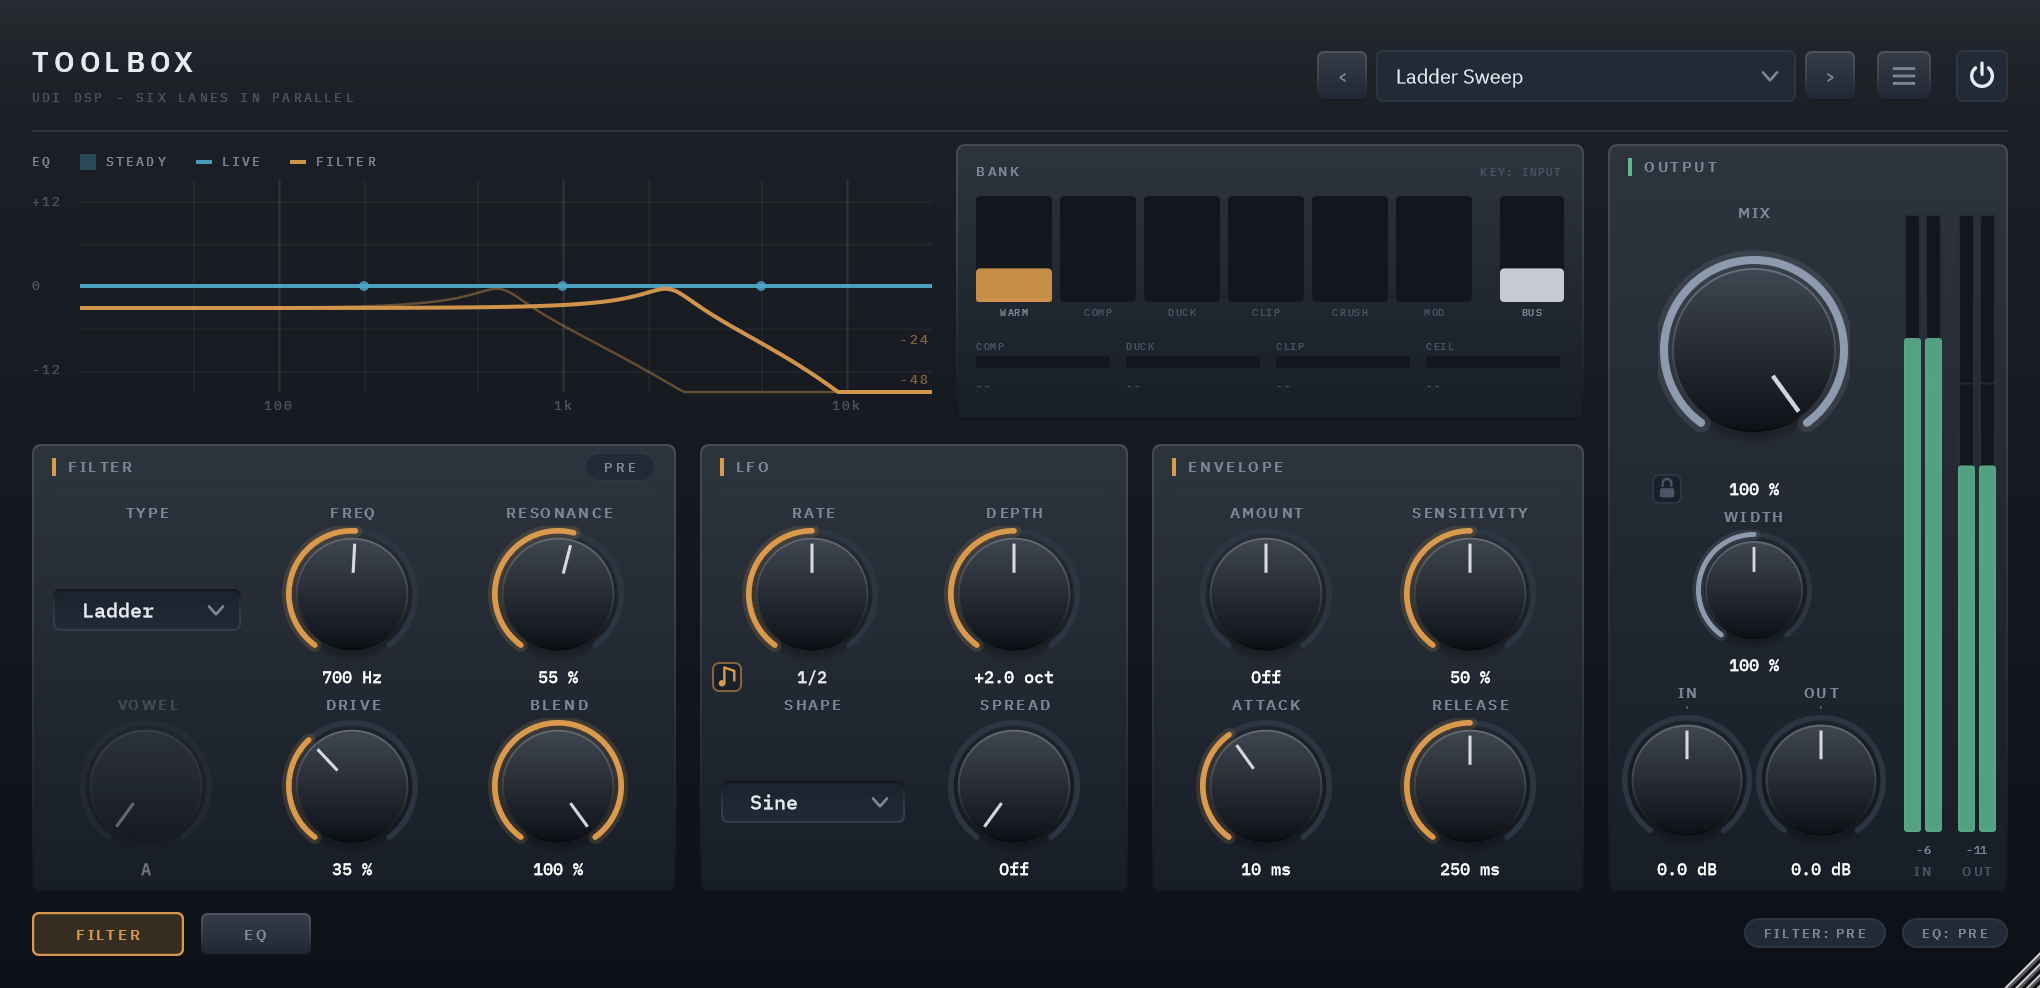
FILTER
- TYPE — Off, Low-Pass, High-Pass, Band-Pass, Notch, Comb, Formant and Ladder. Default Off; at Off the filter isn’t there at all.
- FREQ — 20 Hz to 20 kHz, default 1 kHz. Comb’s pitch.
- RESONANCE — 0–100 %, default 25 %.
- VOWEL — A through U, for Formant only.
- DRIVE — Off to 100 %, for Ladder only.
- BLEND — how much of the filtered signal you hear. 0–100 %, default 100 %.
A control the chosen type doesn’t use is dimmed. It still turns, so you can set it first.
LFO
- RATE — 0.02 to 20 Hz when free, default 1 Hz; or synced with the note button, as MOD’s RATE is. It starts synced, at a half note.
- DEPTH — how far the LFO moves the filter, in octaves: Off to 4. Default Off.
- SHAPE — Sine, Triangle, Saw Up, Saw Down, Square or Random.
- SPREAD — how far the right channel’s sweep runs behind the left’s: Off to 180°.
A synced LFO follows the song. After a loop or a jump it glides back into step rather than snapping — a snap in a resonant filter is a chirp at every loop point — and it snaps only when it starts from silence, so pressing play starts the sweep on the beat.
ENVELOPE
The filter follows what you play.
- AMOUNT — how far, in octaves: −4 to +4, default Off.
- SENSITIVITY — how quiet a sound starts to move it. 0–100 %, default 50 %.
- ATTACK — 1 to 500 ms, default 10 ms.
- RELEASE — 10 ms to 2 s, default 250 ms.
07 The EQ page
Open it with EQ in the footer. The pill at the right of LOW’s title reads Pre or Post, as the filter’s does.
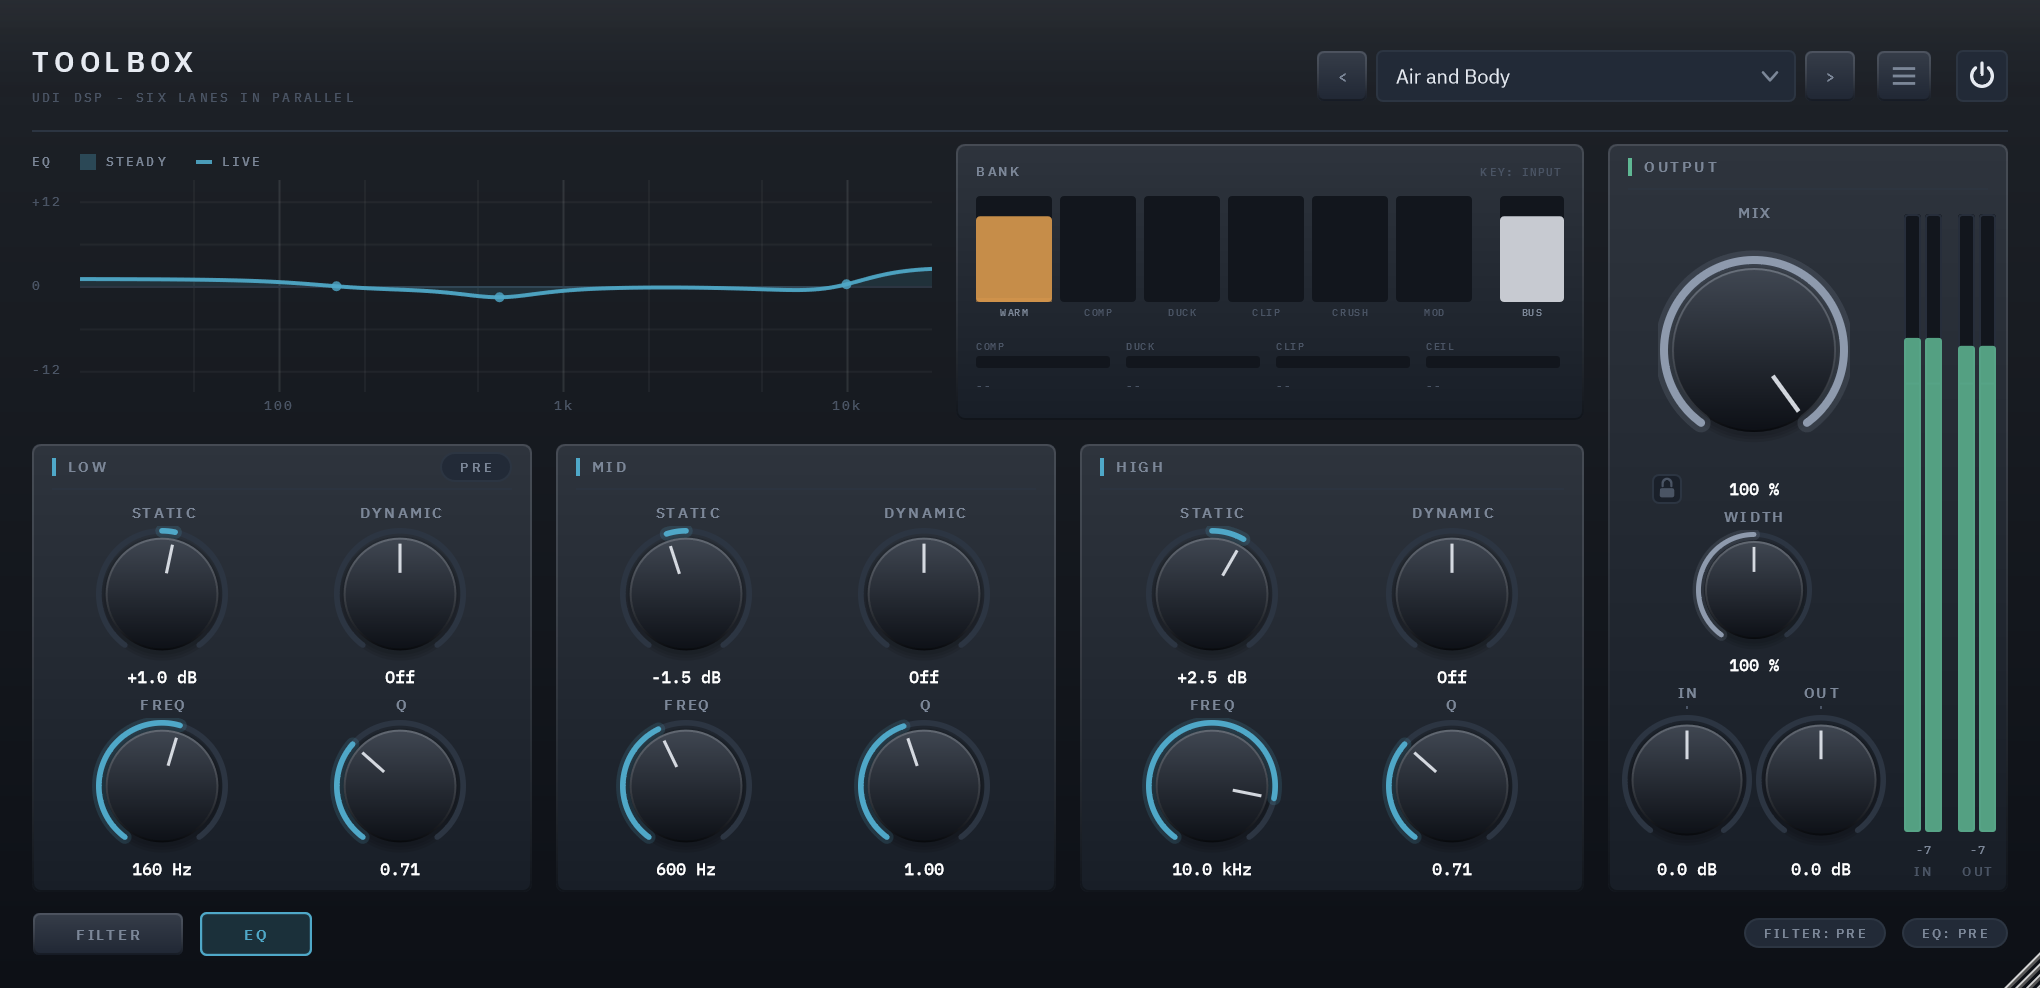
Three bands — a low shelf, a mid bell and a high shelf — each with four controls:
- STATIC — a steady gain: −12 to +12 dB, default 0.
- DYNAMIC — a gain that reacts to level: −100 % to +100 %, default Off. Below 0 it cuts the band when that band gets loud; above 0 it boosts it when it gets loud. At 0 the band is steady.
- FREQ — where the band sits. Low 20 Hz – 1 kHz (default 200 Hz); Mid 200 Hz – 8 kHz (default 1 kHz); High 1.5 – 16 kHz (default 5 kHz).
- Q — how wide: 0.3 to 4.
With every band’s STATIC and DYNAMIC at zero, the EQ isn’t there at all.
DYNAMIC is what makes it a dynamic EQ. STATIC at 0 with DYNAMIC below 0 on the high band is a de-esser that does nothing on a quiet phrase and only steps in on the hard sibilants.
08 Presets
The preset field is across the top. < and > step through the presets; click the field to load one, save your own, delete one of yours, or show your presets folder. Use a forward slash in a name to file it in a folder — Drums/My Glue.
In a toolbox, the preset genuinely is the setting: which lanes are on, where the EQ and the filter sit, and how much of each. So the factory presets are filed by the job, not by the effect:
- Drums — Parallel Glue, Room Crush, Snare Bite, Lo-Fi Loop
- Bass — Kick Room, Warm Round, Dirty Sub
- Vocals — De-Ess and Smooth, Air and Body, Telephone, Doubled
- Guitar — Chorus Clean, Jet Flange, Phase Sweep, Amp Grit
- Synth — Ladder Sweep, Vowel Pad, Comb Metal, 8-Bit
- Bus — Glue, Tape Colour, Safety Loud, Width Shimmer
- Broken — Stack, Ring Flange, Notch Chew
Default returns every control to its factory value — Toolbox transparent again.
Loading a preset never changes POWER or your host’s bypass, in either direction, and it clears a solo.
To try presets at your own blend and level, close the padlock beside MIX first (chapter 05). MIX, IN and OUT then stay where you set them, whether the preset comes from the preset field or from your host’s own preset list, and through Default too.
09 Technical specifications
| Formats | VST3 (Windows x64), Standalone |
| Channels | Mono in and out, or stereo in and out |
| Sidechain | Optional, mono or stereo; keys DUCK |
| Latency | 0 samples |
| Tail reported to the host | 10 seconds |
| Factory presets | 27, including Default |
| Panel sizes | 75, 100, 125 and 150 % |
Activation. Click the badge in the header, or Activate… in the menu. The trial, the demo and activation work the same way in every UDI DSP plugin, so they’re explained once, on the support page.
About. About Toolbox… in the menu shows the version and build. Include them in any bug report — they pin down exactly which Toolbox you’re running.