Ghostlight Pro is a spectral granular reverb by UDI DSP.
01 What Ghostlight Pro is
Where a conventional reverb has a single decay time, Ghostlight Pro splits its tail into four frequency bands and continuously re-weights how long each band rings, based on what the input signal is actually doing — in real time, with zero added latency.
It is also simply a good reverb. With the spectral engine at rest, you get a smooth, dense, modulated feedback-delay-network tail comparable to a classic algorithmic hall or plate. That’s the baseline everything else is built on: turn the signature features off and the plugin still earns its place.
At a glance
- Reactive spectral decay — one bipolar control, two different instruments. Bloom rings the loud bands longer; Ghost dies them fast and lets what’s hidden ring on instead. Centred, it’s just a very good reverb.
- A second tail, made of grains — Scatter crossfades the smooth tail into a cloud of overlapping grains pulled from its own recent past, each with its own pitch, position and pan.
- Link: one instrument, not two effects — the granular engine listens to the same analysis driving Ghost/Bloom, so grains are built from whatever band is actually ringing.
- A display that shows the reverb — a continuous, always-on field shows the real wet spectrum. Sparks mark grains you can actually hear.
- Zero added latency — the entire spectral analysis runs side-chain. Reported latency is 0 samples.
- Tune the band split to the source — Low Crossover moves where LOW ends, so Ghost and Bloom can target a source’s actual low-mid register instead of a fixed number.
- Freeze, and play into it — holds the tank indefinitely for pads and live layering, while new input ducks quietly underneath rather than piling on top.
- Tail reported to your host — worked out from the current settings, so the reverb can finish in a bounce that includes the tail, a track freeze, or a host that pauses silent plugins. With Freeze on, the tail is reported as unlimited.
- A reverb worth trusting at the core — 8-line Hadamard-mixed FDN, modulated and diffused inside the feedback loop, with a send-only de-esser so long tails never turn harsh.
- Shimmer, tuned to musical intervals — grains pitched up from unison to two octaves, snapping to musical intervals by default.
- Lock the rhythm to the track, not the clock — Pre-Delay and Shimmer Pan Rate can each sync to the host tempo, so a slapback lands on the beat and the shimmer’s stereo drift moves with the bar, at any tempo, without retuning by hand.
Which one do I need?
Ghostlight Pro has a smaller sibling, Ghostlight — the same reverb core and reactive spectral engine, without the granular tail or the deeper control set:
| Ghostlight | Ghostlight Pro | |
|---|---|---|
| Space (Size, Decay, Pre-Delay, Diffusion, Low Cut, Damp) | Yes | Yes |
| Reactive spectral decay (Bias, Reactivity — Bloom/Ghost) | Yes | Yes |
| Granular tail (Scatter, Grain, Shimmer, Air, Link) | — | Yes |
| Dynamic EQ (3-band, static + level-reactive, movable Freq/Q) | — | Yes |
| Advanced drawer (Tilt, Low/Mid/High Crossover, Low Width, De-Ess, Pan Rate, grain detail, Link split) | — | Yes |
| Tempo sync | Pre-Delay | Pre-Delay + Shimmer Pan Rate |
| Freeze | Holds the tank | Holds the tank and latches the grain buffer |
| Live parameters | 17 | 52 |
| Factory presets | 45 | 45 |
Ghostlight Pro adds a second, completely different kind of tail and the detail controls to shape both — reach for it when you want the full instrument. Ghostlight is for when you want a reverb that’s just really good at the one thing, with nothing in a drawer you’ll never open.
Design philosophy
A small front panel where every knob does something audible and non-obvious. No algorithm menu, no preset landfill. Depth lives behind the ADVANCED and EQ buttons — the granular engine’s finer controls, the band crossovers, the Dynamic EQ — not on the main face, so the everyday panel stays four sections you can learn in a minute.
A control only ships if turning it changes something you can hear without reading the number first. Tempo sync follows the same rule: Pre-Delay and Shimmer Pan Rate can lock to the host tempo because a slapback on the eighth note, or a shimmer drifting with the bar, is audible and specific. Decay, Diffusion, Damp and the rest stay free-running on purpose — nothing about how long a tail rings or how diffuse it is has a natural relationship to tempo.
02 The first engine: spectral decay
The Spectral Bias knob is bipolar, and its two directions are two different instruments. In each diagram below, the left bars show the input’s spectrum; the right bars show how long each band of the reverb tail rings.
Bloom
BIAS → +100Bands that are loud in your source ring longer. The reverb amplifies what's already dominant — chords swell around their own harmonics. Resonant, agreeable, "the room agrees with you."
Ghost
BIAS → −100The inverse — and the sound nobody else has. Loud bands decay fast; quiet bands ring long. The tail carries what your source is not emphasising: on a vocal, the mid presence dies instantly while the air and low body linger.
Centred at 0, the spectral engine is exactly neutral and Ghostlight Pro behaves as a plain — but high-quality — reverb.
03 The second engine: granular tail
Underneath the smooth FDN tail sits a second engine. It continuously captures the last six seconds of that tail into a buffer and can re-scatter it as a cloud of overlapping grains — short windowed fragments of the reverb’s own recent past, layered dozens deep, each with its own pitch, position and pan.
That gives you a second, completely different kind of tail. Where the FDN decays smoothly, the granular tail shimmers, stutters and breathes. You crossfade between the two rather than choosing, so it reads as an extension of the reverb rather than an effect bolted on after it.
Five controls shape it, covered in full under Controls:
| Control | What it does |
|---|---|
| Scatter | Blends from the smooth tail to the granular one |
| Grain | Texture, from long and sparse to short and dense |
| Tune + Shimmer | Pitch grains up into musical intervals — see Shimmer and its tuning |
| Air | Smooths grains into a diffuse, lush wash |
| Freeze | Holds the reverb tank and latches the buffer, so the tail holds indefinitely |
At Scatter 0 the engine is silent and bit-exactly bypassed: the plugin behaves precisely as it would without it.
04 Link: the two engines as one
Everything above describes two engines that happen to share a signal path. Link is what makes them one instrument: it feeds the spectral analyser’s live state into the granular engine, so the grains react to the same listening the reverb tail is already doing.
Transients scatter
The analyser's onset detector drives short bursts of higher grain density and slightly shorter grains, so hits break into a spray that settles back into the texture.
Grains made of what's ringing
Each grain picks a band weighted by that band's current decay multiplier, then is filtered toward it. Under Ghost the grains are made of the same air and low body the tail is ringing — reinforcing the character instead of running alongside it. Under Bloom it follows the loud bands instead, automatically.
At Spectral Bias 0 the multipliers are all exactly neutral, so the band half of Link has nothing to follow and switches itself off — the transient scatter keeps working, since a transient is a transient regardless of bias.
05 How it works
Reverb core
An 8-line feedback delay network (FDN) with prime-length delays, mixed every sample through an 8×8 Hadamard matrix. Each line is slowly modulated by its own independent LFO (0.1–1.2 Hz) using fractional-delay Lagrange interpolation — this keeps long tails from turning metallic without audible pitch wobble. Each line also carries its own allpass inside the loop, scaled with Size, so Diffusion scatters on every recirculation rather than only at the input. Input passes through Low Cut, a pre-delay and a velvet-noise diffuser — a sparse, random-sign smear whose low end (below about 200 Hz) bypasses it untouched, so the bottom octave keeps its weight — before entering the network, all of it as two independent L/R chains, so a stereo image survives the trip and anti-phase content isn’t summed away.
Absorption
A one-pole lowpass in each line’s feedback path (Damp) applies to what the line returns, so its loss compounds on every recirculation — which is what air absorption physically does. It strictly reduces loop gain, so it cannot push the network toward instability. Low Cut works the other way, feed-forward at the input: a high-pass compounding a few hundred times would annihilate everything near its corner instead of trimming it, so it stays out of the loop.
Multiband decay
Each line’s feedback path is split into four bands (crossovers at 300 Hz, 1.2 kHz, 4.8 kHz by default) using an efficient one-pole shelving cascade. Each band gets its own effective RT60: the master Decay time multiplied per band. Every band gain is hard-clamped below unity after all modulation, and the cascade’s inter-band gain ratios and its recirculating signal both carry their own independent safety caps on top of that — closing a real instability found via combined extreme Tilt/Bias/Decay settings, where individually-safe per-band gains still compounded through many feedback cycles into a slow-building runaway. Verified under pathological input, including that specific combination, in the automated test suite.
Spectral analyser
A 1024-point FFT (Hann window, 50% overlap) runs as a side-chain: it watches the dry input but never processes audio that reaches the output — which is why the plugin reports zero latency. Bin energies aggregate into the same four bands as the reverb and are normalised by their sum, so the response follows the shape of your spectrum, not its level. Turning the input up 12 dB does not change the character at all (verified to five decimal places).
Response smoothing
Analyser weights are smoothed with separate attack and release times before touching the decay multipliers, and the multipliers are smoothed again per-sample inside the reverb. The fast path is keyed to band energy rising, so Ghost clamps down on onsets just as fast as Bloom swells on them. This is what keeps the engine free of zipper noise on percussive material. The weight distribution is also contrast-sharpened before mapping, so broadband musical material — not just isolated tones — produces a strong dominant-band response.
Hold through silence
When the input pauses, the engine holds the last-heard spectral shape rather than resetting, drifting back to neutral over roughly six seconds. A Ghost’d vocal tail keeps carrying its air-and-body character through phrase gaps and after the phrase ends, instead of collapsing to a plain reverb the moment the singer stops.
Granular tail engine
A 6-second circular buffer keeps recording the FDN’s wet tail continuously — even at Scatter 0, at negligible cost — so raising the knob has fresh material available instantly. A fixed 48-voice pool spawns overlapping windowed grains (Hann for short grains, Tukey for longer ones) with playback-rate-only pitch — no phase vocoder, the artefacts are the texture. A small always-on per-grain micro-detune (a few cents, independent of Shimmer) decorrelates overlapping grains so they read as a texture rather than a stutter. Grain gain is normalised by the square root of the current overlap, so loudness stays steady across the whole Grain range. Freeze latches both the write head and the read anchor, so grains keep drawing from the same frozen snapshot indefinitely. The smooth and granular tails are combined with an equal-power crossfade driven by Scatter, and at Scatter = 0 that blend is bit-exact — verified in the automated test suite. Air crossfades the whole granular signal through a 6-stage allpass diffuser reaching 79 ms (independent L/R chains, each stage’s delay gently LFO-modulated to avoid static metallic ringing) followed by a fixed ~7 kHz rolloff that keeps it warm rather than brittle — pitch-shifted (Shimmer) content is inherently brighter, so this specifically counters that. Unlike the reverted Regen control below, Air is feed-forward only: nothing recirculates, so it’s unconditionally stable by construction.
Cross-coupling (Link)
The granular engine receives the spectral engine’s per-band decay multipliers and its onset detector each block. Flux drives grain density and length at block rate — safe because both are read only when a grain spawns, so a stepped control value can’t produce a discontinuity mid-grain. Crucially, grain gain is renormalised against the post-burst overlap; normalising against the pre-burst value would turn every transient into a level spike, heard as pumping rather than scatter. Band selection is a multiplier-weighted random draw made once at spawn, so it’s naturally free of zipper artefacts, and the chosen band’s filter depth scales with how far that band sits above neutral — which is what makes Spectral Bias 0 bit-exactly uncoupled rather than “every grain filtered to a random band.” The per-grain filter is a deliberately low-Q bandpass blended against the raw grain rather than replacing it, so it emphasises a band rather than isolating it.
Tried and reverted: a Regen control fed grains back into the reverb’s own input for another pass of diffusion/decay, hoping the extra passes would sound airier. It measured perfectly stable but sounded like squeaks and murmurs rather than lush — reverted in favour of Air above.
06 Signal flow
Freeze holds the reverb tank itself, so it sits across the whole FDN rather than at any one point in this chain.
Two things in that chain explain why some controls behave the way they do.
Low Cut and Diffusion are on the way in; Damp is inside the loop. A filter inside a feedback loop applies again on every recirculation, so its effect compounds — which is exactly what you want from high-frequency absorption, and exactly what you do not want from a low cut. So Damp is in the loop and Low Cut guards the door.
The input runs as two independent chains, not a mono sum. Left and right get their own low cut, their own pre-delay and their own diffuser with different stage lengths, so anti-phase stereo content reaches the tail intact instead of cancelling itself out on the way in.
07 The panel
Four sections, grouped by what they do rather than by which engine they belong to: SPACE (Size, Decay, Low Cut, Pre-Delay, Diffusion, Damp) is the room itself; SPECTRAL (Bias, Reactivity) is the analyser-driven pair; GRANULAR (Scatter, Grain, Tune, Air, Link, Shimmer) is the grain engine; OUTPUT (Mix, Width, the two trims, and the meters) stays on screen even with the advanced drawer open, so you never lose sight of your levels.
Freeze sits in the header, next to the power switch, rather than in any section. It holds the reverb tank, which is not one engine’s business, and it is the control most likely to be reached for mid-take, so it belongs where nothing covers it. Its silhouette is deliberately unlike the power switch’s — a wide pill that fills purple, against a small square with a monochrome lamp — so you never have to read them to tell them apart.
Tilt lives in the ADVANCED drawer, not on the main panel. It is a ratio between bands, so it cannot shorten the highs without lengthening the lows by as much — which makes it the wrong first reach for “darker”. Damp does that one-sidedly and sits on the main panel instead.
The power switch
The circle at the top left is Ghostlight Pro’s own bypass, and it’s the one to reach for.
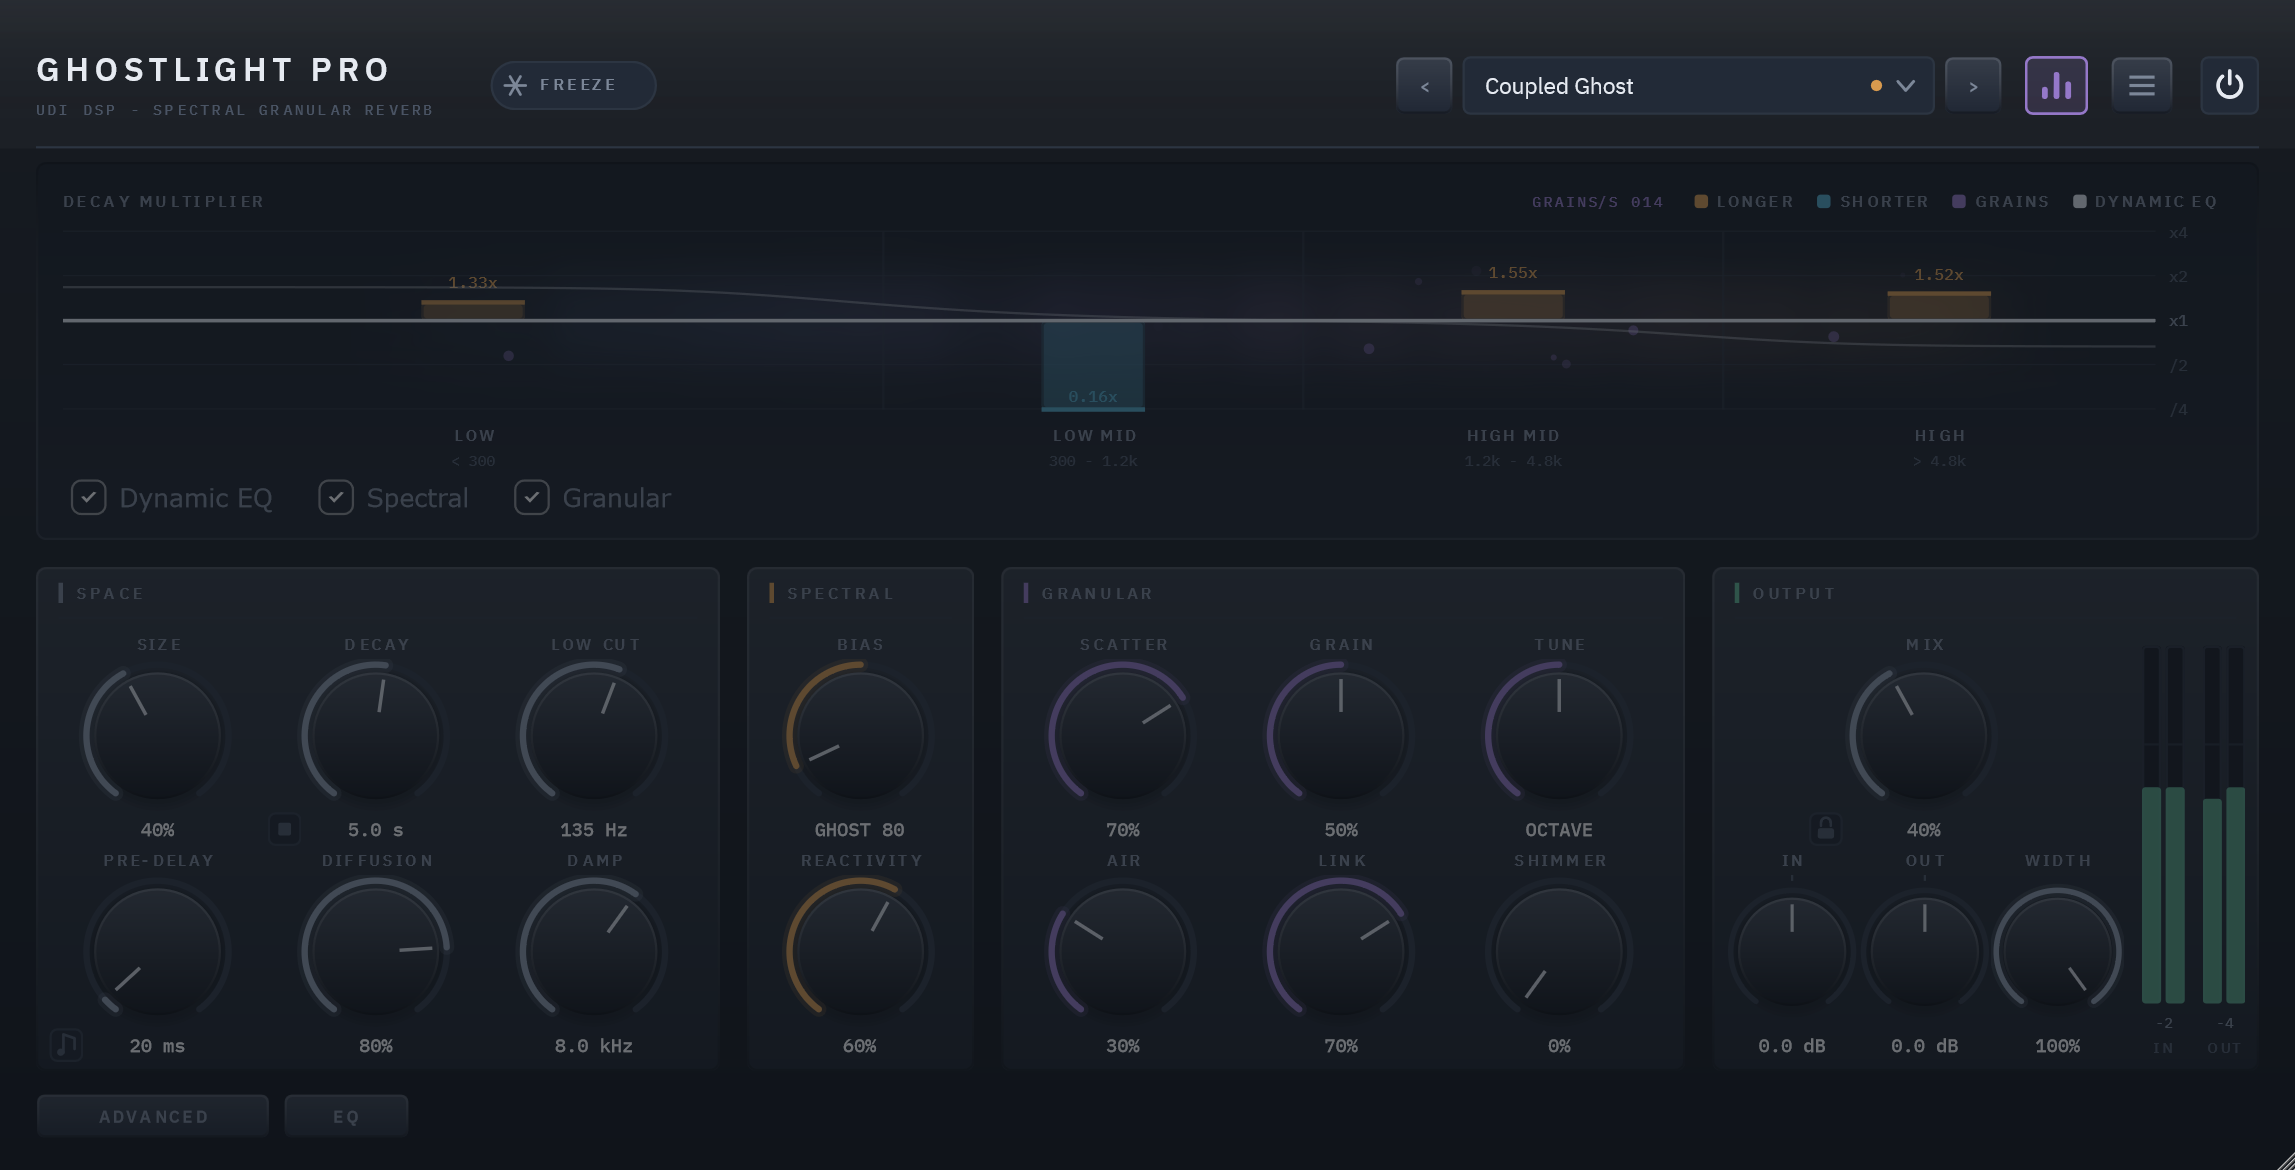
Bypassed. Everything below the header dims so the state reads across a room; the header stays lit, because the switch you press to undo it lives there.
It crossfades over about 20 ms rather than hard-switching, so there’s no click even with a loud tail ringing — and the engines keep running while it’s off. Switch back a few seconds later and the tail is still there, quieter than you left it, because it carried on decaying the whole time. A host’s bypass button usually can’t offer that.
It’s also the reliable one. Hosts drive plugin bypass inconsistently: FL Studio’s mixer LED, for instance, deactivates the plugin outright rather than bypassing it — “unloads processing for that plugin, saving CPU”, by its own documentation — which stops Ghostlight Pro running at all and cuts the tail dead. Nothing a plugin can do about that from the inside. The panel switch always gives you the crossfade.
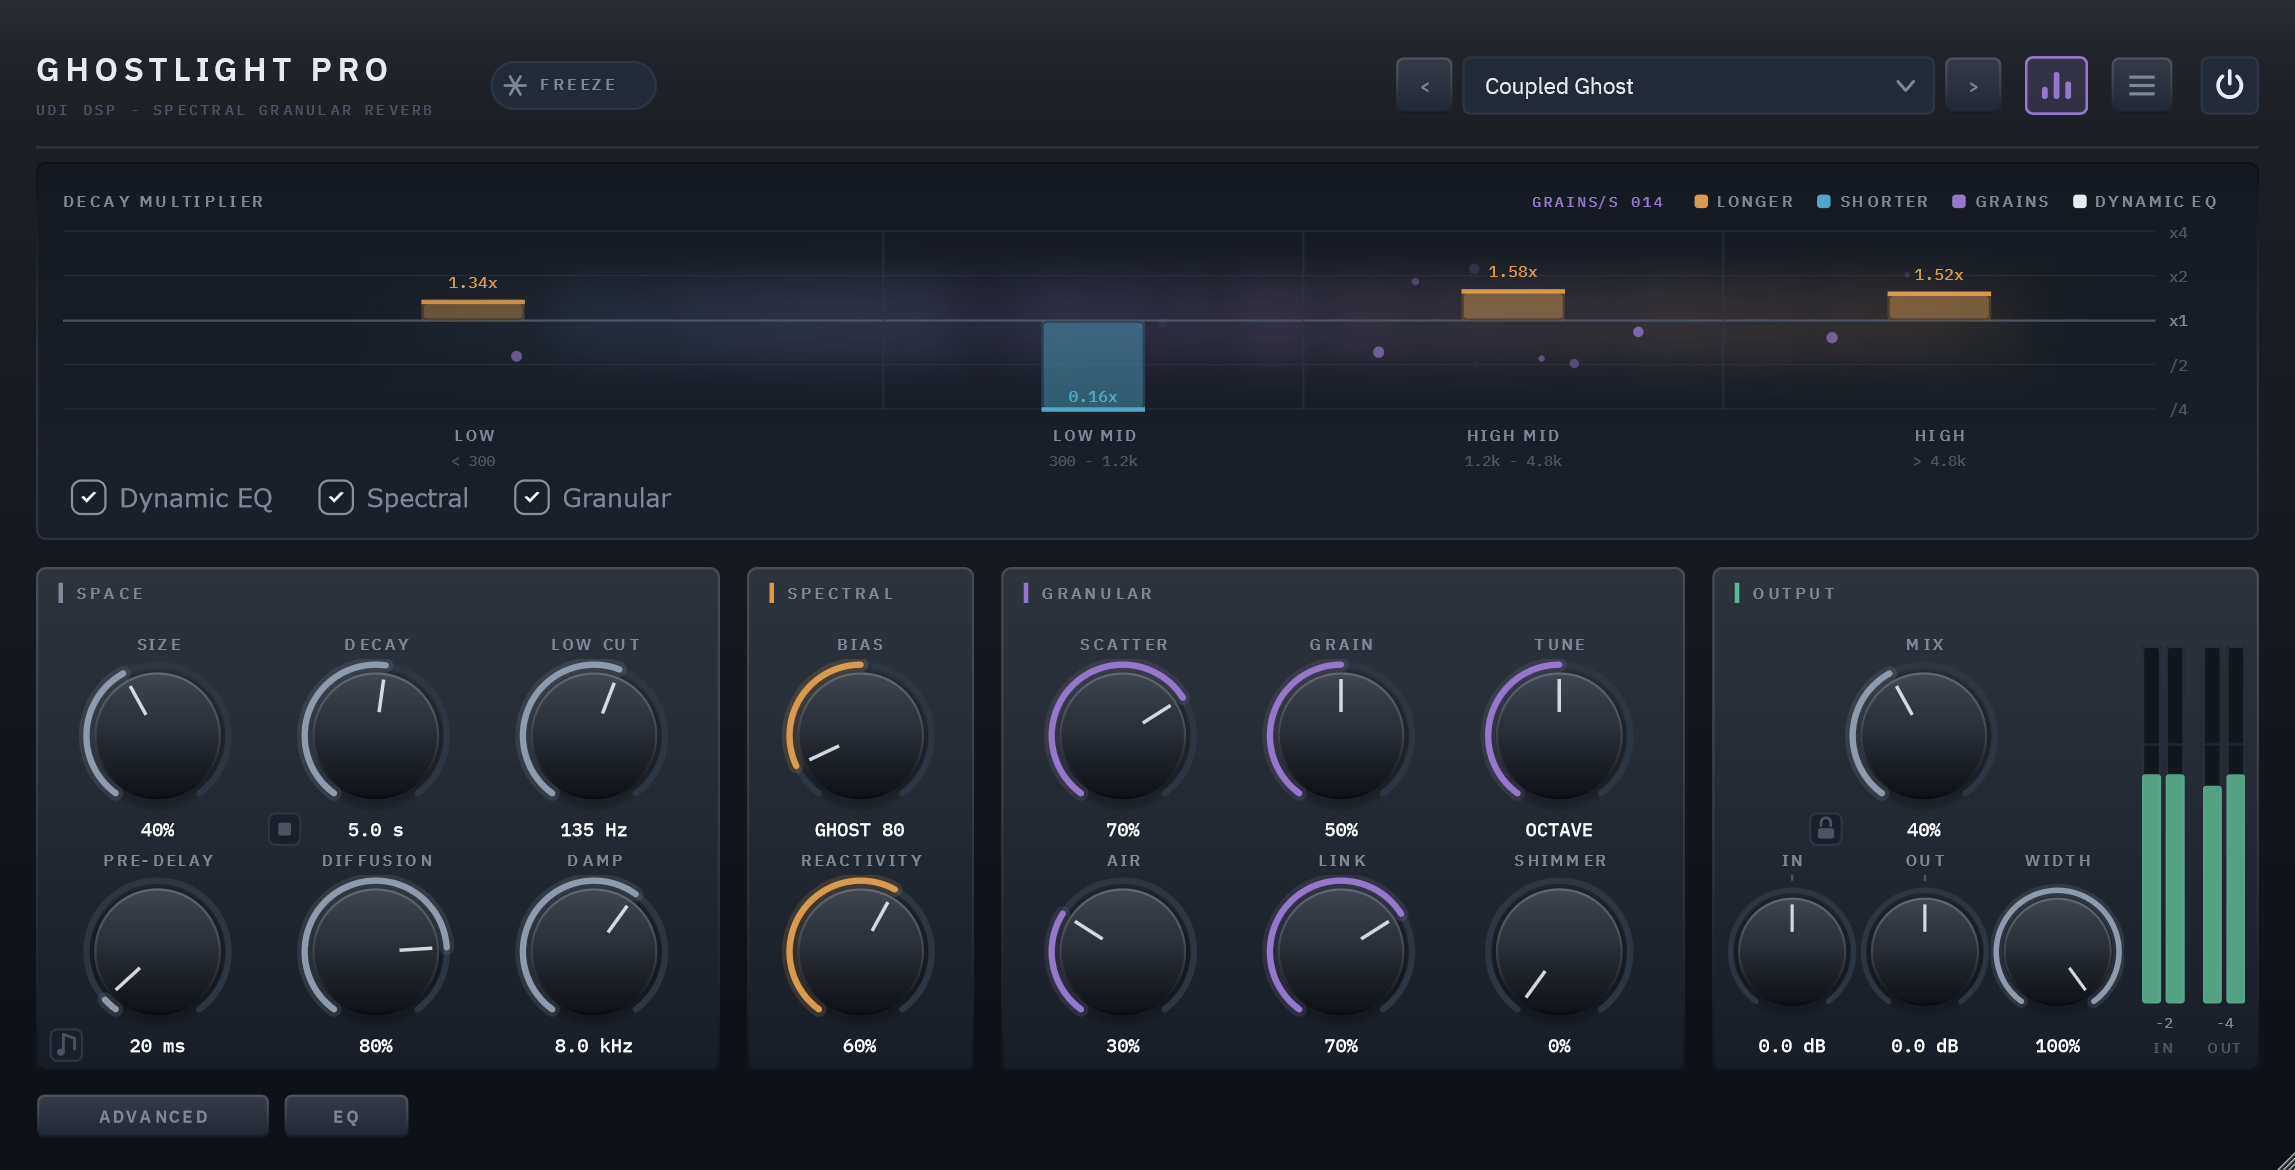
The front panel running the Coupled Ghost preset on a bright sustained chord. The cloud shows real energy spread across the whole spectrum; the low-mid band the source is loudest in has been pushed down to 0.15× while the other three ring past 1.3×, and the purple sparks are real, audible grain spawns collecting in the bands that are ringing longest.
Colour means something
There are exactly three accents: amber = ringing longer than the Decay setting, cyan = dying faster, purple = the granular engine. Controls that belong to no signature engine (SPACE and OUTPUT) are deliberately neutral so the amber and purple sections are what your eye lands on.
Knobs that are centre-detented (Tilt, Spectral Bias, Input Gain, Output Gain) fill their ring outward from twelve o’clock and carry a small tick there, so “neutral” is findable without reading the number.
Reading the display
The cloud — always on. A soft field across a real log-frequency axis (20 Hz – 20 kHz), showing what’s actually in the wet signal — the reverb’s own output, not the dry input and not a prediction of what the engine intends to do. Brightness is level against a fixed reference, so a decaying tail visibly dims as it dies rather than staying artificially lit. Colour is a fixed gradient tracking position on the axis, not any setting, so it reads as a more legible ruler for the same axis the bars sit on. Bright behind a flat bar means the reverb is audibly present and the spectral engine simply isn’t reshaping it; dark under a deflected bar means the setting has nothing to act on there. To hide the display, collapse the whole visualizer with the button in the header; the analyser behind it costs nothing while the plugin window is closed.
The bars — what the spectral engine is doing to each band’s decay time.
- Bars grow from a centre baseline. Up and amber means that band is ringing longer than your Decay setting; down and cyan means it is dying faster.
- The scale is log2, so “twice as long” and “half as long” are equal and opposite deflections. Gridlines are labelled ×4, ×2, ×1, /2, /4; the engine clamps multipliers to 0.15×–4×, so bars can reach the top and bottom of the plot but never leave it.
- At Spectral Bias 0 every multiplier is exactly 1.0, so all four bars collapse flat onto the baseline and the numeric readouts disappear entirely. The display goes quiet precisely when the feature is off — flat bars mean the spectral engine is genuinely doing nothing.
- Bar width is not data. Every bar is the same size regardless of how wide its band is on the frequency axis — that width is carried by the cloud and the band labels instead.
Purple sparks are grain spawns — audible ones. A spark only appears when the grain it marks actually has real signal behind it. With Link’s band coupling engaged, each spark appears in the column its grain took material from, so you can watch the granular engine track whichever band is ringing. When band coupling is not engaged, the sparks scatter across the full width rather than being misattributed to one column.
The band labels are the reverb’s actual current crossovers — by default below 300 Hz, 300 Hz – 1.2 kHz, 1.2 – 4.8 kHz, above 4.8 kHz — but they move live with the three crossover controls in the ADVANCED drawer (section 08), and the cloud’s axis follows them.
The Dynamic EQ curve — off-white, and only when engaged. When any EQ band is doing something, its shape is drawn over the cloud as a curve on the same log axis: a faint line for the static shelf/bell shape and a solid line for the live response as the reactive part moves, so you can see the moment Dynamic engagement pulls the curve away from where Static set it. It is drawn off-white specifically so it reads apart from the amber/cyan bars and the purple sparks. See section 11.
Three checkboxes sit below the visualizer — Dynamic EQ, Spectral, Granular — each turning its own layer of the display on or off independently. They are a display convenience only: unticking one hides that overlay, it does not change the audio.
Presets
The field in the header shows the loaded preset. Click it for the full menu.
- Factory — 45 curated presets plus Default, compiled into the plugin. They’re grouped into nine instrument-and-use categories (Vocal, Guitars, Strings, Brass, Cinematic, Ambient, Drums, Keys, Sound Design), each of which appears as its own submenu. They can’t be deleted or corrupted, and they are identical on every machine.
- User — your own, stored as files under
%APPDATA%\udidsp\Ghostlight\Presets. Put a forward slash in the name when saving (“Pads/Wide and Slow”) and it files itself into a folder, which then appears as a submenu. - Save / Save As… / Delete — Save overwrites the loaded user preset; on a factory preset it falls through to Save As, since factory presets are read-only. Delete removes the file and leaves your current sound exactly as it is — only the label stops claiming a source.
- Open Preset Folder — sharing a preset is just sending someone the file.
The arrows either side step through everything in order, factory then user, and wrap around.
An amber dot appears next to the name once any control differs from the preset you loaded. The name stays visible rather than clearing, because knowing what you started from is more useful than knowing you have since moved.
Two things make auditioning presets easier:
- The Mix lock — the small padlock beside the Mix readout. While it’s closed, loading a preset leaves Mix, Input Gain and Output Gain exactly where you have them, so every preset you step to plays at your blend and your levels instead of its own. It’s saved with the session, per instance, so a send reverb at 100% and an insert at 25% each keep their own. A preset saved while it’s locked still stores the Mix, Input Gain and Output Gain you’re hearing, and moving any of the three while locked doesn’t light the amber dot.
- Clear Tail on Preset Change — in the main menu (the ☰ button). With it ticked, the previous preset’s tail is cut as the next one loads, so a thirty-second decay doesn’t bleed into the preset you’re judging. It’s off by default — a tail ringing across the change is what many people want. Like the Mix lock it belongs to this instance and is saved with the session: turning it on for one track leaves every other instance, and every new one, with it off, and it works on your DAW’s own program changes whether or not the panel is open.
Presets store parameter values only — never window size, and never which preset was loaded. They are written in the same format as the plugin’s own session state, so anything saved now stays loadable as the plugin evolves.
The advanced drawer
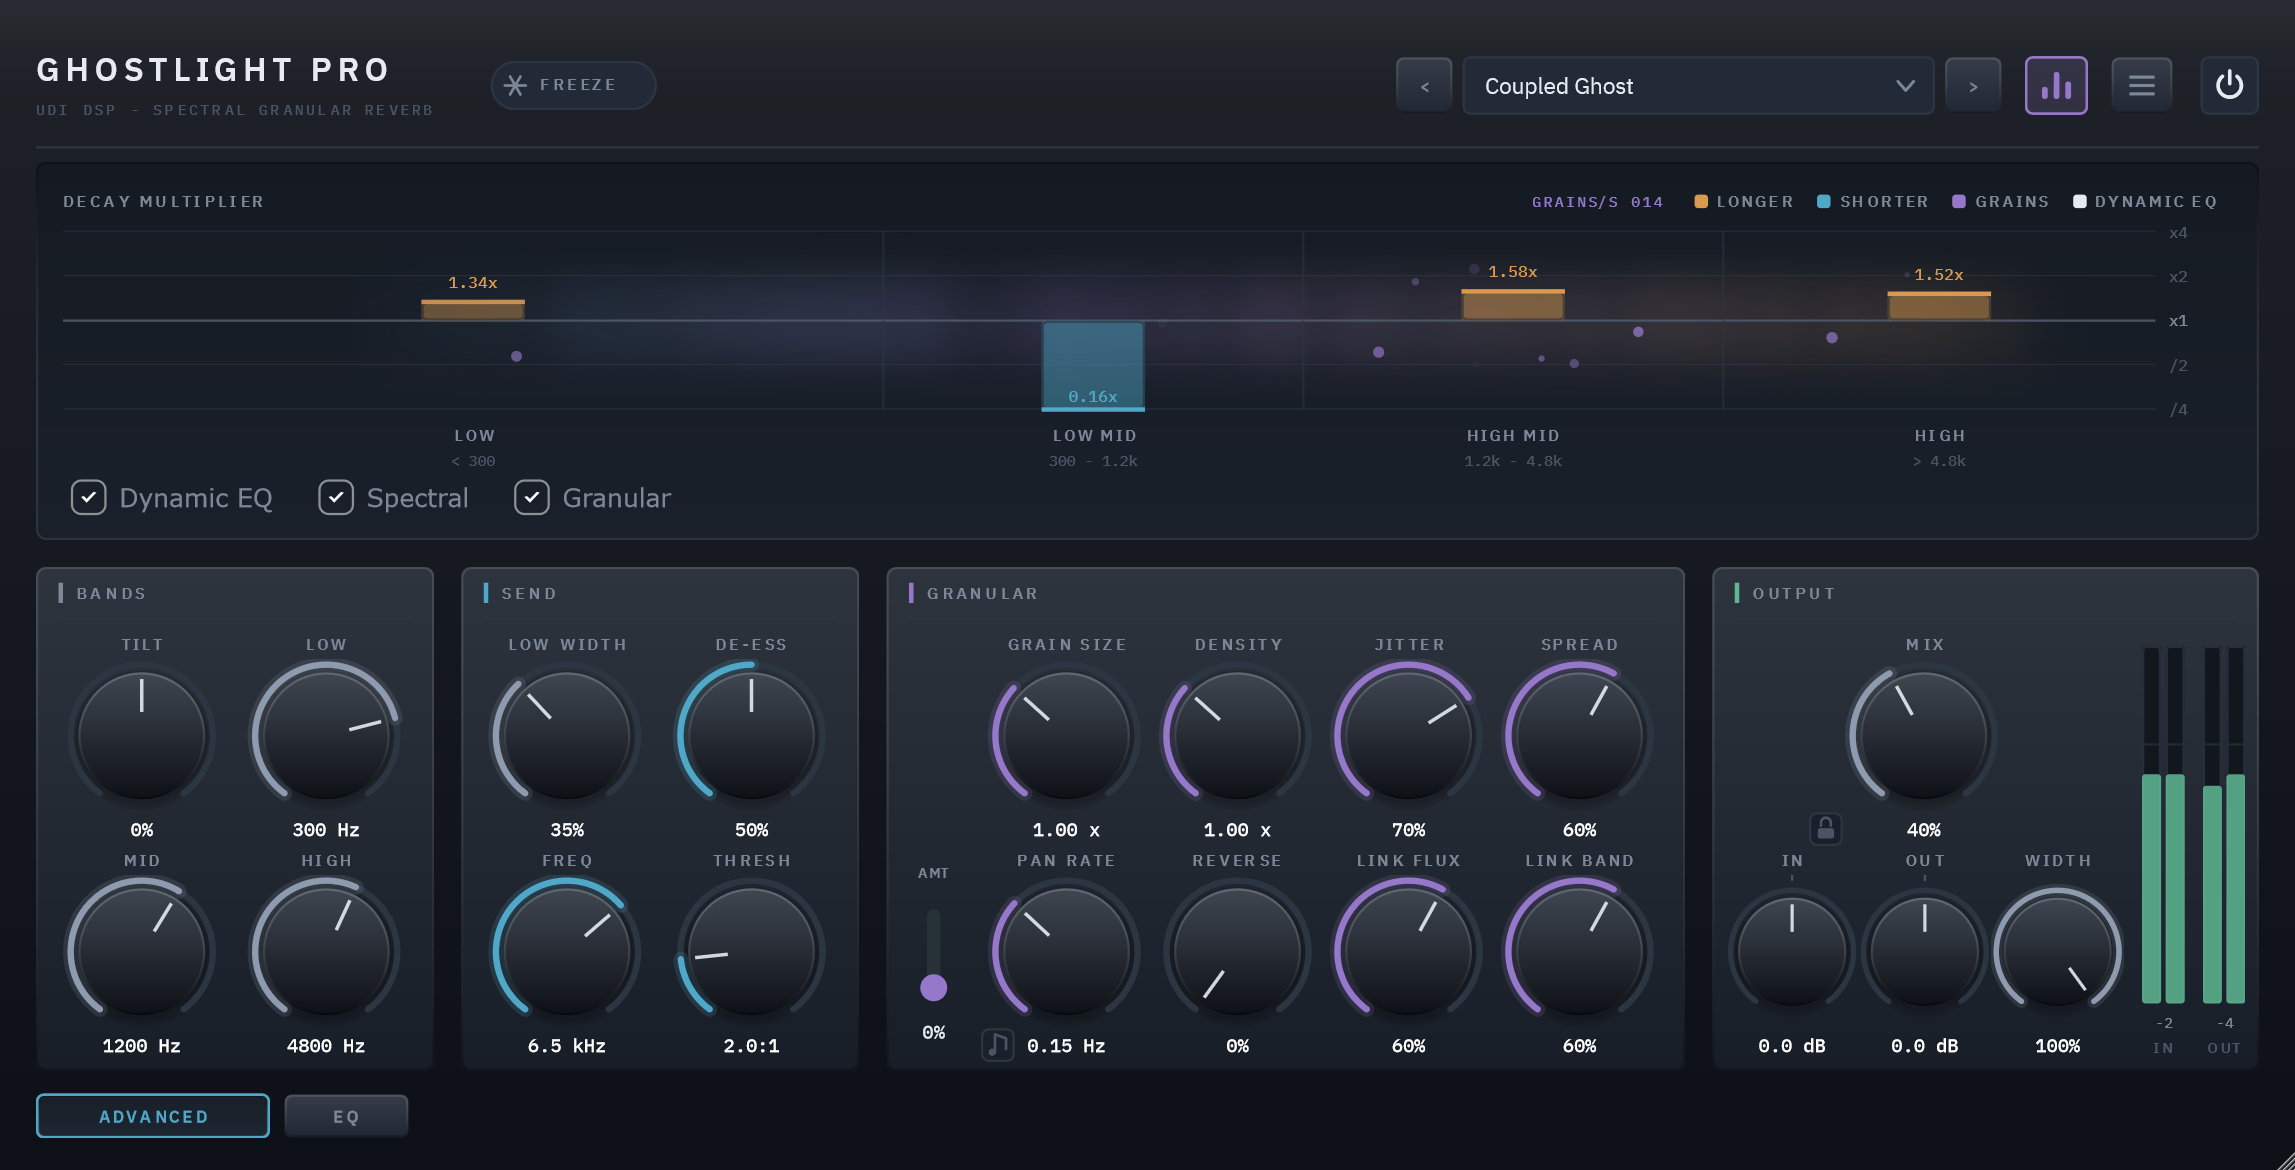
The same live state with the drawer open. OUTPUT deliberately stays put, so you keep your levels and meters while you work.
The button at the bottom left swaps the SPACE / SPECTRAL / GRANULAR sections for eighteen live parameters, presented as seventeen controls in three sections — BANDS, SEND and GRANULAR. Eight of them — Tilt, Low/Mid/High Crossover, Low Width, De-Ess, Pan Rate and Amount — are controls in their own right, documented in section 08. (Pan Rate’s tempo-sync toggle is a second parameter folded into that one control’s own entry, which is why seventeen controls cover eighteen parameters.) The other nine are finer detail: five shape individual grains, two split the Link macro into its two halves, and two tune the de-esser’s detector, all documented in section 10. All eighteen are automatable from the host whether the drawer is open or not — the drawer is just where they live on the panel, and the defaults are chosen so you never need to open it.
Right next to it is a second button, EQ, which flips the same three sections for the Dynamic EQ instead (section 11). The two are mutually exclusive — opening one closes the other — and OUTPUT stays on screen for both, so your levels and meters never move.
Resizing and readouts
Drag the bottom-right corner. The panel is one fixed design scaled by a transform, so it holds its proportions anywhere between 75% and 150%, and the size you choose is saved with the session alongside the parameters.
Every value shown on the panel is the same string the host shows in its automation lane — there is no second formatting path that can disagree with it. The footer shows the current sample rate and a smoothed estimate of how many grains per second the engine is spawning.
08 Controls
All parameters are automatable from your DAW and saved with your project. The main panel’s controls come first, then the ones in the ADVANCED drawer, then Freeze in the header.
Size
0 – 100% · default 40%
Scales the lengths of all eight delay lines — from a tight chamber at low settings to a vast, slow-blooming space at maximum. Changes are smoothed: sweeping fast produces a gentle, tape-like pitch bend as the delays stretch, which can be musical. For example, 15–25% reads as a small live room — a drum booth or a tight vocal booth; 70–90% reads as a cathedral or a warehouse, with individual reflections far enough apart to hear as a space rather than a colour.
Decay
0.2 – 30 s · default 2.5 s
The master reverb time (RT60): how long the tail takes to fall 60 dB. This is the base decay before Tilt and Spectral Bias reshape it per band. Below ~0.8 s it reads as a room; at 30 s it approaches a freeze-like drone. For example, 0.6 s suits a drum room where you want size without washing out the groove; 2.5 s is a generic hall that works on most material; 12 s and up stops reading as a room at all and starts reading as a pad underneath the source.
The small square button beside the Decay readout kills the tail: a press fades the reverb and the grains out over 10 ms, smoothly enough not to be heard as a cut, and empties them, pre-delay included, so a long decay doesn’t have to ring out every time you try a setting. Your dry signal is untouched, and so is Freeze: a frozen tail is emptied, but the hold stays on and refills as you play into it. It’s also a host parameter, Kill Tail, fired each time it switches on, so you can automate a clean cut at the end of a section. It is never saved in a preset.
Low Cut
20 – 500 Hz · default 150 Hz
What gets into the tank at the bottom — a high-pass on the reverb send only, so it never touches your dry signal. A long tail manufactures low end the source never had: every recirculation adds it again, and nothing about a long decay makes that stop — an eight-second tail on an acoustic guitar measured 242% more sub-300 Hz energy than the guitar itself. So this control decides how much ever gets in, rather than how fast it leaves.
Rule of thumb: the longer the Decay, the higher this wants to sit — around 100–150 Hz for normal reverb times, 200 Hz and up past ten seconds. The minimum is 20 Hz rather than an off position, because even wide open it should strip DC and subsonic rumble.
Pre-Delay
0 – 500 ms · default 20 ms
Silence inserted before the reverb onset. Short values (10–40 ms) keep a vocal upfront while still sitting it in a space; long values create distinct slapback-into-wash effects. For example, 15 ms keeps a lead vocal feeling close while still giving it room; 120 ms on a snare gives a clear gap before the tail arrives, so the hit and the room read as two separate events.
The small note-icon button, bottom-left, syncs it to your host’s tempo. Tap it and the same knob stops sweeping milliseconds and instead steps through tempo divisions — 1/32 up to 8 Bars — snapping to the nearest one as you turn it, the same way the Shimmer Tune knob snaps to musical intervals. The value readout switches from “20 ms” to the division name (“1/8”, “2 Bars”) so you always know which mode you’re in. Tap the button again to drop back to Free and the knob returns to whatever ms value it last held.
For example, at 120 BPM a Pre-Delay synced to 1/8 sits at 250 ms; the same 1/8 at 90 BPM is 333 ms. Sync it once and the plugin keeps the musical relationship exactly right every time the tempo changes, rather than you recalculating milliseconds by hand.
Diffusion
0 – 100% · default 70%
How much the tail is scattered — whether you hear a pattern recirculating or a smooth wash. It works in two places at once: a velvet-noise diffuser smears the input on the way in, and an allpass inside each of the eight delay lines scatters the signal again on every recirculation, so the control reaches the whole tail rather than only its first fifty milliseconds. At 0% it’s the least diffuse setting that still sounds like a room — tight and defined, with transients intact. At 100% it’s smooth and blooming even on sharp transients. Because it lives inside the loop, Diffusion is one of three controls that still reshapes a tail while Freeze is held.
Damp
1.5 – 20 kHz · default 7 kHz
High-frequency absorption inside the feedback loop: the corner above which the tail loses energy on every pass. This is the control for “darker” — and unlike Tilt, it’s one-sided: it shortens the top without lengthening the lows. Because it sits in the loop, the loss compounds, the way air absorption does over distance. Measured across the range, the 9.6 kHz decay shrinks 83% while 200 Hz moves 9%. Like Diffusion, it stays live under Freeze.
The maximum is a real 20 kHz corner rather than an “off” position. Even a 20 kHz one-pole rolls off audibly once it has been applied a few hundred times, and that gentle floor is what stops a six-second tail ringing for four and a half seconds at 10 kHz — so the number on the panel is always the truth.
Spectral Bias
−100 (Ghost) … +100 (Bloom) · default 0
The signature control — see section 02. At 0 the spectral engine is bypassed exactly (mathematically identical to a static reverb). The further from centre, the stronger the effect; its actual depth and speed are governed by Reactivity.
Reactivity
0 – 100% · default 50%
A dual macro controlling both the depth and the speed of the spectral response. At 0% the spectral engine doesn’t react at all. Raising it increases how far the band decays deviate and how quickly they track the input — attack from roughly 120 ms down to 8 ms, release from roughly 1.2 s down to 80 ms, attack always faster than release. Depth follows a square-root curve, so the default 50% already delivers most of the available depth; the knob’s upper half mainly buys speed. Low settings breathe slowly with the phrase; high settings snap per note.
Scatter
0 – 100% · default 0%
Crossfades (equal-power) from the smooth FDN tail to the granular tail — see section 03. At 0% the granular engine is silent and the blend is bit-exact bypass. Moderate settings add motion and grain to an otherwise-smooth tail; 100% replaces the tail entirely with the granulated texture.
Grain
0 – 100% · default 50%
One macro sweeping grain length and density together: long, sparse grains (~1.2 s, ~7/s) at 0% through to short, dense grains (~25 ms, ~180/s) at 100%. Grain loudness is normalised across the whole range, so this is a pure texture control — low settings smear and breathe, high settings granulate finely. Only audible once Scatter is above 0%.
Tune
unison to two octaves · default OCTAVE · snaps
How far grains are pitched up. Drag normally and it lands on musical intervals — UNISON, 5TH, m7, OCTAVE, OCT+5, 2 OCT. Hold SHIFT while dragging to move freely between them; the readout then shows the offset from the nearest interval, like OCTAVE +12c.
Does nothing on its own — Shimmer decides how many grains it applies to. See Shimmer and its tuning.
Air
0 – 100% · default 0%
Crossfades the whole granular signal from raw to a smoothed, diffused wash — a 6-stage allpass diffuser reaching 79 ms with gentle built-in modulation and a warm, fixed top-end rolloff. Feed-forward only: nothing recirculates, so it can’t build up resonance or run away at any setting. Especially useful paired with Shimmer, since pitched-up content is inherently brighter and benefits most from the warmth. Only audible once Scatter is above 0%.
Link
0 – 100% · default 50%
Couples the granular engine to the spectral analyser — see section 04. Transient scatter works at any Spectral Bias setting; band-following grains need Spectral Bias off centre to do anything, since at Bias 0 every multiplier is exactly 1.0 and there’s nothing to follow. Only audible once Scatter is above 0%. Two parameters in the ADVANCED drawer, Link Flux and Link Band (section 10), set how much of the macro goes to each half.
Defaults to 50%. That costs nothing out of the box, because Link only does anything once Scatter is above 0 — so the plugin’s default sound is unchanged, but the moment you engage the granular engine you get the coupled behaviour rather than two unrelated effects running in parallel.
Shimmer
0 – 100% · default 0%
How many grains get pitched up, read literally: at 30%, three grains in ten come back transposed at whatever Tune is set to.
Only audible once Scatter is above 0%; independent of Grain.
Mix
0 – 100% · default 30%
Dry/wet balance. The dry signal holds on through most of the knob and only gives way near the top, so even 60–80% keeps the source’s weight under the reverb instead of washing it out. At 0% the plugin is a bit-transparent passthrough. On an insert, 15–30% is a natural amount of space on a vocal or a lead instrument; on a dedicated aux/send channel, set this to 100% and control the amount from the send level instead, which is also what lets several tracks share one reverb.
The padlock beside the readout locks Mix, Input Gain and Output Gain against preset changes — see Presets in section 07.
Width
0 – 100% · default 100%
How wide the reverb tail sits. This affects the reverb only — your dry signal keeps its own stereo image at every setting — so it is most audible with Mix at 100%. At 100% the tail is exactly as the engines produced it; turning it down narrows the tail toward the centre, reaching mono at 0. The centre level itself never changes: the control only ever removes side content, never the middle. Reach for it when a tail feels too spread for the material, or when you want a deliberately narrow reverb behind something already wide.
Input Gain / Output Gain
±24 dB · default 0 dB
Utility trims at either end of the chain, each paired with a stereo peak meter (the output meter includes a clip indicator with a ~2-second hold). The input meter shows the post-trim level — what the reverb actually receives.
Deliberate design property: input gain changes level only, never the reverb’s character — the spectral analyser normalises band energies, so driving the input harder does not alter the Ghost/Bloom response. Use the trims for gain-staging and level-matched A/B comparisons: a wet setting 1 dB louder reliably sounds “better”, so match output levels before judging. If a quiet source is producing a thin-sounding tail, raise Input Gain before reaching for Decay or Mix, then level-match with Output Gain and compare again.
Tilt
−100% … +100% · default 0% · in the ADVANCED drawer
A static bright/dark shaper operating on the same four decay bands as the spectral engine. Negative (dark): highs decay quickly, lows ring — classic warm hall behaviour. Positive (bright): highs ring, lows tuck — airy, shimmering tails. Tilt is applied on top of whatever the spectral engine is doing, so you can Ghost a vocal while keeping the whole tail dark. For example, −30% on a bright acoustic guitar mellows the tail’s top end; +30% on a dark synth pad gives the tail a lift the source itself doesn’t have.
Reach for Damp first. Tilt is a ratio between bands — at the extremes the high-to-low decay ratio reaches 16:1 — so it physically cannot shorten the highs without lengthening the lows by the same factor. Asking it for “darker” always buys that darkness with a longer, heavier low tail. That’s why it lives in the drawer rather than the main panel, and why Damp exists: absorption in the loop shortens the top and leaves the bottom alone. Tilt sits at a genuine zero by default, and is there for when a real tonal tilt is what you want.
Low Crossover
80 – 500 Hz · default 300 Hz · in the ADVANCED drawer
Where LOW ends and LOW MID begins — shown live on the display, in the band labels and in where the LOW/LOW MID separator actually sits. It moves how much of the source’s own low-mid “mud” register (roughly 200–500 Hz) falls inside the one band Ghost and Bloom can shape as a single block.
Lower it, toward 80 Hz, and LOW narrows to true bass — kick body, bass guitar fundamental — decoupled from the boxy region above it. Raise it, toward 500 Hz, and LOW widens to take in that whole boxy region, so Ghost and Bloom act on all of it at once.
That widening cuts both ways: paired with Ghost, a wide LOW band is the most decisive way to tame a boxy low-mid in one move; paired with Bloom on a source where LOW is already loudest, the same width is the fastest way to add mud. Defaults to the plugin’s original fixed boundary, so every existing preset and saved session sounds identical until you move it.
Mid Crossover
400 Hz – 3 kHz · default 1.2 kHz · in the ADVANCED drawer
Where LOW MID ends and HIGH MID begins, shown live on the display. Raise it to hand more of the body of the sound to the lower band’s decay time; lower it to let the upper band’s brightness reach further down. For example, raising it toward 2 kHz on a full vocal mix pulls the chesty, present part of the voice into LOW MID, so Ghost/Bloom shape that register as one block instead of splitting it across two bands.
High Crossover
2 kHz – 12 kHz · default 4.8 kHz · in the ADVANCED drawer
Where HIGH MID ends and HIGH begins — the boundary Damp and Tilt pivot the top end around. Lower it to bring more of the presence region under the HIGH band’s decay. For example, lowering it toward 3 kHz brings vocal sibilance and cymbal shimmer into the HIGH band, so Damp’s absorption (or a Ghost bias) reaches material that would otherwise sit in HIGH MID and be left alone.
The three crossovers can’t cross each other — drag one past a neighbour and it pushes the neighbour along rather than swapping places, so the bands always stay in order.
Low Width
0 – 100% · default 35% · in the ADVANCED drawer
The same idea as Width, but for the bottom of the tail — everything below about 700 Hz. A reverb tank’s low frequencies have far fewer resonances than its high ones and can end up opposed between left and right, which leaves the tail sounding hollow in the middle even though nothing is wrong with the level. Bass-heavy and picked material shows it most; tight rooms and short decays show it more than halls.
Turning it down mostly will not sound narrower — below about 300 Hz your ears have little to localise with, so perceived width comes from higher up, which this control doesn’t touch. What you should hear instead is the low end gaining a position and a pitch instead of a vague swimmy rumble. It trades level for definition, so the bottom of the tail also gets a little quieter as it tightens; that’s the effect, not a side effect. If a setting sounds thin rather than tight, you have gone too far.
De-Ess
0 – 100% · default 50% · in the ADVANCED drawer
Tames sibilance on the reverb send only — your dry signal keeps its esses intact. A reverb smears a short “sss” across its entire decay, turning a natural transient into a sustained hiss cloud; that’s why the effect gets obvious above about 50% Mix, where you’re hearing mostly tail. It’s the same reason engineers put a de-esser before a reverb send.
- It reacts to sibilance, not brightness. The threshold is measured against each source’s own baseline brightness, so a consistently bright instrument simply raises its own baseline and is left alone, while a short spike above that baseline is treated as an ess. Across the test material that is the difference between clamping a trumpet for 88% of its length and leaving it alone 94% of the time.
- It’s level-independent, like the spectral engine. The same performance recorded 12 dB hotter is de-essed identically, so you never have to re-tune it after touching the input trim.
Only the top end moves — a dynamic high shelf, not a broadband duck, so the body of the sound never pumps. De-Ess Freq and De-Ess Threshold (section 10) tune it for material sitting higher or lower than usual.
Pan Rate
0.02 – 2.00 Hz · default 0.15 Hz · in the ADVANCED drawer
Speed of the slow left-right sweep a SHIMMER-shifted grain’s pan can follow — Amount, below, sets how much it actually follows it. Free-running by default; 0.15 Hz is roughly one full cycle every 6–7 seconds.
The note-icon button, bottom-left, syncs it to the host tempo — same mechanism as Pre-Delay’s sync button above. Because this rate is naturally slow, the musically useful end of the division list is the long one: syncing it to 2 Bars ties the shimmer’s stereo drift to a clear two-bar phrase, so it reads as locked to the track rather than wandering at an unrelated speed. A short division like 1/8 produces a fast, almost tremolo-like wobble — valid, but a different effect from the slow drift the control was built for.
Amount
0 – 100% · default 0% · in the ADVANCED drawer, left of Pan Rate
How much a SHIMMER-shifted grain’s pan actually follows the sweep above, instead of landing at a random position (set by Spread) like every other grain. At 0% a shifted grain is placed exactly like an unshifted one, so this changes nothing until you raise it. Unshifted grains are never affected. For example, 100% Amount with Pan Rate synced to 2 Bars makes the shimmer layer sweep fully left-to-right once every two bars — a clearly audible, rhythmic stereo motion rather than a static wash.
Freeze
Off / On · default Off · in the header, beside the power switch
Holds the reverb tank: whatever’s in the tail when you press it stays there indefinitely, independent of new input. It latches the granular buffer too, so it works whatever Scatter is set to. No click either way — it ramps over about 20 ms, so it’s usable mid-take. You can play into a freeze: the input is trimmed to −12 dB rather than cut, so new notes layer over the held tail instead of piling up on it.
Three controls sit inside the feedback loop and keep acting on a tail that’s already in there:
| Live while frozen | Inert while frozen |
|---|---|
| Size — warps the held tail dramatically | Decay — this is the thing Freeze overrides |
| Damp — darkens it | Low Cut and Pre-Delay — both act on the way in |
| Diffusion — scatters it further | Tilt — a held tail has no decay left to shape |
The inert ones aren’t broken: Low Cut and Pre-Delay act on what enters the tank, and nothing enters while the hold is on; Decay and Tilt describe how fast bands die, which a hold suspends entirely.
To clear a frozen tail without releasing the hold, use the kill button beside Decay: the tank empties, Freeze stays on, and whatever you play next is what gets held.
09 Shimmer and its tuning
Shimmer is the effect most people mean by “ambient reverb”: the tail doesn’t just decay, it blooms upward into something higher and brighter than what you played. It gets its own chapter because it’s the one control on the panel split in two, and the reason why is the interesting part.
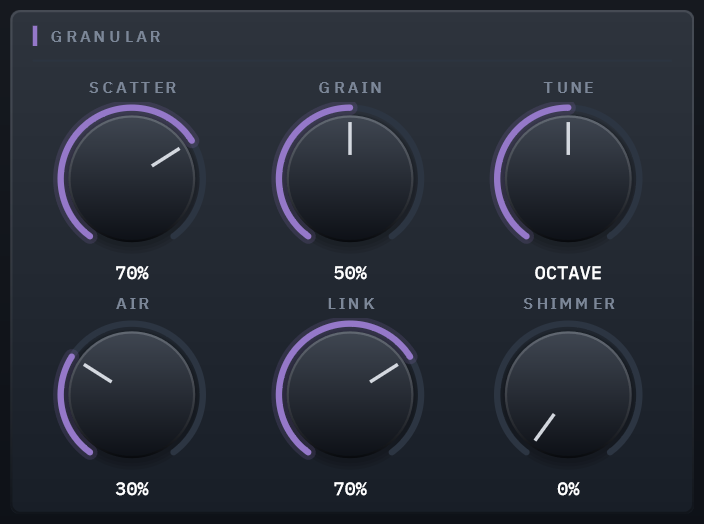
TUNE sits directly above SHIMMER: one control split in two, kept together.
What it actually does
The granular engine is constantly slicing the reverb tail into thousands of tiny fragments and replaying them. Shimmer takes some of those fragments and plays them back faster, so they come out higher-pitched.
Think of it as a choir echoing your reverb tail back at you. Tune decides what note they sing. Shimmer decides how many of them are singing.
Why two controls and not one
They used to be one knob, and that was a mistake worth explaining, because it shows what the split buys you.
A single knob had to raise the interval and the number of grains together. Choosing an octave forced roughly three-quarters of the grains to take it — and two whole regions of useful sound were simply unreachable:
Two octaves, few grains
Occasional high glints over a dark tail rather than a wash. This is what most people actually want when they say "a bit of shimmer".
A fifth, nearly every grain
A thick, close-harmony bloom that never gets bright enough to distract.
Neither is exotic. Both were impossible, because nothing musical connects “how high” to “how much” — they were welded together for the convenience of having one knob.
Why Tune snaps
Tune spans two octaves. Spread across a knob’s rotation that’s roughly nine cents per degree of travel, which means an exact fifth — the thing that makes a shimmer sit in a track rather than fight it — is essentially impossible to land on by hand.
So it snaps. Every stop is an exact interval and you get them without aiming.
Hold SHIFT and it moves freely. That isn’t an escape hatch, it’s a technique: a fifth sitting fifteen cents sharp beats slowly against the source and is genuinely lovely — lush rather than wrong. What you don’t want is to land there by accident and spend twenty minutes wondering why the reverb sounds sour. The readout tells you exactly where you are.
| Reads | Meaning |
|---|---|
OCTAVE |
exactly an octave up |
OCTAVE +12c |
twelve cents sharp of it — deliberate detuning |
5TH -8c |
eight cents flat of a fifth |
+15.5 st |
nowhere near an interval, so it just states the number |
The genuinely dissonant places are the midpoints between intervals, not the near misses. The readout makes the difference visible.
Where to start
| Sound | Tune | Shimmer |
|---|---|---|
| Classic ambient wash | OCTAVE |
60–80% |
| Occasional high sparkle | 2 OCT |
10–20% |
| Thick close harmony | 5TH |
80–95% |
| Ethereal, unplaceable | OCT+5 |
50–70% |
| Chorused thickening, no transposition | UNISON + SHIFT to ~20c |
60–90% |
Scatter must be above 0 or the granular engine isn’t running and Shimmer has nothing to work on. Air smooths the shifted grains into a wash rather than leaving them as distinct particles.
One way Ghostlight Pro differs
In many shimmer reverbs the pitch shift sits inside the reverb’s feedback loop, so each pass shifts again and the sound climbs forever. Beautiful, but prone to running away.
Ghostlight Pro shifts once, from the tail as it already exists. You get the shimmer character while the tail still decays exactly as Decay says it should. If you’re used to the runaway kind and wondering why it doesn’t keep climbing — that’s why, and it’s deliberate.
Making the shimmer move
Everything above is about pitch — what note the shimmer sings and how many grains join it. The Pan Rate and Amount controls (ADVANCED drawer, section 08) are about where it sings from: they let the shimmered layer drift across the stereo image on a slow sweep instead of sitting still, and that sweep can lock to the host tempo the same way Pre-Delay can. A static shimmer wash and one that visibly breathes left-to-right with the bar are the same pitch settings with Amount at 0% versus 100%.
10 Advanced controls
Nine of the seventeen controls behind the ADVANCED button — the fine-detail ones; Tilt, Low/Mid/High Crossover, Low Width, De-Ess, Pan Rate and Amount are controls in their own right and are documented in section 08 instead. Every one has a sensible default — reach for them when you want a specific texture, not because something is wrong.
Grain Size
0.50× – 2.00× · default 1.00×
Multiplies grain length around whatever the Grain macro has set. Grain sweeps size and density together along one curve; this breaks that pairing. Above 1× you get longer grains at the same rate, so overlap rises and the texture smooths toward a wash. Below 1× the grains shorten while the rate holds, thinning the texture into distinct, audible events. Grain gain is renormalised for the resulting overlap, so loudness stays roughly constant as you move it.
Density
0.50× – 2.00× · default 1.00×
The other half of that pairing: multiplies how often grains spawn, leaving their length alone. Above 1× the cloud thickens; below 1×, isolated grains become audible as individual events. Pushing Density up while pulling Grain Size down (or the reverse) reaches textures the Grain macro alone cannot — a dense cloud of very short grains reads as noise-like shimmer, while sparse long grains read as a stuttering echo.
Jitter
0 – 100% · default 70%
How far back into the 6-second history buffer a grain may start reading. At 0% every grain reads from the same recent point, so overlapping grains are near-identical copies of each other — that comb-filters into a stutter rather than a texture. Raising it spreads grains across the recorded past, which is what makes the cloud sound like a cloud. The 70% default was set specifically to fix a stutter problem; go lower only if you want that artefact deliberately.
Spread
0 – 100% · default 60%
Stereo placement of each grain. At 0% every grain lands dead centre and the granular layer is mono; at 100% grains scatter fully across the image. Because placement is per-grain and random, higher settings widen the cloud without moving the smooth tail underneath it.
Reverse
0 – 100% · default 0%
Probability that any given grain plays backwards. At 30% roughly one grain in three reverses, which reads as a shimmer with swells rising into notes rather than decaying out of them; at 100% every grain reverses. Because grains are windowed, reversal never clicks — it changes the envelope’s direction, so the tail seems to anticipate the source.
Link Flux
0 – 100% · default 60%
The share of the Link macro spent on transient coupling: onsets trigger short bursts of denser, slightly shorter grains that decay back over about a quarter-second. This half works at any Spectral Bias setting — a transient is a transient — so it is the half that always does something. Turn it down to 0 and Link only does band-following.
Link Band
0 – 100% · default 60%
The share of Link spent on band coupling: each grain draws a frequency band weighted by the spectral engine’s current decay multipliers, then is filtered toward it, so grains are made from whatever the tail is ringing longest. Unlike Link Flux, this half needs Spectral Bias off centre to do anything — at Bias 0 every multiplier is exactly 1.0, the weighting goes uniform, and band coupling disengages precisely.
Isolating these two is the fastest way to hear what Link is actually doing: set one to 0 and sweep Link.
De-Ess Freq
2.00 – 12.00 kHz · default 6.50 kHz
Centre frequency of both the sibilance detector and the shelf it moves — they track together, so this is a single “where is the harshness” control. Move it down toward 4–5 kHz for harshness that sits low (some male vocals, brass); up toward 8–10 kHz for airy, thin sibilance and cymbal splash.
De-Ess Threshold
1.2:1 – 6.0:1 · default 2.0:1
How far above the source’s own brightness a spike must rise before the shelf moves. This is a ratio against a slowly-tracked baseline, not an absolute level — a consistently bright instrument raises its own baseline and is left alone, while a short spike above it reads as an ess. Lower values engage more readily; higher values catch only the most extreme spikes. If a bright source is being dulled when it shouldn’t be, raise this before reaching for De-Ess itself.
11 The Dynamic EQ
Pro adds a three-band dynamic equaliser that shapes the finished wet tail — after both engines and the width stage, before the Mix blend — so it never touches your dry signal. Open it from the EQ button beside ADVANCED (section 07). It is parallel and transparent by construction: at its neutral defaults every band is bit-exactly bypassed, so switching the panel on costs nothing until you move something.
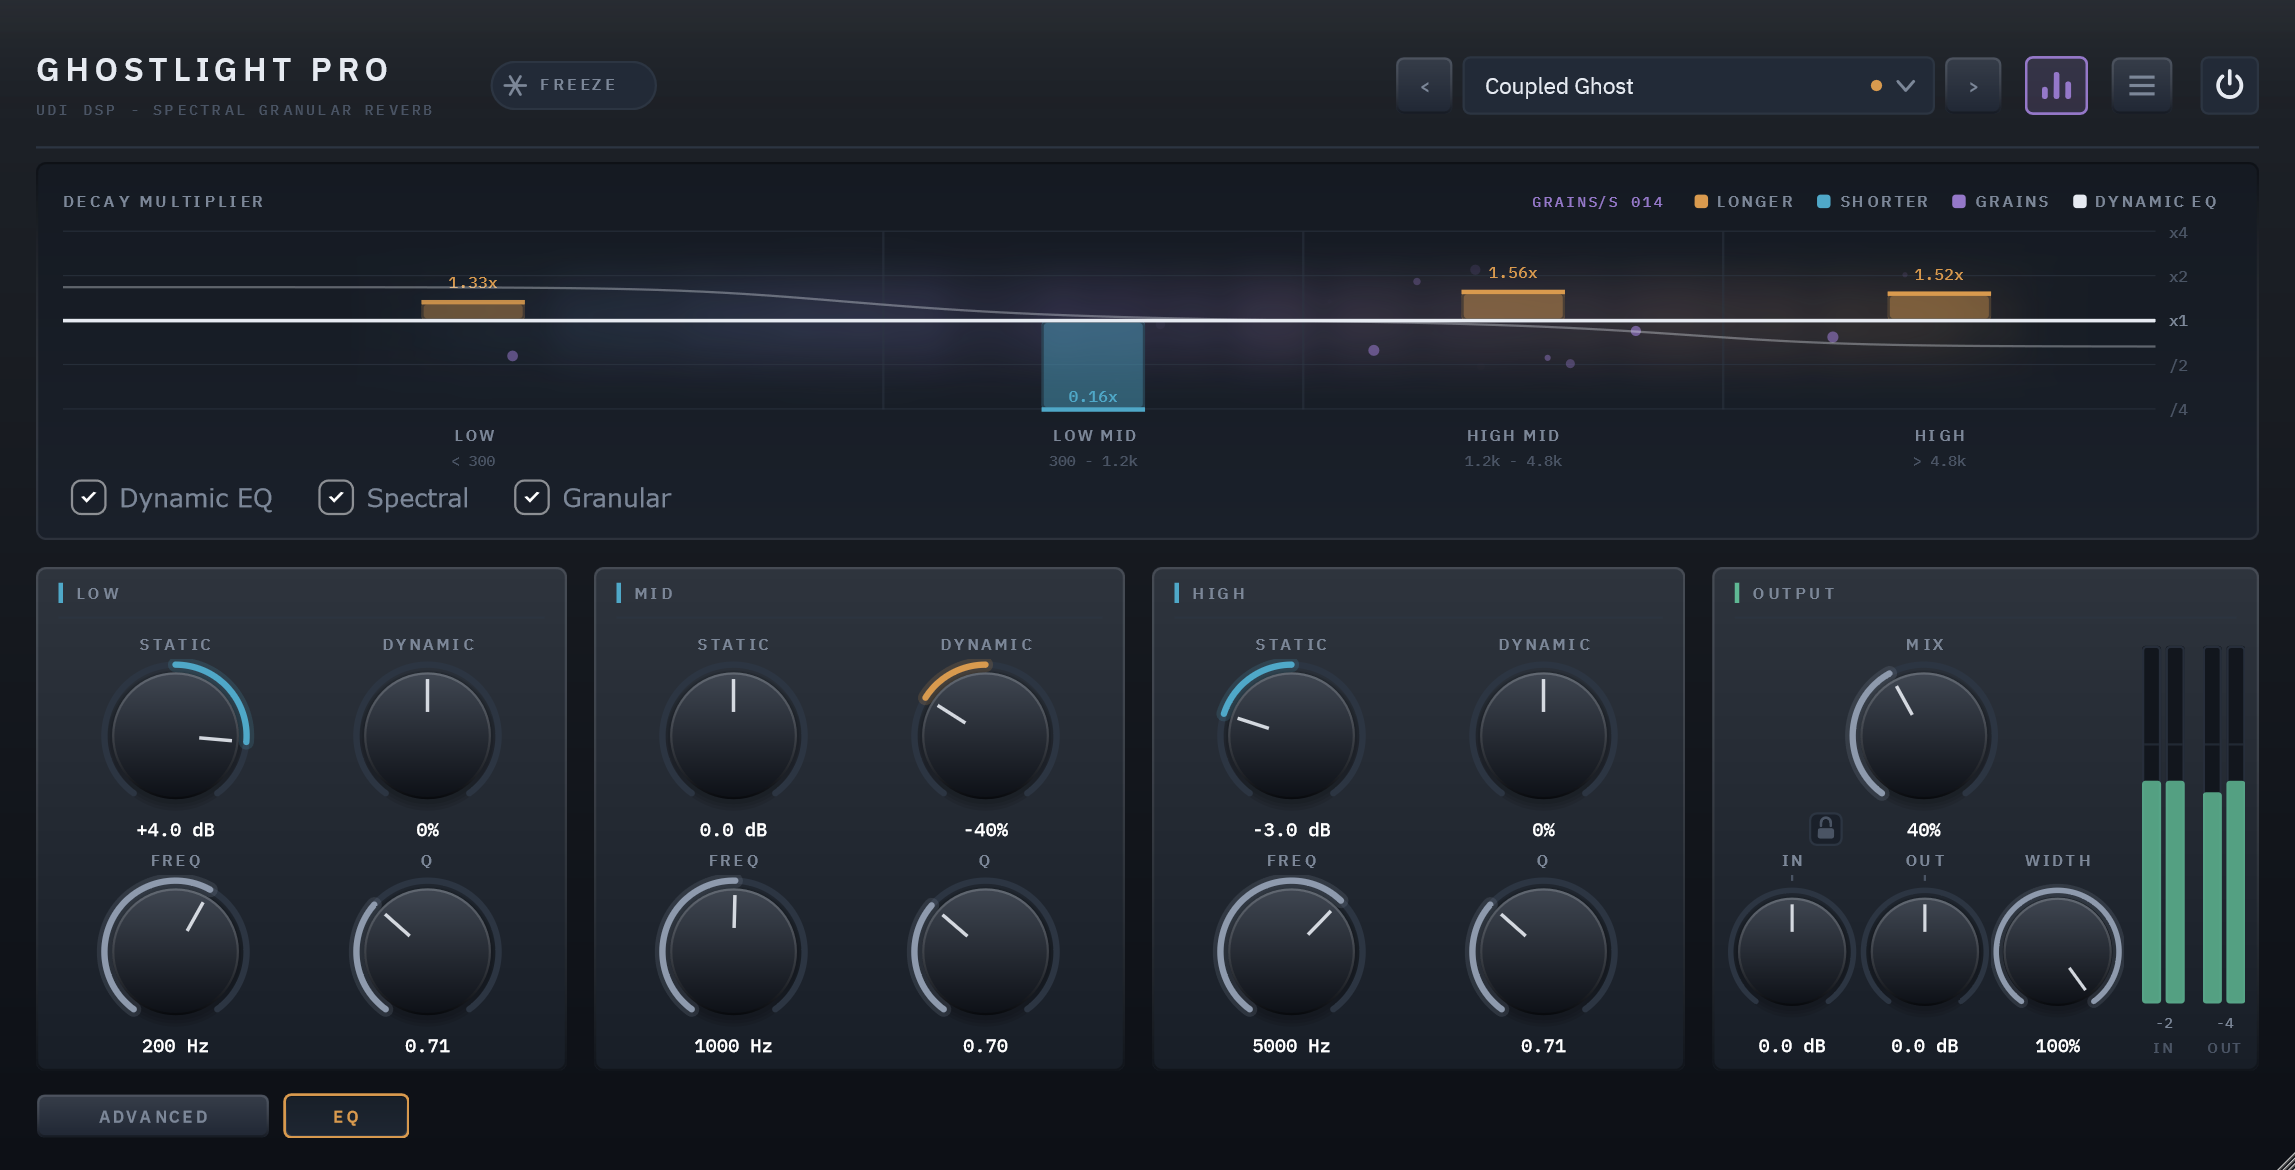
Three bands, each a different shape and each with the same four controls:
- Low — a low shelf. Freq 20 Hz – 1 kHz (default 200 Hz).
- Mid — a bell. Freq 200 Hz – 8 kHz (default 1 kHz).
- High — a high shelf. Freq 1.5 – 16 kHz (default 5 kHz).
| Control | Range | What it does |
|---|---|---|
| Static | ±6 dB | A fixed shelf or bell, always applied — ordinary EQ, gentle by design. |
| Dynamic | −100% … +100% | Level-reactive gain on the same band, on top of Static. Positive boosts the band as it gets louder; negative cuts it as it pushes past a threshold, the way a band compressor would. The amount sets both how hard it acts and how low the threshold sits, so a little is a light touch and a lot is a firm grab. At 0 the band is purely static. |
| Freq | per band, above | Moves the shelf corner or the bell centre. |
| Q | 0.3 – 4.0 | Bell width, and shelf-slope steepness. |
Because it reads the wet bus’s own level, the reactive part follows what the reverb is actually doing rather than the dry input — so a High band on a small negative Dynamic tames a tail’s sibilant sheen only when the tail is bright, and a Mid cut opens up a boxy resonance only while it’s ringing. Its boost is capped internally (roughly +15 dB combined) so a loud band can’t run the tail into clipping; cuts are unbounded. The whole curve draws over the display in off-white — see section 07, Reading the display.
12 Presets
45 factory presets ship with the plugin, plus Default — which holds no settings of its own, so loading it simply returns every control to its factory value. A fresh instance opens on Default, and it’s the way back after you’ve been exploring. Selecting any preset resets every control, so they’re absolute starting points rather than modifiers on whatever you had.
They’re organised into nine categories by instrument and use — Vocal, Guitars, Strings, Brass, Cinematic, Ambient, Drums, Keys and Sound Design, five presets each — and each category appears as its own submenu in the header’s preset field. The arrows either side of the field step through the whole bank in order and wrap around, so you can audition them on your source without opening the menu.
13 Technical specifications
| Format | VST3 (Windows x64) — AU / macOS planned |
| Channels | Mono or stereo in, mono or stereo out (mono is the stereo render folded down, so Mix 0 stays bit-transparent) |
| Latency | 0 samples — spectral analysis is side-chain only |
| Bypass | The power switch at the panel’s top left is the one to use: a short crossfade rather than a hard switch, and the engines keep running so the tail is still decaying when you switch back. Host bypass is handled too, and fully bypassed output is bit-identical to the input, trims included. Some hosts deactivate a plugin instead of bypassing it — FL Studio’s mixer LED does, by its own documentation — which stops the plugin running at all and cuts the tail. The panel switch always gives you the crossfade. |
| Reverb engine | 8-line FDN, Hadamard mixing, Lagrange-interpolated modulated delays |
| Decay bands | 4 (all three crossovers adjustable: 80–500 Hz, default 300 Hz; 400 Hz – 3 kHz, default 1.2 kHz; 2–12 kHz, default 4.8 kHz) |
| Spectral analysis | 1024-pt FFT, Hann, 50% overlap, level-normalised (drives the spectral engine, dry input) |
| Display analysis | Separate 1024-pt FFT per channel on the wet signal, stereo power summed, absolute-level referenced — drives the panel’s cloud only, no effect on the audio path. Always on while the display is showing; collapse the visualizer from the header to hide it. |
| Granular tail engine | 6 s circular buffer, 48-voice grain pool, equal-power Scatter blend (bit-exact at Scatter = 0), feed-forward Air diffuser (6-stage allpass, 79 ms) |
| Send de-esser | Level-independent, baseline-relative sibilance detector → dynamic high shelf on the reverb send |
| Dynamic EQ | 3 bands (low shelf / bell / high shelf) on the wet bus, parallel/transparent at neutral; per band Static ±6 dB, Dynamic ±100% level-reactive, movable Freq and Q; boost capped ≈ +15 dB, cuts unbounded |
| Cross-coupling | Onset flux → grain density/length; per-band decay multipliers → weighted grain band selection + low-Q per-grain bandpass |
| CPU (measured) | 5.46% of one core with the granular engine idle, 6.27% with a real preset engaged (6.61% with the display’s cloud active), 6.86% worst case — everything maxed — 7.22% worst case with the display’s cloud active — @ 48 kHz stereo, 512-sample blocks (Release build, reference machine). Measured through the whole plugin. |
| Tail reporting | Worked out from the current settings and reported to the host, so a bounce, a track freeze or a host’s silence-suspend lets the reverb ring out in full: the time the longest-ringing band takes to fall 140 dB, erring long — about 10 s at the defaults, several minutes at the longest (Decay 30 s with Tilt, Bloom or Ghost pushed hard) — and infinite while Freeze holds the tank |
| Parameter handling | All parameters smoothed; state saved and restored with the session |
| Format migration | Saved state and presets carry a version stamp. A control added in a later version loads inert in an older session rather than at its factory default, so updating the plugin never changes a mix you have already saved. State from a newer version loads best-effort rather than being rejected. |
| Real-time safety | No allocation, locking or I/O on the audio thread; all buffers sized at prepare time, and a host block longer than the one prepared for is processed in pieces that fit them; denormals flushed |
| Sample rates | 44.1–192 kHz, verified: decay in seconds and the engine’s decay multipliers hold across the range |
| Interface | Fixed 980×520 design, scaled 70–160%; size saved with the session |
| Typography | IBM Plex Sans / Mono, embedded in the binary (SIL Open Font License 1.1) |
| Validation | pluginval strictness 10, clean (0 warnings), editor tests included |