Crestwave is a saturation plugin by UDI DSP.
01 What Crestwave is
Crestwave adds harmonics: the extra tones above each note that make a sound feel denser, warmer or more present. It is built so that you always know how much you are adding.
You pick a TYPE — WARM, GRIT or CLIP — and turn DRIVE. Each type covers its own whole range on that one knob. At the bottom you can’t hear it. At the top there’s no mistaking it. In between, it stays one character getting stronger, rather than turning into a different sound halfway up.
Crestwave is also built to be trusted. A lot of saturation colours a sound before you’ve asked for colour, and gets louder as you turn it up, so more always seems better for the first few seconds. Crestwave opens clean, holds the loudness steady while you turn DRIVE, and shows you, as a number, how much it is adding and where that colour turns into distortion.
The name describes the job. A sound’s crest factor is the distance between its peaks and its average level. Saturation narrows that distance, which is how it makes a track denser without making its peaks any louder.
At a glance
- Three types, one knob each — WARM, GRIT and CLIP, each running from inaudible to obvious on DRIVE.
- Opens clean — DRIVE at 0 is your input, bit for bit. The default, 12%, is colour you feel more than hear.
- HOT — how far the DRIVE knob reaches. Off keeps the full turn in the gentler part of each type’s range; at 100% the same turn goes all the way.
- ADDING — a live reading of how much harmonic content is reaching your track, with MIX counted.
- A red tick on DRIVE — where colour becomes distortion for the type you’re on, measured.
- FLOOR — keeps the low end out of the saturation without removing any of it.
- AUTO GAIN and CALIBRATE — judge the tone, not the volume, and get the same result from one DRIVE setting on a quiet track and a loud one.
- The ADVANCED page — Mid/Side, TILT, EVEN/ODD, ENVELOPE, DUCKING (from the track itself or a sidechain) and PULSE, in time with your song.
- Oversampled 4× by default — Off, 2×, 4×, 8× and 16× in the menu, set separately for playing and for exporting.
- A mono-safety meter — CORR, beside ADDING, reads what leaves the plugin.
- CPU — about 2.6% of one core at the defaults (48 kHz stereo), and about 0.2% while no audio plays (chapter 09).
Which one do I need?
Crestwave has a four-band sibling, Crestwave Multibend. The two share their saturation engine, so a type sounds the same in both; what differs is how much of the spectrum you can treat separately.
| Crestwave | Crestwave Multibend | |
|---|---|---|
| TYPE, DRIVE, HOT | Once, for the whole signal | Per band, up to four bands |
| MIX | One | Per band, plus a master MIX |
| M/S (Stereo, Mid, Side) | One switch, on the ADVANCED page | Per band, on each band’s strip |
| FLOOR and TILT | Yes | — (choosing which part of the spectrum saturates is what the bands are for) |
| EVEN/ODD, ENVELOPE, DUCKING, PULSE | Yes | Yes, shared by all four bands |
| AUTO GAIN, CALIBRATE | Yes | Yes (CALIBRATE works band by band) |
| Red tick on DRIVE | Yes | — (the spectrum’s colours show it instead) |
| Solo and mute | — | Per band |
| Visualizer | The heat scope | A heat-coloured spectrum, and any band’s own heat scope |
| Default oversampling | 4× | 2× |
| Parameters | 21 | 46 |
| Factory presets | 30, plus Default | 30, plus Default |
The two are separate products with separate preset libraries. A Crestwave preset doesn’t load in Crestwave Multibend, or the other way round: each edition’s presets are written for what that edition can do.
02 The ideas behind Crestwave
None of this is needed to use Crestwave, but each idea explains why a control behaves the way it does.
One knob per type
TYPE chooses the character, and DRIVE says how much of it. The three types are three different curves, each voiced to stay coherent over its whole range, so turning DRIVE from 10% to 90% inside one type sounds like one idea growing rather than three sounds glued end to end.
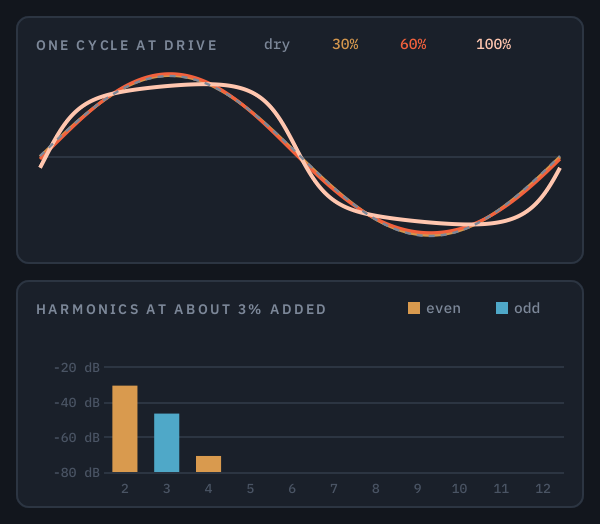
WARM
Tube-style warmth. Rounded and forgiving. Gently, it adds mostly the tones an octave above each note, which blend in as body and density; driven, it thickens into a pushed stage.
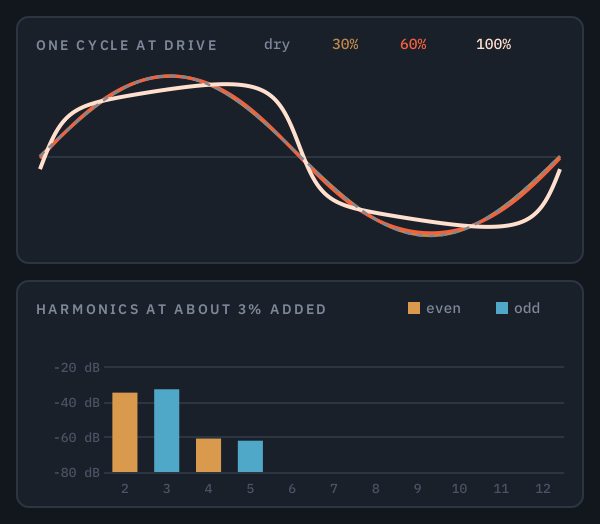
GRIT
Transistor-style bite. More of the higher harmonics come through, so it reads as edge and presence rather than warmth. For parts that need to cut through.
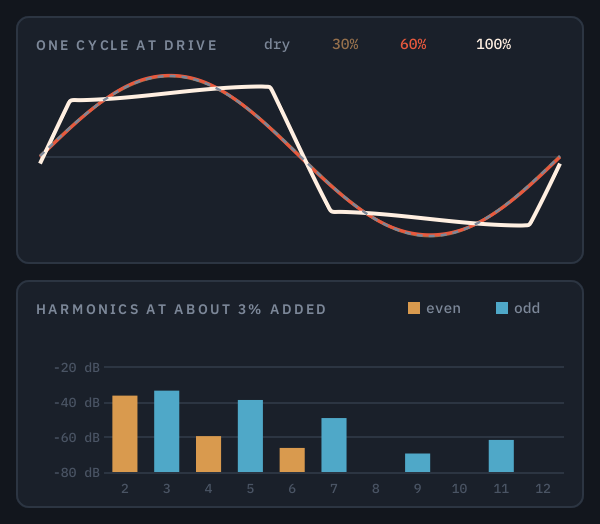
CLIP
A clipper whose corner gets sharper as you drive it: rounded at the bottom of the knob, a hard edge at the top. The clipping arrives gradually instead of switching on at a threshold.
Reading the pictures. The top of each shows one cycle of a sine at DRIVE 30, 60 and 100% (HOT at 100%), each line coloured by what that setting adds, as the panel colours it; the dashed line is the input. The bottom shows which harmonics the type adds, in dB under the note, with all three adding the same amount, 3%, so the bars compare character rather than quantity: WARM leads with the 2nd harmonic, GRIT pairs the 2nd and the 3rd with more above them, and CLIP runs the odd series — 3rd, 5th, 7th — up high.
Each type also has a little compression built into its character, a few dB, working on both channels together so the stereo image doesn’t move.
Transparent first
Crestwave’s starting point is a sound you can’t hear it on.
- At DRIVE 0 it is not there. With the trims at 0 dB, what comes out is exactly what went in, bit for bit, delayed only by the oversampling’s latency, which your host makes up for (chapter 07).
- It opens at DRIVE 12% with HOT off — the setting you can put on a mix bus and feel the mix sit together without being able to say why.
- HOT sets how far the knob goes. With HOT off, a full turn of DRIVE covers a little over half of each type’s range: enough to reach real distortion in the top half of the knob, but not the type’s hardest settings. HOT stretches the same turn further, up to the type’s full reach at 100%. Reaching further is a decision you make on purpose.
Seeing what you add
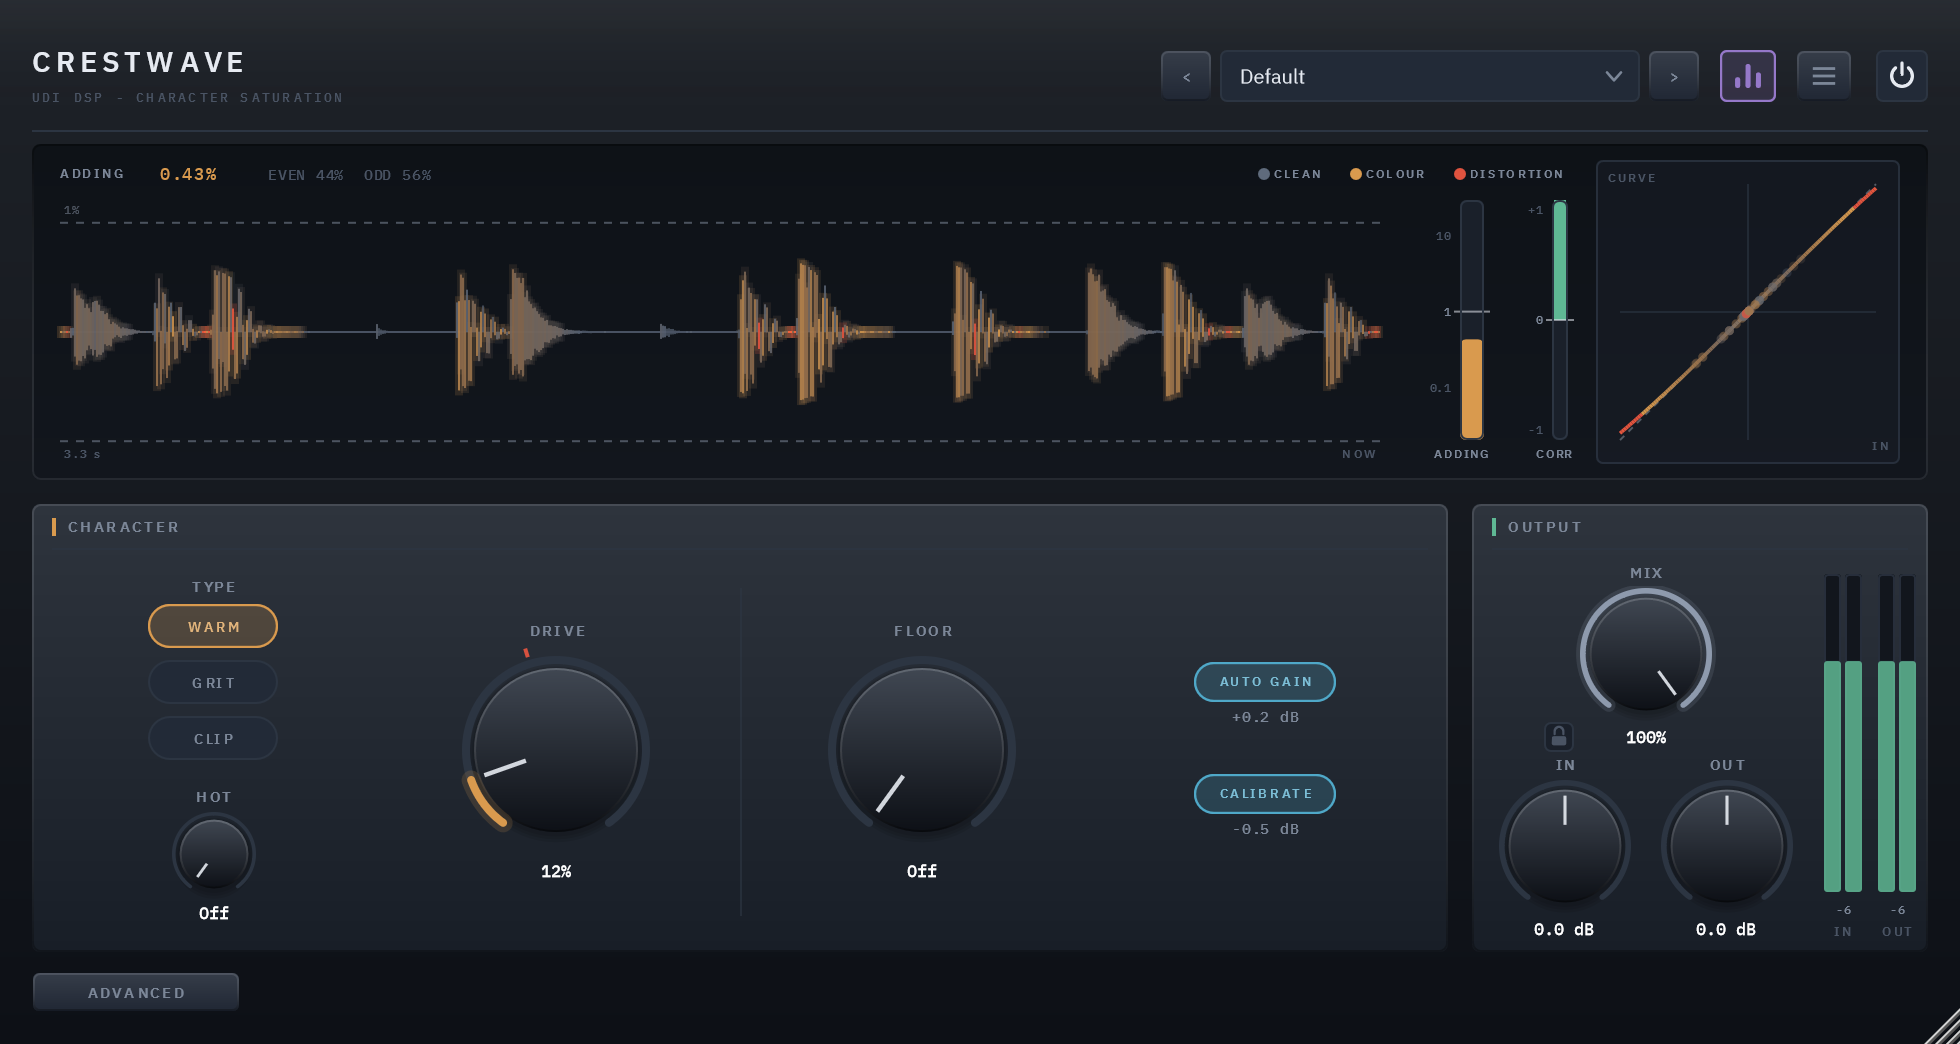
Three things on the panel answer “how much am I adding?” and they all come from the same measurement, so they can’t disagree:
- ADDING, the number, is how much harmonic content is reaching your track, as a percentage of the signal. It counts MIX: a copy driven hard and blended in at 25% adds far less to the track than the copy on its own, and ADDING says so.
- The red tick on DRIVE marks the knob position where ADDING crosses the type’s warning line — where colour starts to be heard as distortion.
- The heat scope colours your signal by what’s being added to it, moment by moment.
The warning line is different for each type, because the types don’t start to sound distorted at the same amount. The lines were set by ear:
| Type | Warning line |
|---|---|
| WARM | 1% |
| GRIT | 0.75% |
| CLIP | 0.6% |
Below the line is colour; past it, distortion. Neither is wrong — plenty of the best uses of a saturator are past the line — but you should always know which side you’re on.
The same setting on every track
A saturator reacts to how loud the signal is: the same DRIVE on a quiet bass DI and a loud drum bus would normally be two very different amounts. CALIBRATE takes that away. It measures the track’s level over a couple of seconds, brings it to one fixed working level before the saturation, and undoes that exactly afterwards. So it never changes how loud Crestwave is, only where the signal sits on the curve, and a DRIVE setting that you like on one track means the same on the next.
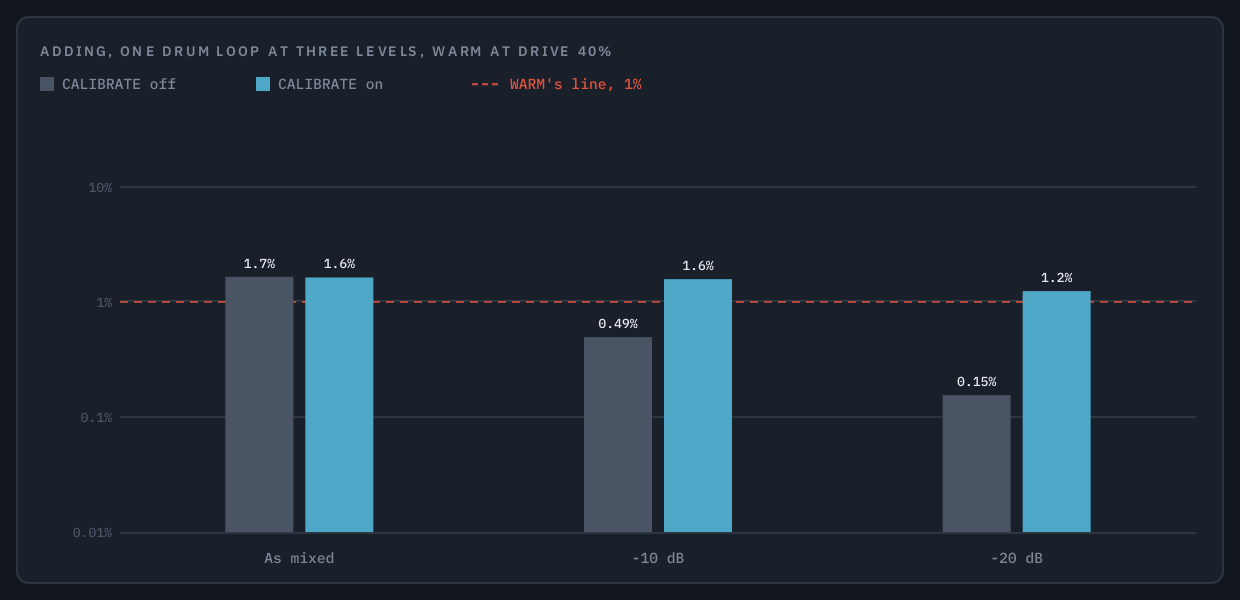
The picture is measured: the same drum loop played as mixed, 10 dB down and 20 dB down, through WARM at DRIVE 40%. With CALIBRATE off, the quieter the track, the less it is saturated — a tenth as much 20 dB down. With it on, the three stay together around the same reading. The figure under CALIBRATE on the panel shows the lift or cut it’s applying now.
Judging the tone, not the volume
Saturation adds harmonics, and the harmonics make things louder. AUTO GAIN takes that level change back out as you turn DRIVE, so switching POWER on and off compares the colour, not the volume. It works out the correction from the input rather than chasing the output, so it’s already right the moment you move DRIVE, with no dip or swell while it catches up.
Running on many tracks at once
Crestwave keeps its CPU use low in four ways, none of which changes its output:
- Silence. When the input goes silent and its output has settled, it stops processing and only keeps count of time, so it continues exactly where it would have been. That costs about 0.2% of one core, at any oversampling setting.
- Mono. When both channels carry the same signal, it processes one and copies the result to the other.
- Meters. ADDING, CORR and the heat scope are computed only while the panel is open.
- Vector instructions. It processes several samples at once: SSE2 on every machine, AVX2 where the processor has it.
Oversampling and exports
The oversampling filters are linear-phase: every frequency is delayed by the same amount, so the shape of the waveform is kept. The menu has two settings: Playing, what runs while you play and mix, and Exporting, what an offline export runs at — Same as Playing unless you choose another, higher or lower. So you can mix at a light setting and export at a higher one. Crestwave reports the larger of the two latencies, so the timing doesn’t move when it switches (chapter 07). Oversampled, ADDING is measured after the same downsampling filters as the output, so it counts only what reaches your track.
03 Signal flow
The dry side of MIX is delayed to match the saturated side exactly, so a parallel blend lines up to the sample and doesn’t comb.
The output stage comes after MIX. It’s a gentle roll-off at the very top whose corner follows DRIVE, the way the output of a real driven stage softens its highest harmonics. Placing it after the blend means the dry and saturated signals meet the same filter, so blending can’t make them disagree in phase. At DRIVE 0, or MIX 0, it’s out of the circuit.
In MID or SIDE, only that part goes through the saturation. The other part is taken from the dry path, untouched, and put back at the end.
FLOOR’s low end never meets AUTO GAIN. It didn’t go through the saturation, so it has no level change to correct.
04 The panel
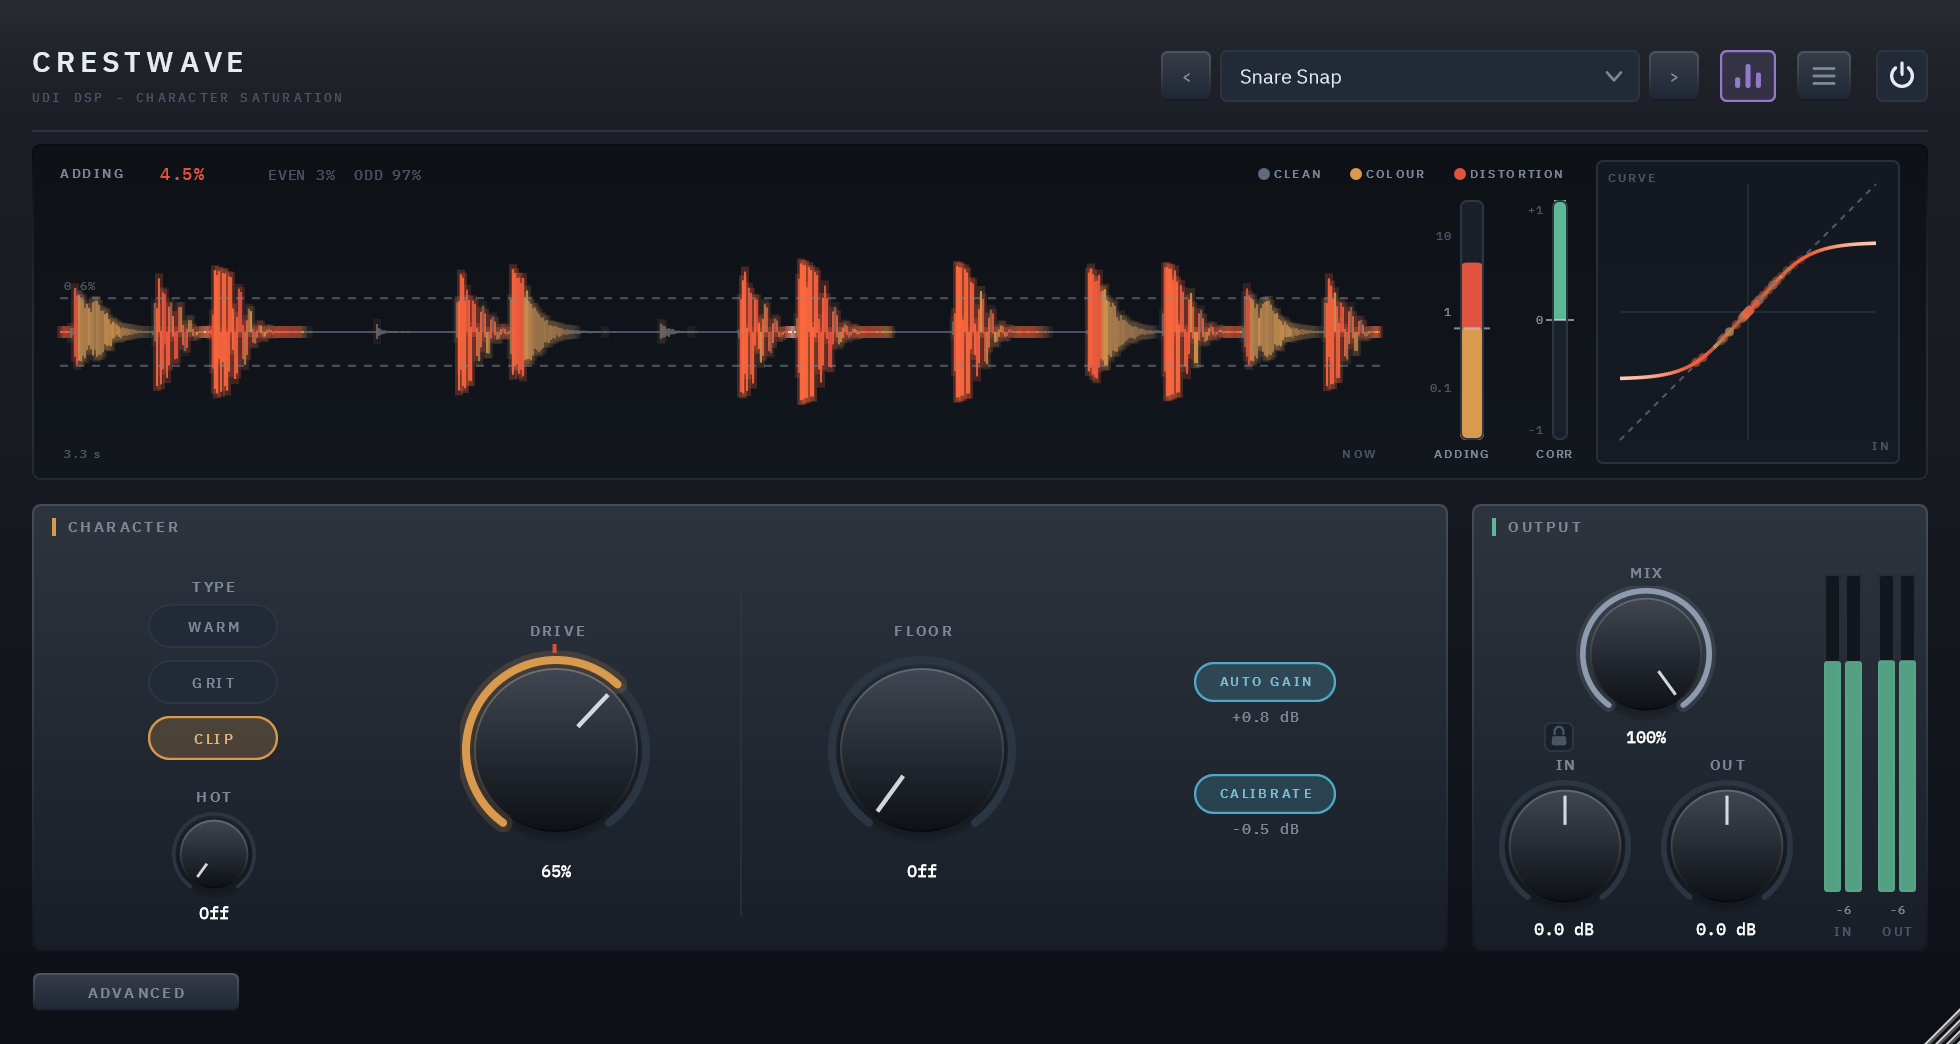
Across the top
The name on the left. On the right, from the edge inwards: POWER, the menu (☰), the button that shows or hides the visualizer, and the preset field with its < and > steps.
The heat scope
The display across the top of the panel shows your signal as the saturation sees it, and colours it by what’s being added.
- The waveform scrolls in from the right (NOW). Its size is how hard the curve is being hit, not how loud the track is: with CALIBRATE on, a quiet track and a loud one look about the same. Each thin slice is coloured by what that moment adds to your track — steel where nothing is added, amber for colour, red past the type’s line, and white-hot at the very top. The peaks glow first, because that’s where a curve does its work.
- The dashed lines, labelled with the type’s line (1%, 0.75% or 0.6%), mark the peak level at which this setting reaches that line. Peaks that reach past them are being distorted. No dashed lines means this setting never gets there.
- ADDING, top left, is the headline number. Below the type’s line it’s amber; past it, red. When MIX is below 100%, COPY beside it shows what the saturated copy adds on its own. EVEN and ODD split what’s being added into its two families of harmonics: the even ones, led by the octave above the note, which read as fullness; and the odd ones, led by the tone an octave and a fifth up, which read as edge. Switching TYPE moves this balance, so the three types read differently here at a glance.
- The ADDING gauge, at the right, draws the same number as a bar, with the type’s line marked on it.
- CORR, beside it, is a mono-safety meter measured on what leaves the plugin: +1 when the two channels are the same, 0 when they’re unrelated, and below 0, in red, when they’d start to cancel if the track were summed to mono. It shows nothing in silence rather than a number made of noise.
- CURVE, in its own strip, is the shape this setting pushes the signal through, drawn with the same maths the audio uses, and red where a peak that large would be distorted. The dots are where the last fraction of a second of peaks landed on it.
The visualizer button in the header (or Show Visualizer in the menu) hides the display. The panel gets shorter; nothing else changes size.
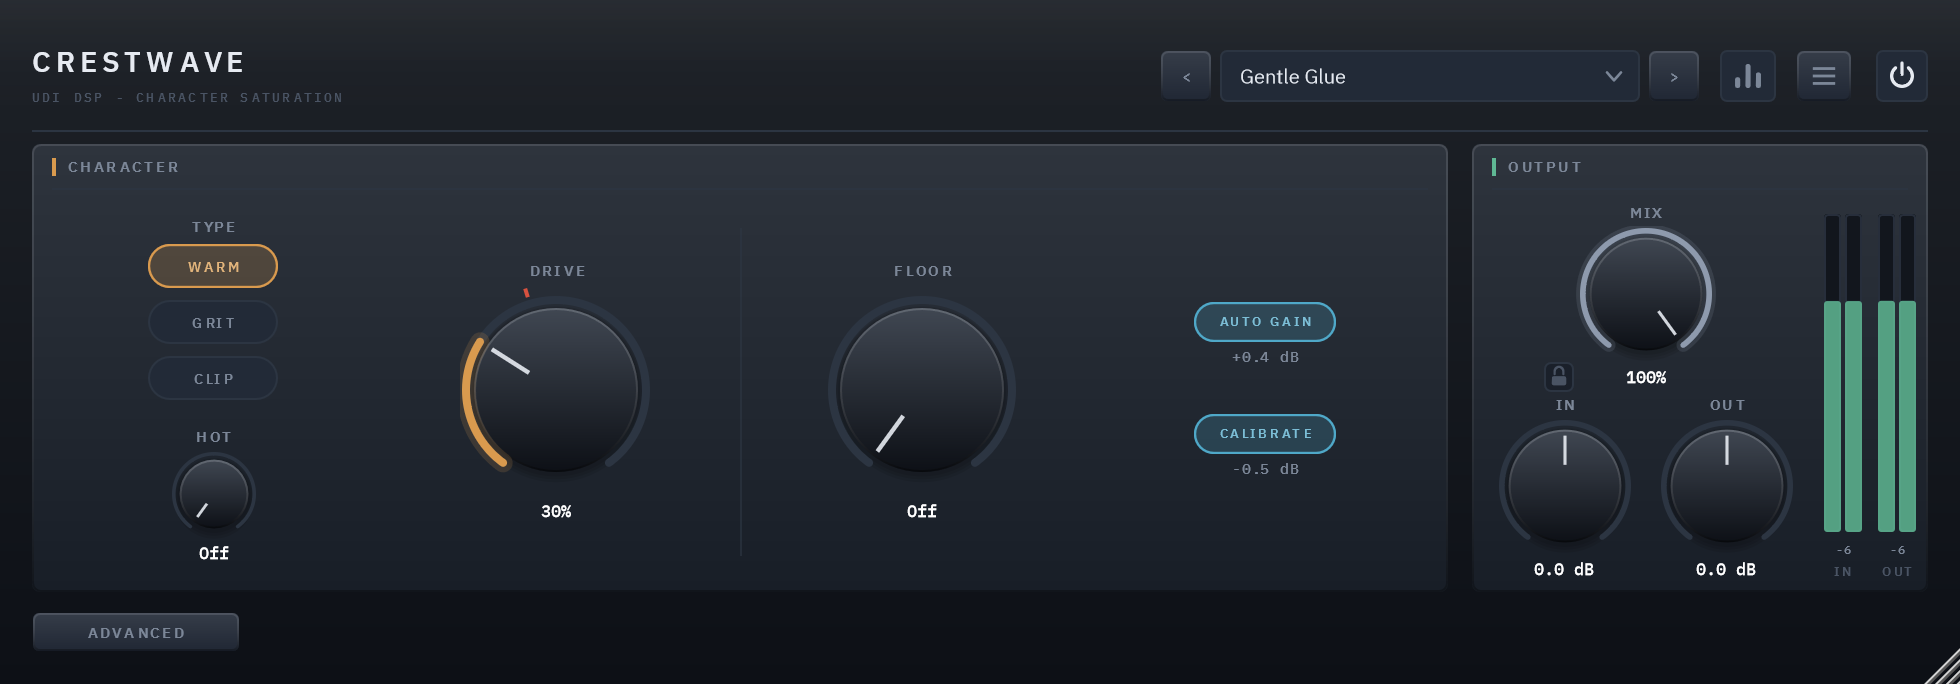
CHARACTER
The main card reads left to right, as one sentence: what kind, how far, how much — then, past the thin divider, where the saturation starts and how the level is kept.
TYPE and HOT · DRIVE, with its red tick · FLOOR · AUTO GAIN and CALIBRATE, each with the figure it’s applying now underneath.
OUTPUT
On the right: MIX on top, IN and OUT below it, and the input and output meters. The small padlock beside MIX’s value holds all three when you change presets (chapter 05).
The footer
ADVANCED, at the bottom left, swaps CHARACTER for the ADVANCED page (chapter 06). The display and OUTPUT stay where they are. Click it again to come back.
Panel size and tooltips
Panel Size in the menu picks 75, 100, 125 or 150%, and that becomes the size every new Crestwave opens at on this computer. Dragging the bottom-right corner resizes only the instance you’re in, anywhere between 75 and 150%, and your project remembers it. Show Tooltips in the same menu turns the help text on every control on or off; it starts on.
05 Controls
Every control here can be automated and is saved with your project. Double-click a knob to return it to its default.
TYPE
WARM · GRIT · CLIP · default WARM
Which character DRIVE is sweeping (chapter 02). Hover over a type for a line about it. Switching while audio plays passes through the clean signal for a moment, about 20 ms, so the change can’t click.
HOT stays where you set it when you change TYPE.
In your host’s automation list, TYPE has a fourth position, Reserved. It plays with no saturation and lights none of the three buttons.
DRIVE
0 – 100% · default 12%
How much of the chosen type. At 0 Crestwave is not there at all.
The red tick just outside the ring marks where ADDING crosses the type’s warning line. With HOT off, it sits a little under halfway round for WARM and GRIT and about halfway for CLIP. At HOT 100% it sits about a quarter of the way round, because the same amount of distortion now comes earlier on the knob. It also moves with MIX (a smaller blend takes longer to reach the line), with EVEN/ODD, with M/S and with the oversampling setting that’s running (Playing’s while you play, Exporting’s while you export: chapter 07). Where a setting can’t reach the line at all, there’s no tick.
The tick is measured on reference material. On your own track, ADDING is the exact reading; the tick tells you where to expect it.
HOT
Off – 100% · default Off
How far the DRIVE knob reaches. Off, a full turn covers the gentler part of each type’s range; at 100% the same turn goes all the way to the type’s hardest setting. Between the two it stretches smoothly.
HOT stretches the whole knob, not only its top. DRIVE 0 is clean whatever HOT is set to, but every other DRIVE position reaches a little further as HOT goes up — which is why the red tick moves toward the start of the knob.
FLOOR
Off – 500 Hz · default Off
Where the saturation starts. What’s below this frequency passes through clean; what’s above it is saturated. It is not a low cut — nothing is removed, and the low end is neither turned up nor down.
The split is gentle rather than a brick wall: well below the setting is clean, well above it is saturated, and around it one hands over smoothly to the other. The two parts always add back up to exactly what went in, so FLOOR can’t put a dip or a bump at its own frequency.
On a bass or a kick, FLOOR set just above the sub lets the part above it grow harmonics that carry on small speakers, while the sub stays solid and clean. That covers a lot of what people reach for a multiband saturator to do. Off saturates everything.
AUTO GAIN
On / Off · default On
Keeps the loudness steady as DRIVE moves, so you judge the tone, not the level. The figure under the switch is the correction it’s applying now, in dB. Turn it off when you want the level rise to be part of the effect.
CALIBRATE
On / Off · default On
Makes one DRIVE setting mean the same on a quiet track and a loud one (chapter 02). The figure under the switch is how far it’s moving the level into the saturation right now, in dB; it will move the level up to 18 dB either way.
A few things worth knowing:
- It takes a couple of seconds to settle on new material, the way a slow meter does.
- It holds through pauses. It stops listening while the track is silent or has dropped more than 20 dB, so a phrase after a gap comes back at the same drive it left with, instead of being pushed harder. The other side of that: a passage that stays more than 20 dB quieter keeps the louder part’s setting and saturates less, much as a hardware unit would.
- With CALIBRATE on, IN changes loudness, not colour, because CALIBRATE takes the level change back out. With CALIBRATE off, IN is how hard you hit the saturation: the classic way of working, where a hotter track saturates more.
MIX
0 – 100% · default 100%
Dry against saturated. The dry side is delayed to line up with the saturated side exactly, so parallel blends don’t comb. Driving hard and blending a little under the dry signal is parallel saturation: density and grit without losing the transients. ADDING counts MIX, and COPY shows the saturated copy on its own.
IN and OUT
−24 to +24 dB · default 0 dB
Level trims. IN is before everything; OUT is after everything. The meters beside them read what comes in and what goes out.
The padlock
Locked / Unlocked · default Unlocked
The small padlock beside MIX’s value. Locked, loading a preset leaves MIX, IN and OUT where you have them, so you can step through presets at your own blend and level and hear each one in your track. Everything else in the preset loads as usual. It holds whichever way the preset arrives: the preset menu, the < and > steps, or your host’s own preset list.
A preset you save still stores MIX, IN and OUT, and while the padlock is closed, moving them doesn’t put the modified dot beside the preset’s name. The lock belongs to this instance of Crestwave and is saved with your project, never in a preset. It isn’t a parameter, so your host can’t automate it.
POWER
Bypasses Crestwave with a 20 ms crossfade. Bypassed, your signal comes out untouched and still delayed by the same latency, so switching POWER never moves the track in time. The panel dims below the header while it’s off. Your host’s own bypass does the same thing.
06 The ADVANCED page
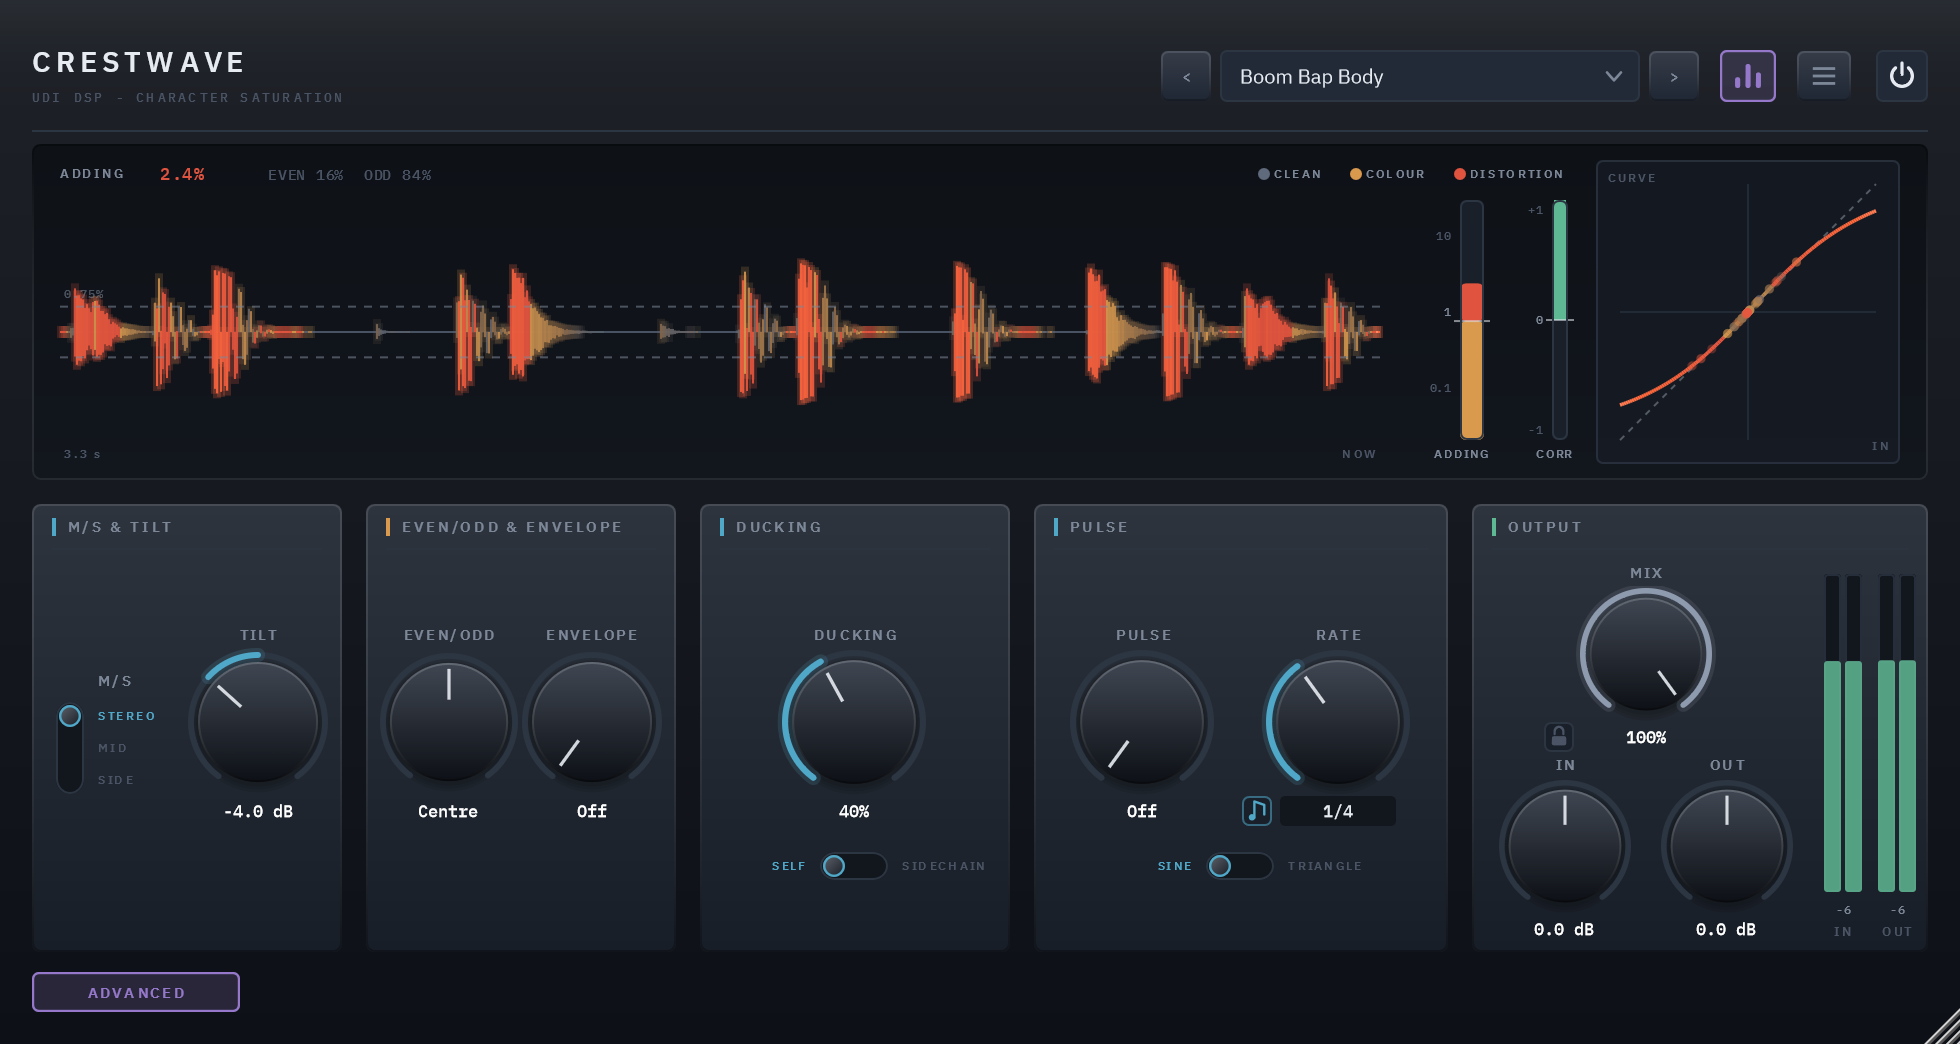
Open it with ADVANCED in the footer. Four cards: M/S & TILT — which part of the sound is saturated; EVEN/ODD & ENVELOPE — what kind of content, and what a hit does to it; DUCKING and PULSE — what hits and time do to DRIVE.
Everything on this page starts off or centred, so opening it changes nothing until you turn something.
M/S
STEREO · MID · SIDE · default STEREO
Which part of the stereo image is saturated, with the same TYPE and DRIVE:
- STEREO — both channels, as they are.
- MID — only what the two channels share: typically the vocal, kick, snare and bass. The sides pass through clean.
- SIDE — only what differs between them: width, room, reverb. The middle passes through clean.
SIDE is a way to add air and width without touching what’s in the centre; MID warms the core of a mix and leaves its width alone. Keep an eye on CORR when you use SIDE. A change passes through the clean signal for about 20 ms, so it doesn’t click. On a mono track, M/S has nothing to split, and the channel is saturated as it is.
TILT
−12 to +12 dB · default Off
Which end of the spectrum hits the saturation harder, pivoting around 1 kHz. Turned up, the top end saturates first — bite and presence. Turned down, the lows do — weight. The tilt is undone after the saturation, so the tone of the track doesn’t tilt; only where the added harmonics come from changes.
You may still hear it as brighter or fuller, because the harmonics themselves have moved. That’s the point of it: it changes the colour, not the EQ.
EVEN/ODD
Even 100% – Centre – Odd 100% · default Centre
A fine-tuning knob for the type’s character. It changes what kind of content is added:
- Toward EVEN, fuller: more of the tones an octave above the note, which blend in as body and warmth. It does this in every type, so even CLIP can be given some body.
- Toward ODD, those octave tones fade out and the type’s own bare edge is left. Because the octave tones are what fill the sound out, turning toward ODD mostly makes things a little cleaner.
- At Centre, each type is exactly as it was voiced.
It’s deliberately subtle. The ear barely registers the octave tones as distortion, so the change is in fullness rather than in how dirty the sound is. Try it once DRIVE is where you want it.
ENVELOPE
Off – 100% · default Off
Hits bloom and push. For a moment on each hit — a drum, a pluck, a consonant — the saturation gets a little warmer and drives a little harder, then settles back. Attacks come out thicker and slightly crunchier; they don’t come out louder. Held notes are left alone.
At 100%, a strong hit drives up to 1.6 times your DRIVE setting, but never past the reach HOT allows. At DRIVE 0 it does nothing. ENVELOPE’s warmth uses the same octave tones as EVEN/ODD, so with EVEN/ODD toward ODD it blooms less.
DUCKING and SOURCE
DUCKING Off – 100% · default Off · SOURCE SELF / SIDECHAIN · default SELF
Takes DRIVE back while a hit plays and returns it afterwards: the attack comes through clean and the body behind it is saturated. At 100% a full hit takes all of the DRIVE away for that moment.
- SELF ducks on this track’s own hits, with no routing.
- SIDECHAIN ducks on whatever your host sends to Crestwave’s sidechain input — a kick ducking the saturation on a bass or a bus, for example. How you route a sidechain depends on your host; look for a sidechain or key input on the plugin. With nothing routed, SIDECHAIN ducks nothing.
It listens for hits — sudden rises above the source’s own recent level — so it works the same on a quiet key and a loud one. The flip side is that a loud, steady sound like a pad isn’t a hit, and doesn’t duck. It reacts at once and lets go over about 150 ms.
PULSE, RATE and SHAPE
PULSE Off – 100% · default Off · RATE 1/32 – 8 Bars, or 0.05 – 20 Hz · default 1/4 · SHAPE SINE / TRIANGLE · default SINE
DRIVE rises and falls in time with your song. The DRIVE knob is the top of each cycle, and PULSE is how far below it the bottom goes — at 100% the bottom is clean. So PULSE only ever takes drive away, and the DRIVE knob and its tick keep their meaning.
- RATE is how long one rise and fall takes. With the small note button lit it’s a note value, from 1/32 to 8 Bars, locked to where you are in the song: start playback anywhere and the pulse lands where it would have if you’d played from the top. A bar follows your song’s time signature: in 3/4, 1 Bar is three beats. With the note button off, RATE is a free rate from 0.05 to 20 Hz. Hold Shift while dragging for fine steps.
- SHAPE — SINE for a smooth swell, TRIANGLE for a straight rise and fall.
With the transport stopped, a synced PULSE keeps running at the right speed on its own. After a loop or a jump it eases back into step rather than jumping. DUCKING and PULSE can run together; both only take drive away.
07 Oversampling and latency
Saturation makes new, higher tones. Pushed hard, some of them can land above what the session’s sample rate can hold, and they fold back down as harsh, unrelated tones — the “digital fizz” of a cheap distortion. Running the saturation at a higher internal rate keeps that out.
Oversampling in the menu holds two settings for this instance, Playing and Exporting (below), each Off, 2×, 4× (the default), 8× or 16×. Both are saved with your project. A new Crestwave always opens at 4×, exporting the same, whatever you chose elsewhere. They aren’t knobs, aren’t automated and aren’t stored in presets, because changing them changes the plugin’s latency.
| Setting | Latency | At 48 kHz | What it’s for |
|---|---|---|---|
| Off | 0 samples | 0 ms | Tracking and live use, and gentle settings. At the hardest settings a little fizz can get through |
| 2× | 49 samples | about 1.0 ms | Light on CPU; by our measurements it keeps the fizz out even at the hardest settings |
| 4× (default) | 61 samples | about 1.3 ms | The everyday choice |
| 8× | 58 samples | about 1.2 ms | Extra margin on the hardest CLIP settings |
| 16× | 59 samples | about 1.2 ms | The last word, for a final bounce |
Higher settings cost more CPU, except 8×, which costs about the same as 4× (a little less in our measurements); chapter 09 has the figures. With no audio playing, every setting costs almost nothing.
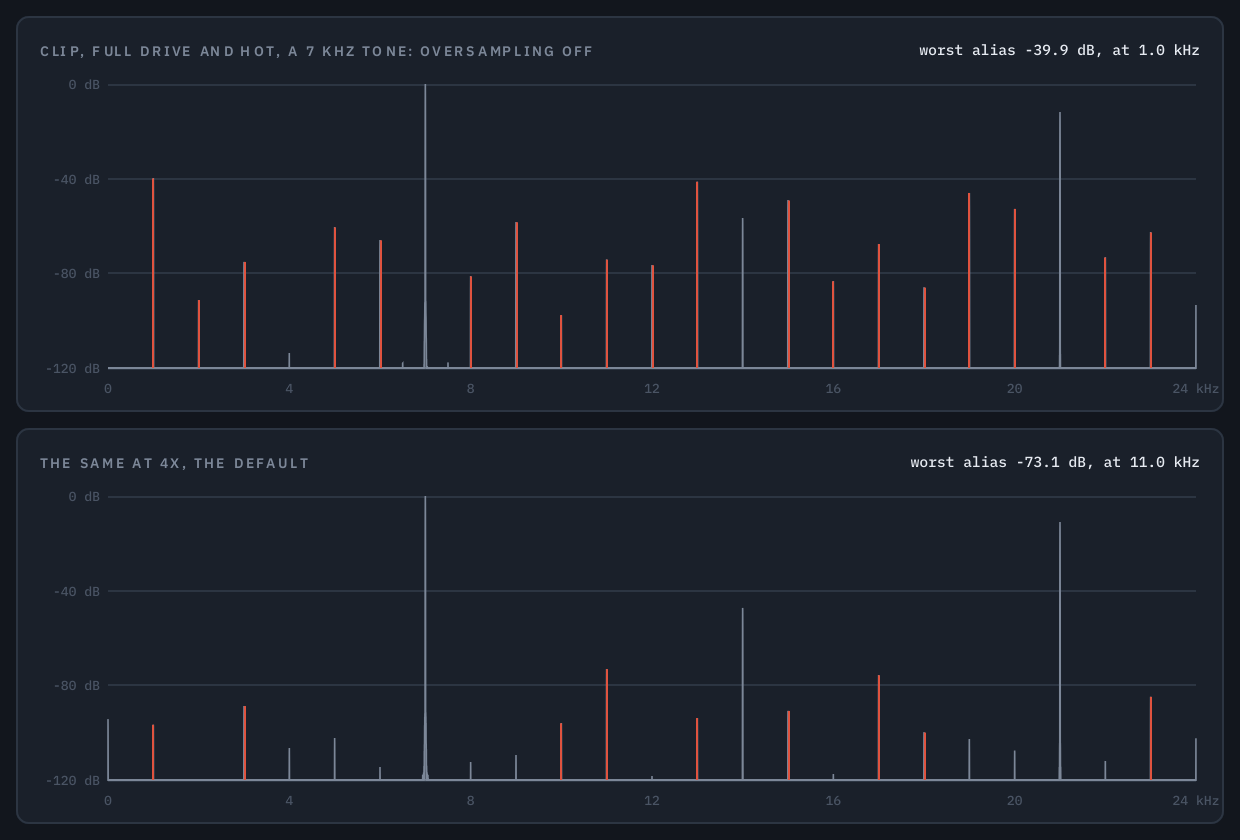
The picture is the hardest case, measured: a 7 kHz tone through CLIP at full DRIVE and HOT, whose harmonics run far above the audible range. Every red line is an alias — a harmonic folded back to a frequency unrelated to the note. The worst alias at each setting, in dB under the tone:
| Off | 2× | 4× | 8× | 16× |
|---|---|---|---|---|
| −40 dB | −47 dB | −73 dB | −82 dB | −102 dB |
At gentler settings there is far less to fold back, which is why Off is fine for most colour.
Playing and Exporting
Playing is the setting that runs while your host plays in real time: what you hear, and what your CPU pays for, while you mix. Exporting is the setting an offline export runs at: Same as Playing (the default), or any of the five. Play at 2× and export at 16× to mix light and render at the highest quality, or set Exporting lower for a quicker export. Each submenu’s name shows its current setting, and both are saved with your project.
Crestwave switches when your host says it’s rendering offline, which is what an offline export or bounce does in most hosts. A bounce your host plays in real time, or one from a host that doesn’t say, runs at the Playing setting. If you’re not sure what yours does, set Exporting to Same as Playing before your final export.
The latency doesn’t move when it switches: Crestwave tells your host the larger of the two settings’ latencies and holds the other back to match, so the export lines up exactly with what you heard. So with Playing at Off and Exporting at another setting, the plugin still reports that setting’s latency while you play; for zero latency, set Exporting to Same as Playing (or Off) too.
Crestwave tells your host its latency, and the host delays everything else to match, so the track stays in time. Only the oversampling settings change it. DRIVE, TYPE, HOT and every other control leave it exactly where it is, so automating them never makes the host recalculate its timing mid-song. When you do change a setting, Crestwave tells the host the new figure straight away.
08 Presets
The preset field is in the header. < and > step through every preset, factory then yours, and wrap round. Click the field for the full menu:
- Factory — 30 presets and Default, in six groups of five, filed by what you’re working on: Mix Bus, Drums, Bass, Vocals, Guitars & Keys and Creative. Some stay colour; others go past the line on purpose, so you can hear the whole range.
- User — your own. Save overwrites the user preset you have loaded (on a factory preset it asks for a name instead); Save As… saves a new one; Delete removes the loaded user preset, and asks first. Put a forward slash in a name to file it in a folder —
Drums/Room Smash. Open Preset Folder shows where they are kept, so sharing one is sending the file.
A dot beside the preset’s name means you’ve changed something since loading it.
Default returns every control to its factory value: Crestwave clean again.
A preset is a whole setting, not a change on top of the last one: loading it resets every control first. It carries everything that shapes the sound — including M/S, AUTO GAIN and CALIBRATE — but never POWER or your host’s bypass, in either direction. The oversampling settings aren’t part of a preset either; they stay as you set them.
To audition presets at your own blend and level, close the padlock beside MIX first (chapter 05): MIX, IN and OUT then stay where you set them, and every other control still loads.
A preset change that moves a control a long way at once passes through the clean signal for about 20 ms, the same as a TYPE change, so stepping between very different presets doesn’t click.
Your presets live in %APPDATA%\udidsp\Crestwave. Uninstalling Crestwave leaves them where they are.
09 Technical specifications
| Formats | VST3 (Windows x64), Standalone |
| Channels | Mono in and out, or stereo in and out |
| Sidechain | Optional, mono or stereo; used by DUCKING when SOURCE is SIDECHAIN |
| Types | WARM, GRIT, CLIP |
| Oversampling | Off, 2×, 4× (default), 8×, 16× — two menu settings, Playing and Exporting (Same as Playing by default), saved with the project |
| Latency | Set by oversampling only: 0 (Off), 49 (2×), 61 (4×), 58 (8×) or 59 (16×) samples; with Exporting set apart from Playing, the larger of the two. Never changed by DRIVE or any other control |
| Tail reported to the host | 0 seconds |
| Automatable parameters | 21, including the host’s bypass and POWER |
| Factory presets | 30, plus Default |
| Preset files | .cwpreset, in %APPDATA%\udidsp\Crestwave\Presets |
| CPU (measured) | About 2.6% of one core at the defaults (4×), 48 kHz stereo, 512-sample blocks, on the reference machine, with the panel closed; 3.0% with it open, while the meters and the scope run. With DRIVE up: 0.8% at Off, 1.4% at 2×, 2.6% at 4×, 2.3% at 8×, 4.1% at 16×. With no audio playing, about 0.2% at any setting |
| Panel sizes | 75, 100, 125 and 150% |
Activation. Click the badge in the header, or Activate… in the menu. The trial, the demo and activation work the same way in every UDI DSP plugin, so they’re explained once, on the support page.
About. About Crestwave… in the menu shows the version and build. Include them in any bug report — they pin down exactly which Crestwave you’re running.