Crestwave Multibend
A four-band saturator built transparent first. Choose WARM, GRIT or CLIP in each band and take it from inaudible to obvious on one DRIVE knob, while a spectrum coloured by heat shows how much every band is adding and where colour turns into distortion.
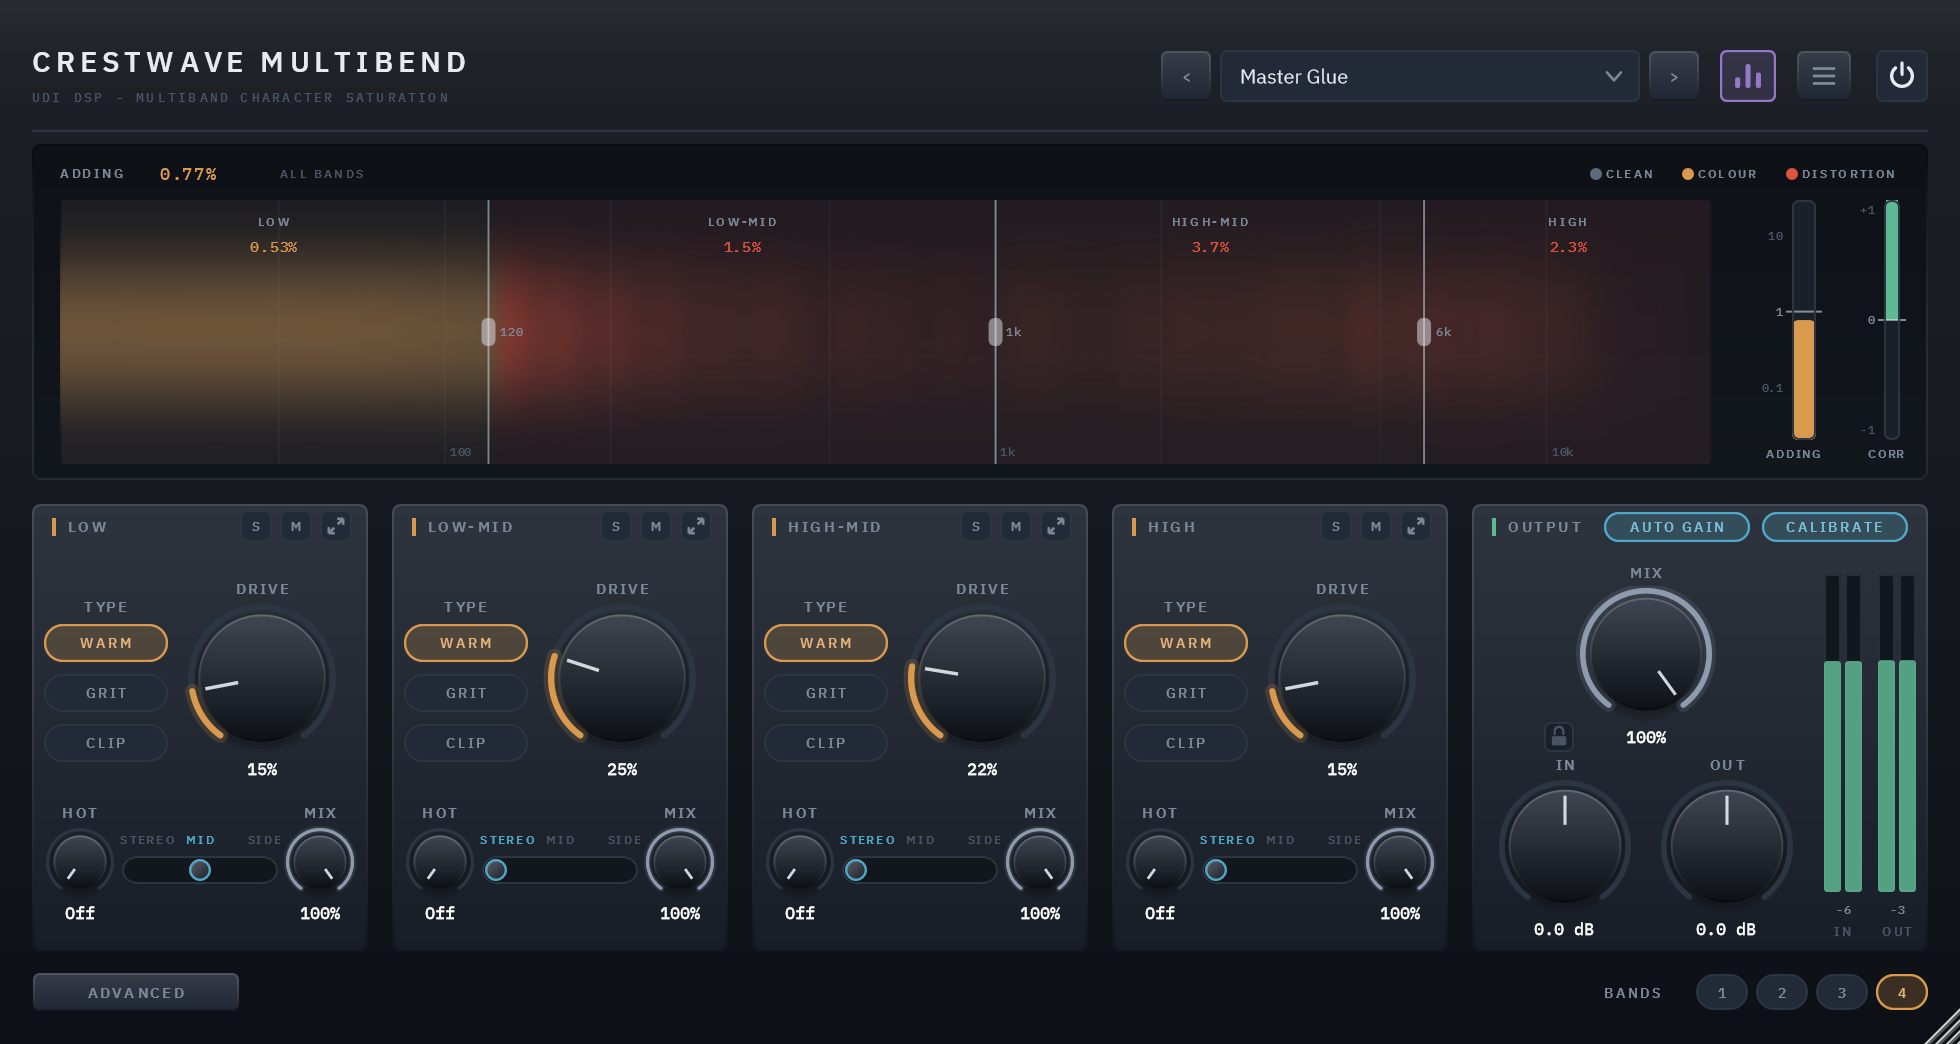
Transparent first, and all the way when you ask
Crestwave Multibend splits your sound into four frequency bands and saturates each one on its own terms: a whisper of warmth on the low end, real grit in the mids, a little air on top, all at once and without the bands smearing into each other. In every band you choose one of three kinds of saturation, WARM, GRIT or CLIP, and turn that band's DRIVE.
It is built transparent first. At DRIVE 0 a band adds nothing, a fresh instance opens gently, the level stays put while you drive, and the panel shows you, as a number and in colour, how much each band is adding and where colour turns into distortion. That is where it starts, not where it stops: every type goes all the way to obvious, deliberate distortion when a part calls for it. Both are right; you always know which one you're getting.
The same clip, dry and wet
8 sources, each run through the factory preset built for it. Toggle Dry/Wet mid-playback — it crossfades from the same instant rather than restarting.
Four bands, side by side
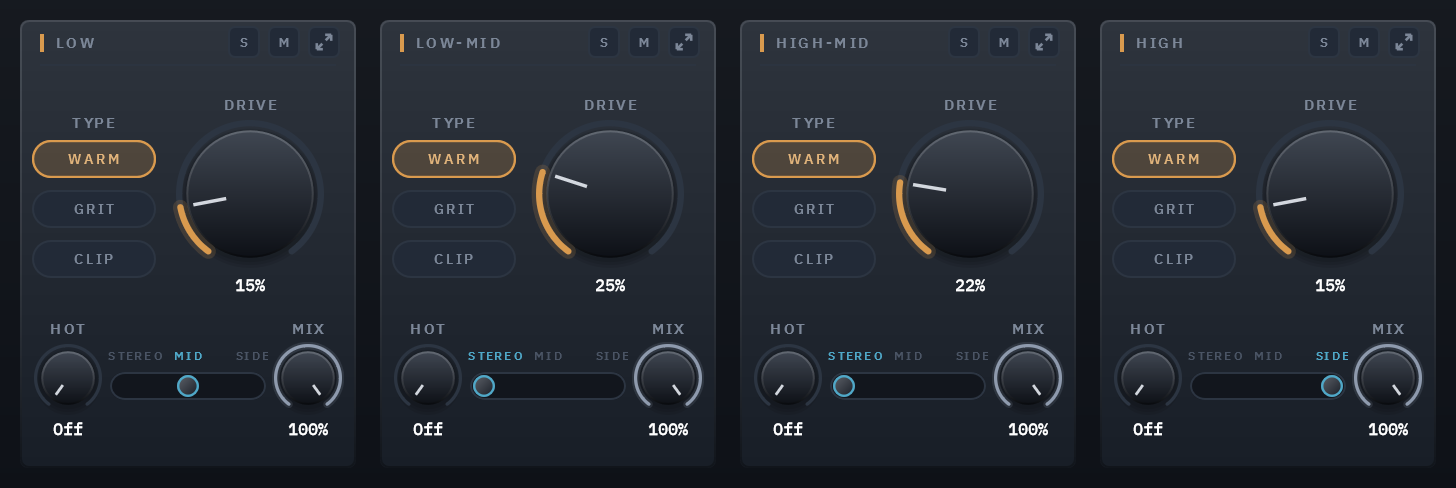
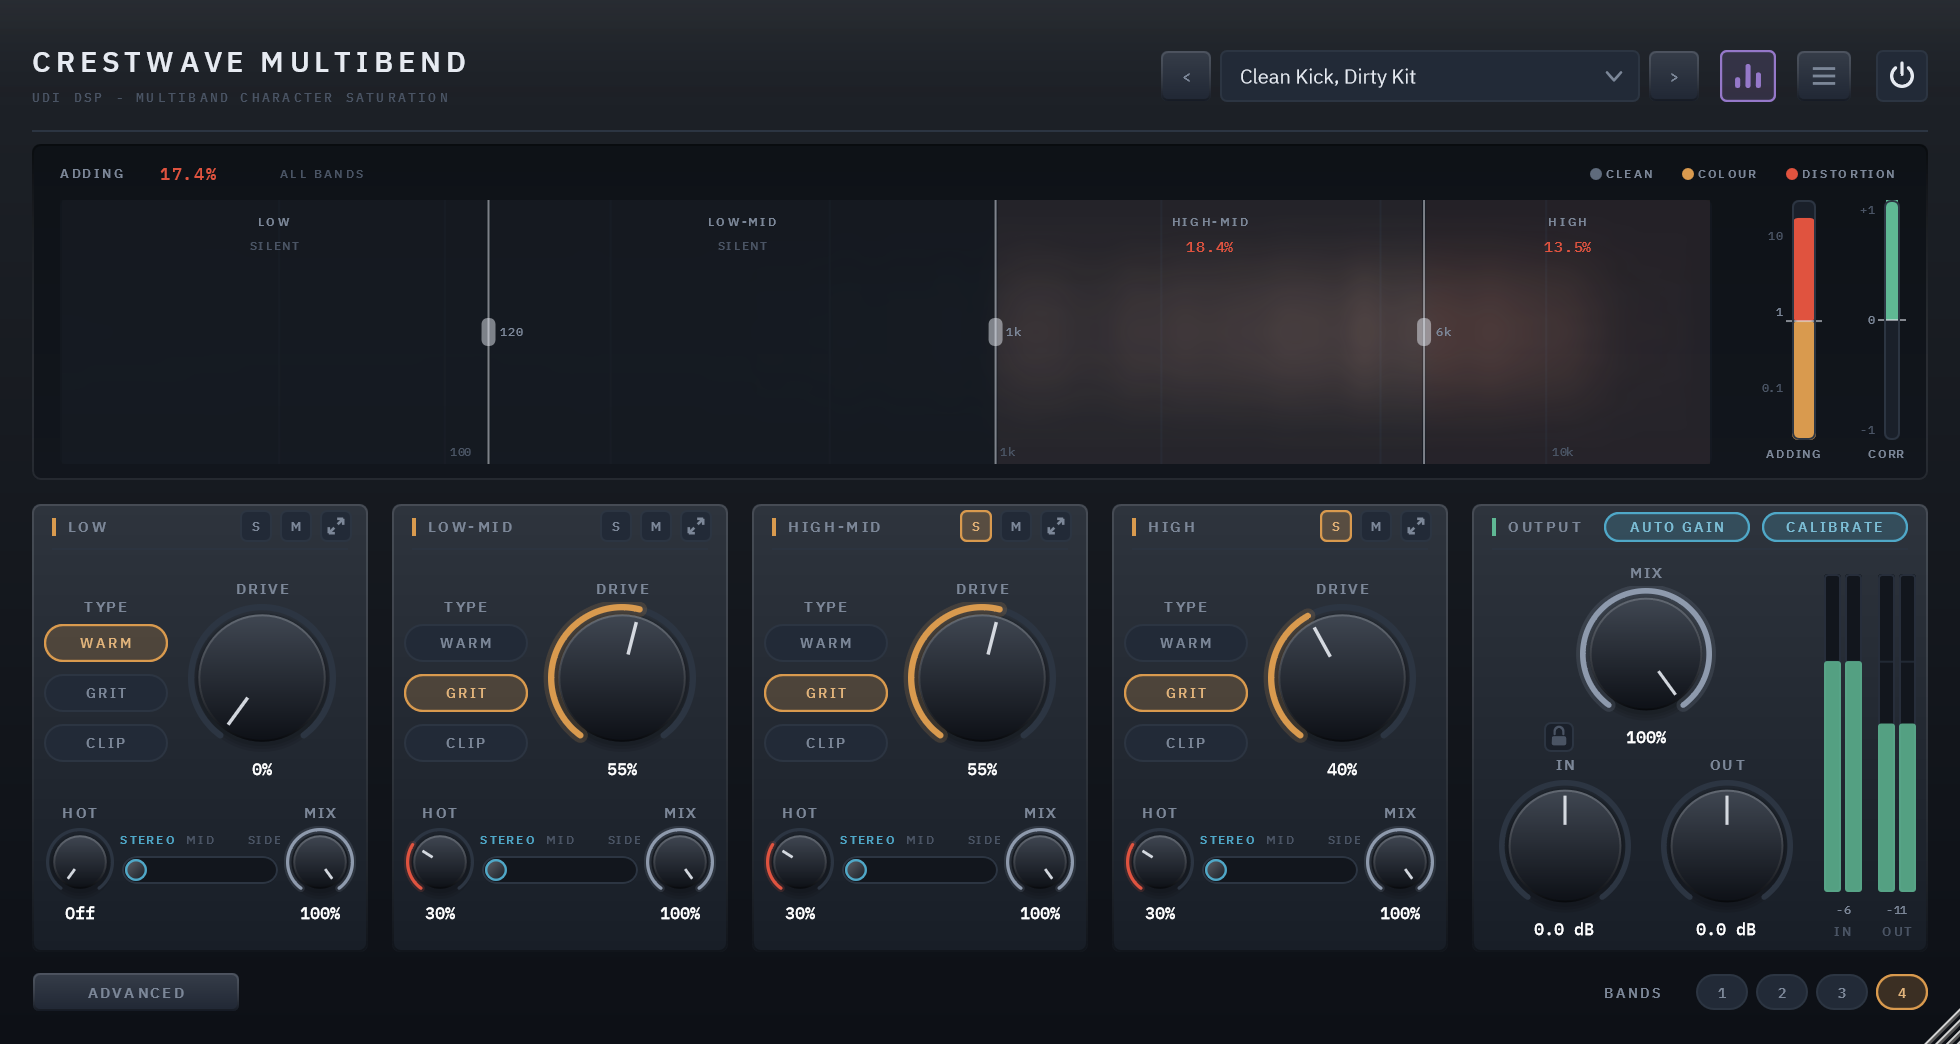
LOW, LOW-MID, HIGH-MID and HIGH, each with its own TYPE, DRIVE, HOT, MIX and Stereo/Mid/Side switch, all visible at once, like channels on a mixer. Or one, two or three: BANDS splits once, twice or not at all instead.
Three types in every band
WARM for body, GRIT for edge, CLIP for transients and loudness, each running from inaudible to obvious on its band's DRIVE knob.
Transparent until you ask
At DRIVE 0 a band adds nothing, and each type has a warning line, set by ear, where colour becomes distortion. Cross it on purpose, never by accident.
A spectrum coloured by heat
Each band's part of the live spectrum takes the colour of what that band is adding: steel for clean, amber for colour, red past its type's line.
Any band's own scope
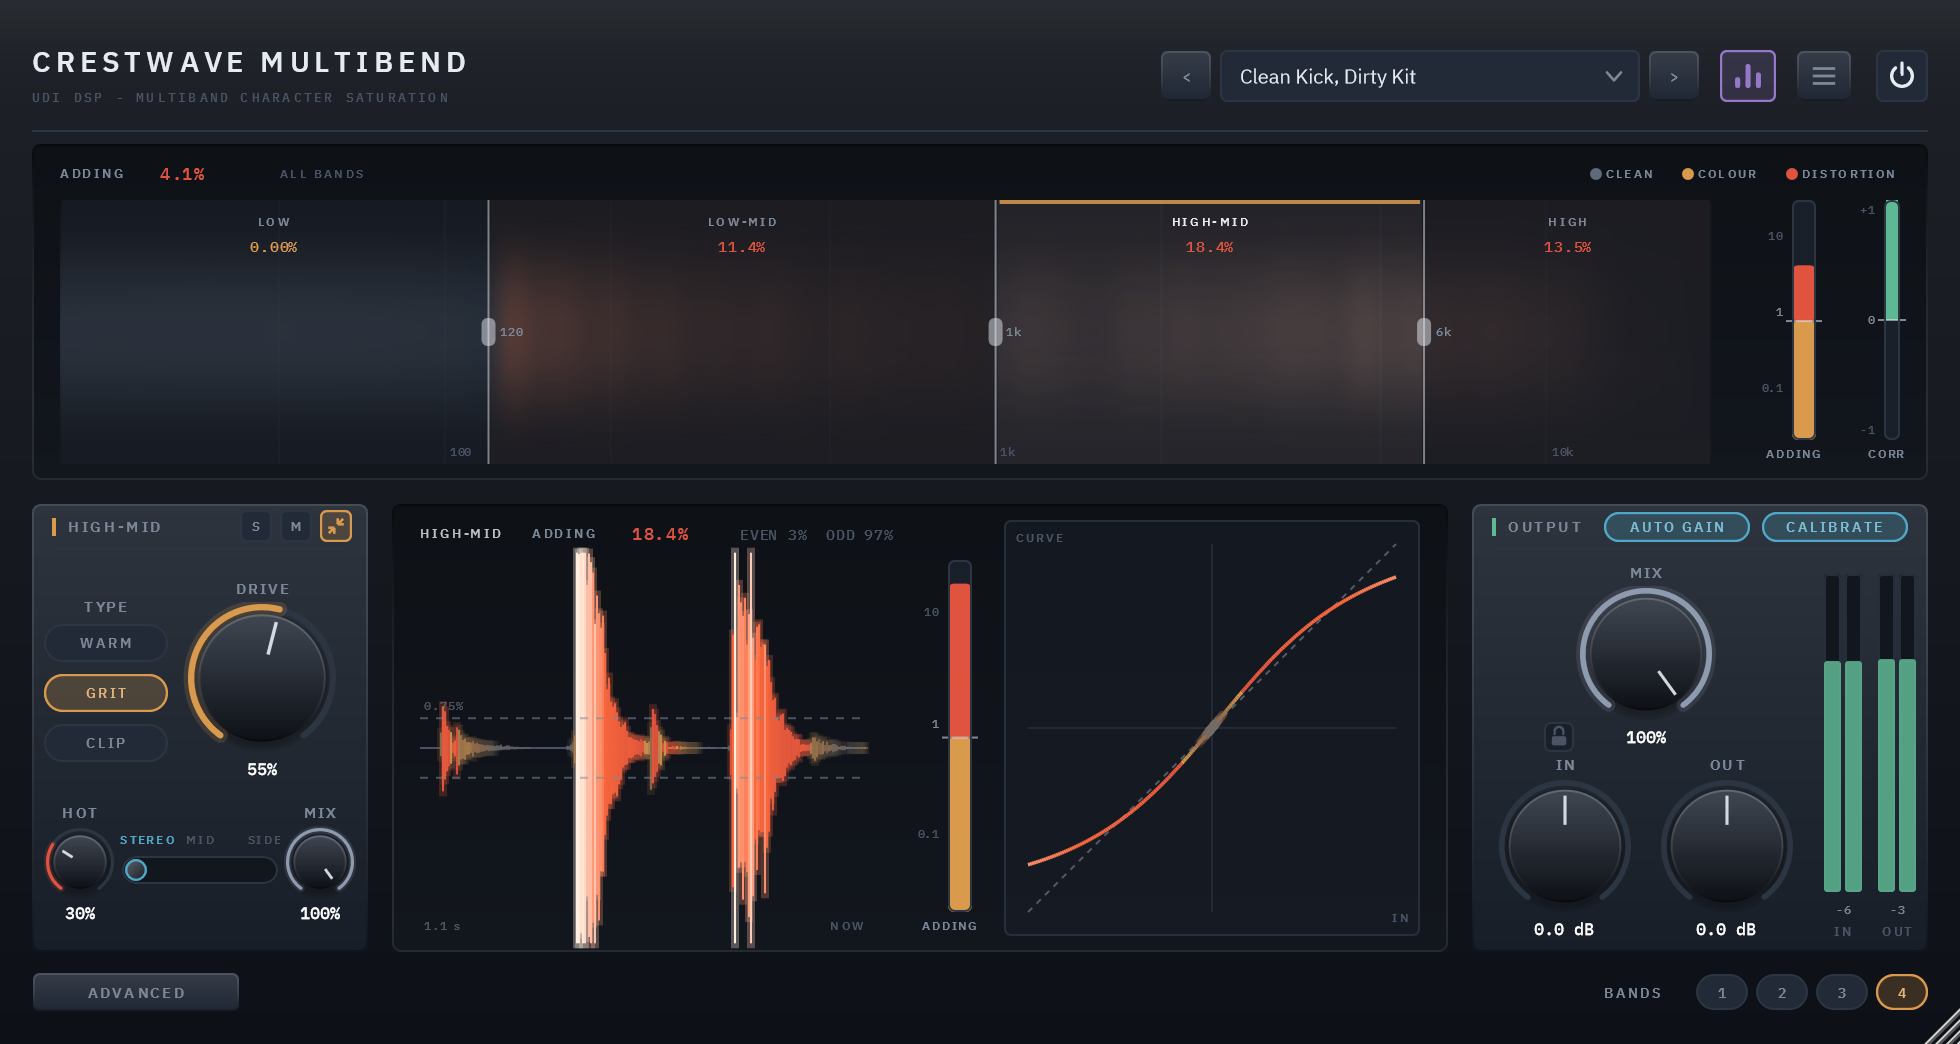
Click a band on the spectrum, or its expand icon, and its strip moves aside for that band's own heat scope: its waveform, its curve and what it adds.
Crossovers, two ways
Drag the three crossovers on the spectrum; they glide, so moving one while the track plays doesn't click. Zero Latency by default, or Linear Phase.
Solo and mute per band
Several at once, as on a mixer, saved with your project and automatable. Ctrl-click for one band alone; hold the button to hear it only while you press.
Mid/Side per band
Keep the low band's saturation on the middle so the bottom stays mono and tight, while the top band adds its edge on the sides.
CALIBRATE, band by band
Each band is brought to one working level before the saturation and back after it, so a DRIVE setting means the same in every band and on every track.
Three kinds of saturation, one knob each
Saturation is what happens when a sound is pushed into a curve that bends: its peaks are rounded, and the bending adds harmonics, new tones above each note, that make a sound denser, warmer or more present. How the curve bends decides which harmonics you get, and that is what a type is. Each is voiced so that turning DRIVE from the bottom to the top sounds like one character getting stronger, not several sounds glued end to end.
WARM
Tube-style body and warmth
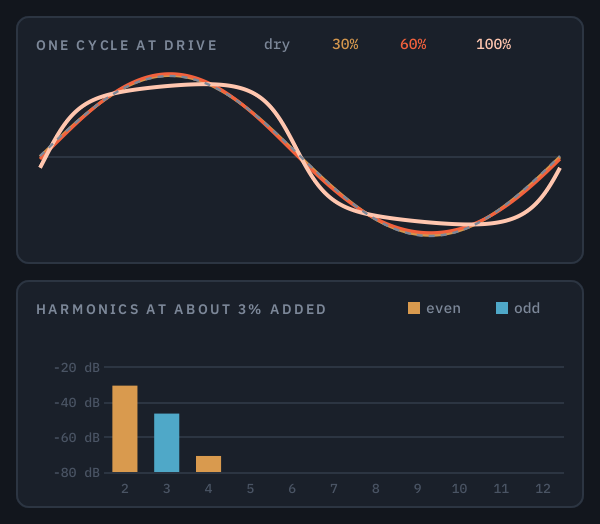
At the gentle end it adds mostly the 2nd harmonic, the tone an octave above each note, which blends in as body rather than being heard as an effect. Pushed harder, the odd harmonics catch up and it thickens into a driven stage.
For low end, mix buses, and anything that should feel fuller without sounding processed.
GRIT
Transistor-style edge and presence
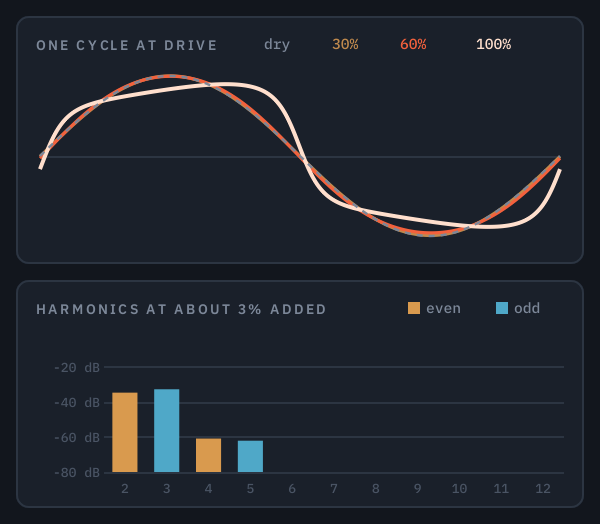
Its curve reaches its ceiling more slowly, so the 3rd harmonic comes through as strongly as the 2nd, with more above them than WARM gives. It reads as edge and bite rather than warmth.
For parts that need to cut through: vocals, guitars, snares, the attack of a bass.
CLIP
A clipper that arrives gradually
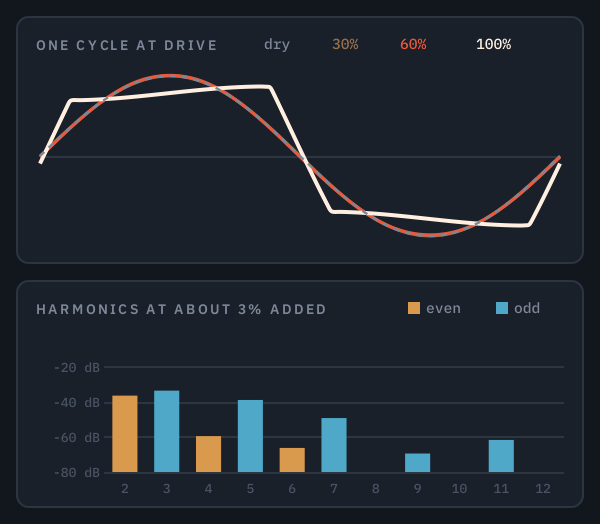
Its corner sharpens as you drive it: rounded at the bottom of the knob, a hard edge at the top, so clipping arrives gradually instead of switching on at a threshold. Driven, it runs the odd series, the 3rd, 5th and 7th, up high.
For transients and loudness: shaving peaks, an 808's growl, a master pushed hard.
The top of each picture shows one cycle of a sine at DRIVE 30, 60 and 100%, HOT at 100%, each line coloured by what that setting adds, as the panel colours it; the dashed line is the input. The bottom shows the harmonics each type adds, in dB under the note, with all three adding the same amount, 3%, so the bars compare character rather than quantity.
Each type has its own warning line, set by ear, where colour becomes distortion: WARM at 1% of added harmonics, GRIT at 0.75%, CLIP at 0.6%. Each carries a few dB of gentle compression as part of its character, linked across both channels so the stereo image stays put.
With a type in every band, one instance can do what would otherwise take several: WARM on the lows for weight, GRIT on the high-mids for presence, CLIP on the top to catch the transients.
Stereo, Mid or Side, band by band
Every band has its own STEREO / MID / SIDE switch on its strip. STEREO saturates the band as it is. MID saturates only what the two channels share, the centre of the image: the kick, the bass, the lead vocal. SIDE saturates only what differs between them: the width, the room, the double-tracked guitars and the pads.
The part that isn't chosen is never touched. It comes from the band's own clean signal, delayed to match, and is put back exactly. So MID on the low band thickens the bottom while its stereo image stays exactly as it was, keeping the lows mono and tight, and SIDE on the high band adds edge to the width without touching the centre. Switching while the track plays doesn't click, and a band's ADDING counts what reaches the track, the untouched part included.
The same push in every band, on every track
A saturator reacts to level. Push the same curve with a quiet signal and a loud one and you get two very different amounts of saturation, which is why one setting can sound tasteful on one track and broken on the next. A multiband makes it worse: the bands of one track can sit tens of dB apart, and the top of a dark mix is far quieter than its lows.
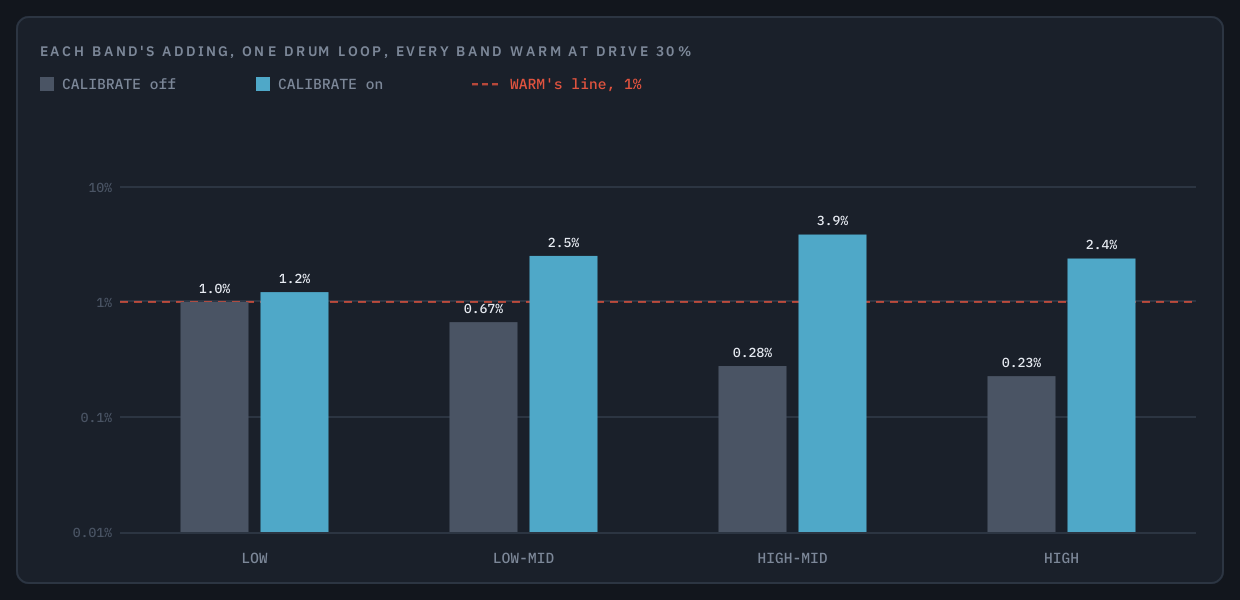
CALIBRATE takes level out of the equation, band by band. It listens to each band over a couple of seconds, brings it to one fixed working level before the saturation, and undoes exactly that afterwards. It never changes how loud anything is, only where the signal sits on the curve. So DRIVE pushes every band equally hard, whatever its level, and a setting you like on one track carries to the next.
The picture is measured: a drum loop with every band on WARM at DRIVE 30%. With CALIBRATE off, the quiet upper bands hardly take any drive, a fifth of what the low band gets. With it on, every band is worked at the same level, and what still differs is the material: the snare and hi-hats in the upper bands are peakier than the kick and bass, and peaks are what a curve works on.
It is careful about what it listens to. It lifts a quiet band by up to 18 dB and leaves a band that is essentially silent alone. It holds its level through the pauses in a track, so the first phrase after a break isn't driven harder than the one before it, and with a band on Mid or Side it keeps a level for each part. When you'd rather a band reacted to how much level it really has, the way a hardware unit does, switch CALIBRATE off. AUTO GAIN is its partner on the way out: it takes the level rise of saturation back out of every band, worked out from the input rather than chasing the output, so switching POWER compares colour, not loudness.
Harmonics that stay harmonics
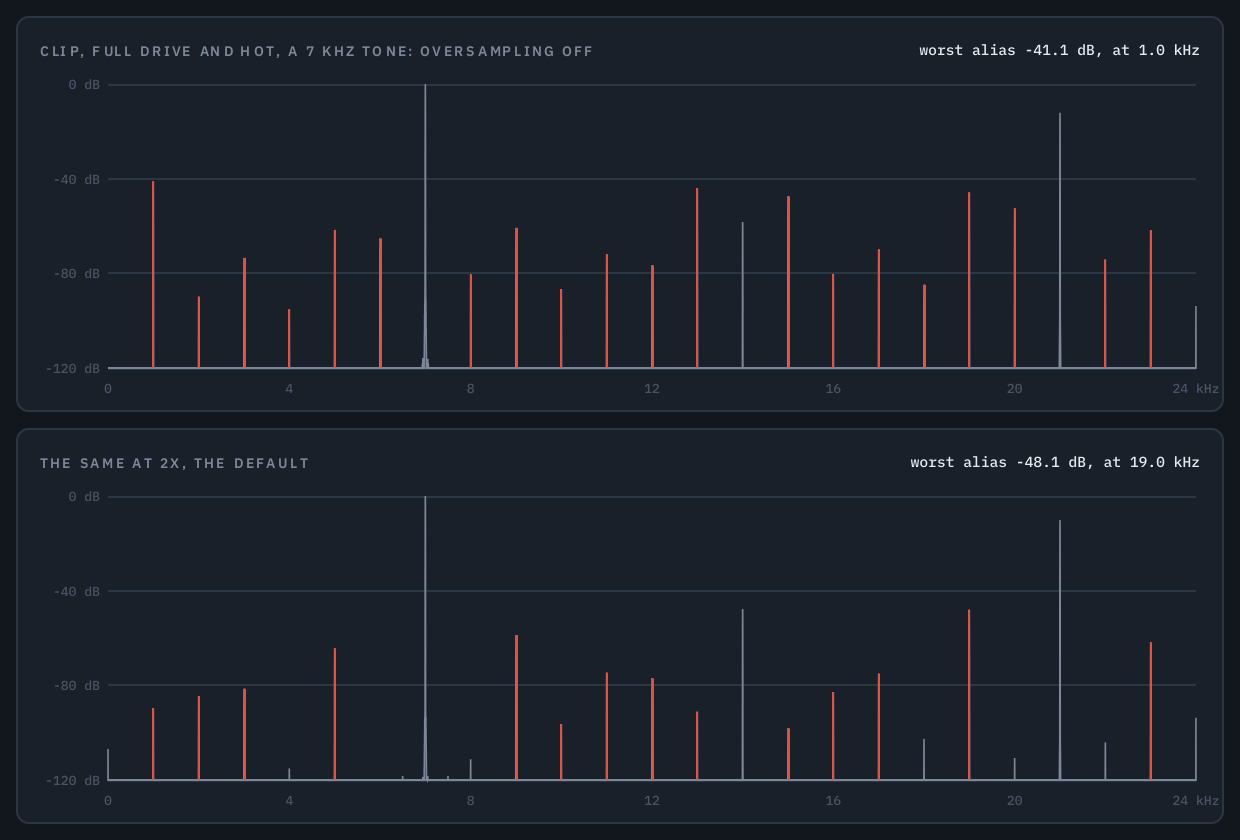
Saturation adds harmonics, and a hard curve adds them far above the audible range. Inside a plugin running at your session's rate, nothing above half that rate can exist: it folds back down as aliasing, tones no longer related to the note, heard as a grainy, metallic harshness. Oversampling runs the saturation at a multiple of the session's rate, so those harmonics have room to exist, and filters them away cleanly before the signal comes back down.
Choose Off, 2×, 4×, 8× or 16× in the menu. The default is 2×, a balance for four bands at once: it keeps even CLIP at full DRIVE and HOT in every band, the hardest case there is, 48 dB clear of aliasing, at 5.0% of one CPU core at the defaults. 4× takes that to 75 dB for about 1.8 times the CPU, and 16× to 106 dB; Off costs the least and adds no latency of its own. With no audio playing, every setting costs almost nothing.
The menu holds two settings: PLAYING, what runs while you play and mix, and EXPORTING, what an offline export runs at — Same as Playing by default, or any setting, higher or lower. Play at 2× and export at 16× to mix light and render at the highest quality. The latency doesn't move when it switches, so the export lines up with what you heard.
Latency is set by this choice alone (with Exporting set apart from Playing, by the larger of the two), never by a knob, a TYPE or a preset, and reported to your host in whole samples, so its delay compensation lines everything up exactly: 49 samples at 2×, 61 at 4×, 59 at 16×, none with oversampling Off and the Zero Latency split. Linear Phase adds its 1280 samples on top. The choice is saved with your session; a new Crestwave Multibend always opens at 2×.
The picture is that hardest case, measured: a 7 kHz tone through CLIP at full DRIVE and HOT. Every red line is an alias, a harmonic folded back to a frequency unrelated to the note.
Open any band's own scope
The spectrum shows all four bands at once. For the detail, click a band on the spectrum or its strip's expand icon: the strip moves to the left and that band's own heat scope opens where the others were, with its waveform coloured by what the band is adding, its ADDING gauge, and the curve its type and DRIVE are pushing it through. Click another band to switch to it; click the open one again to close it.
Hear what one band is doing
Each strip's S and M choose which bands you hear. Solo several at once, as on a mixer; mute wins over solo. A band that's soloed away or muted reads SILENT on the spectrum, and every change fades over 10 ms, so it never clicks. Solo and mute are saved with your project and can be automated, but a preset never sets or clears them.
Zero Latency or Linear Phase
Zero Latency, the default, splits with minimum-phase crossovers: every frequency comes out at your input's level, with the timing shifting very slightly around each crossover, and no latency of its own. Linear Phase gives back exactly your input when nothing is being saturated, delayed by about 27 ms, and crossfades when a crossover moves. The master MIX's dry signal goes through the same split, so a partial blend lines up with the saturated bands and doesn't comb.
A spectrum that shows the heat
The display across the top is your track's live spectrum, split into its bands at the crossovers, and each band's part of it takes the colour of what that band is adding: steel where it's clean, amber for colour, red past its type's line. Each band's name and its ADDING figure sit at the top of its region, and the whole track's ADDING sits top left.
Beside the spectrum are the ADDING gauge, with the line marked on it, and CORR, a mono-safety meter read on what leaves the plugin. Drag a crossover to move it; click a band to open its own scope.
What hits and time do to every band
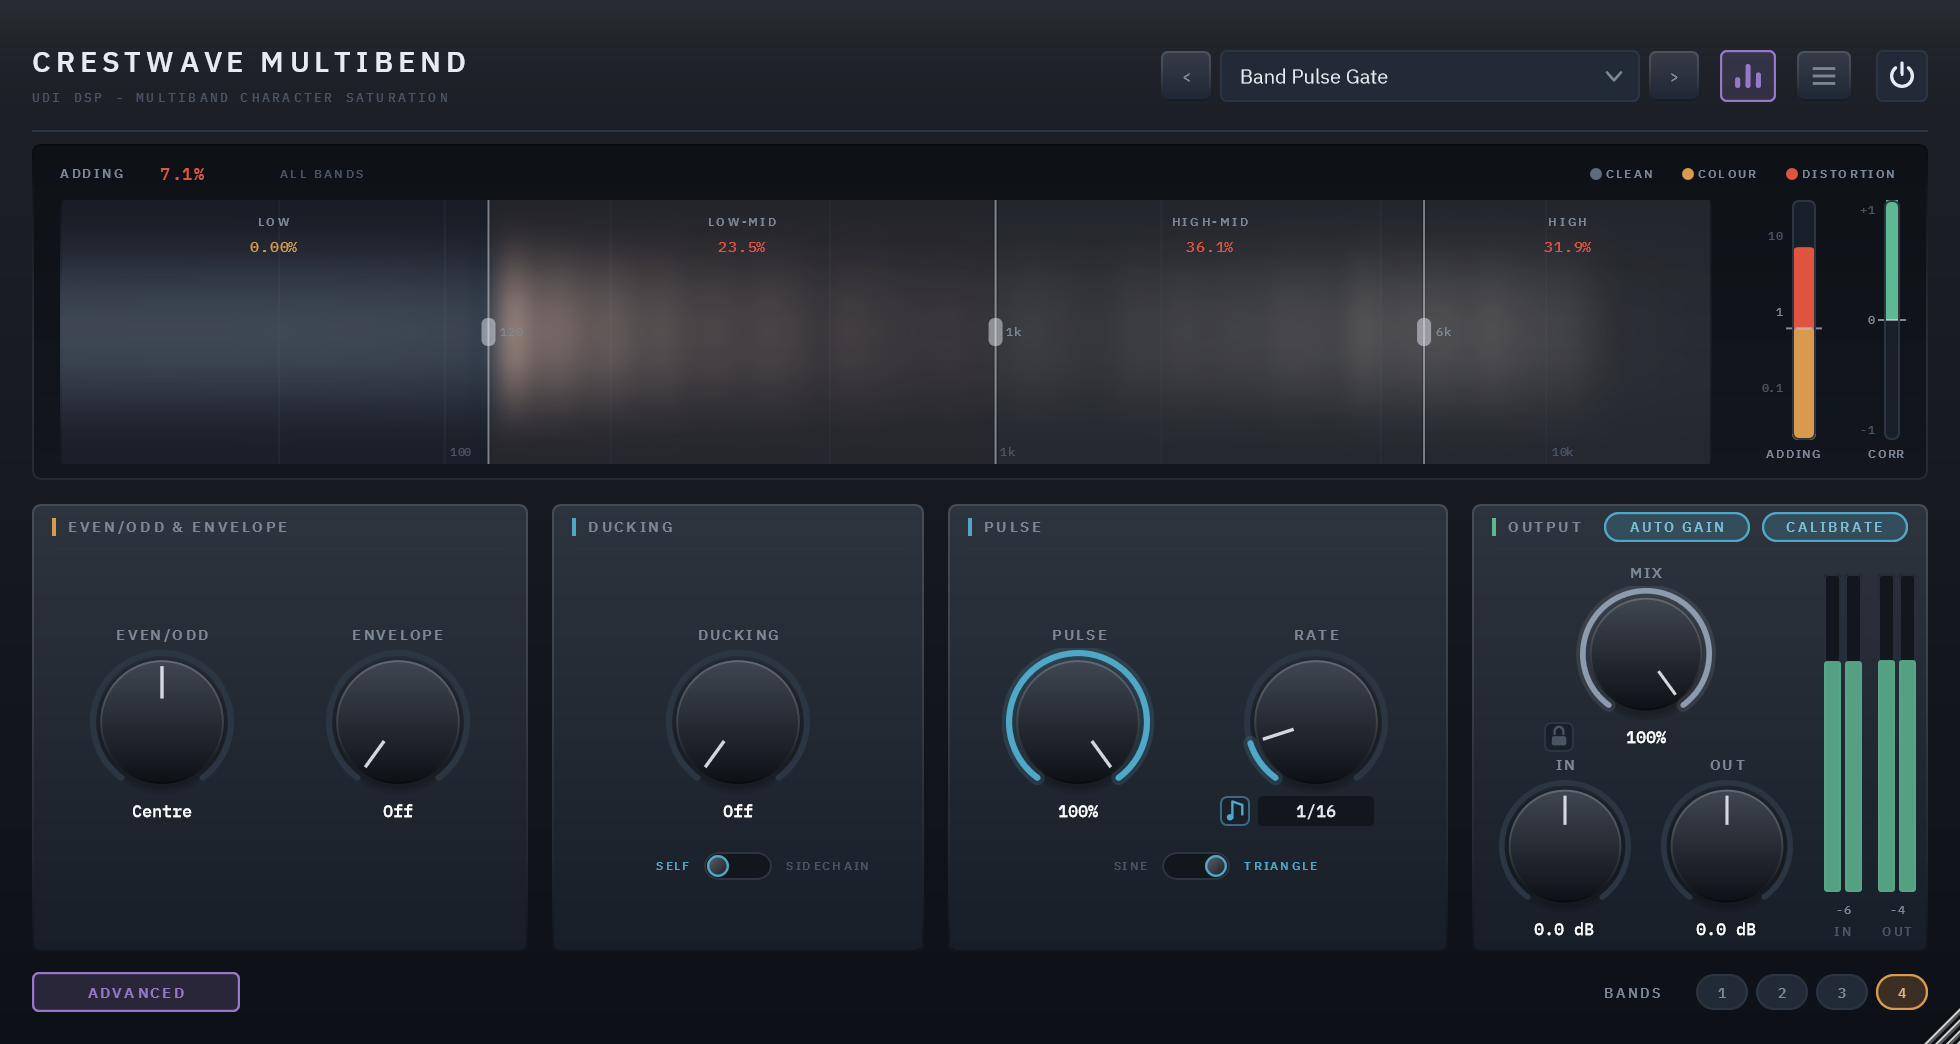
The ADVANCED button swaps the band strips for three cards shared by every band: EVEN/ODD and ENVELOPE, DUCKING, and PULSE. They start off or centred, so opening the page changes nothing until you turn something. The spectrum and OUTPUT stay where they are.
EVEN/ODD and ENVELOPE
EVEN/ODD leans every band's type toward the even harmonics, which read as fullness, or away from them; toward ODD the sound mostly gets cleaner. ENVELOPE makes each hit bloom for a moment, warmer and a little harder, then settle, while a sustained sound is left alone.
DUCKING and PULSE
DUCKING takes DRIVE back in every band while a hit plays, listening to the track itself or to a sidechain. PULSE moves DRIVE in time with your song, from 1/32 to 8 bars or free in Hz, on a sine or a triangle. Both only ever take DRIVE away.
Specifics, stated plainly
| Bands | Four by default, or one, two or three with BANDS; each with TYPE (WARM, GRIT or CLIP), DRIVE, HOT, MIX, Stereo/Mid/Side, solo and mute; up to three crossovers dragged on the spectrum |
|---|---|
| Split and latency | Zero Latency (minimum phase, the default) or Linear Phase (about 27 ms more). With oversampling at its default 2×, 49 samples; 0 with oversampling Off and the Zero Latency split. No knob or preset moves it |
| Oversampling | Off, 2× (default), 4×, 8× or 16×, in the menu; set separately for playing and for exporting (Same as Playing by default) |
| Sidechain | Optional, mono or stereo; keys DUCKING in every band when its SOURCE is SIDECHAIN |
| Output | The master MIX against the dry signal, with a padlock that holds the master MIX, IN and OUT through preset changes, while each band's own MIX loads with the preset; IN and OUT trims, ±24 dB |
| CPU | 5.0% of one core at the defaults (four bands, 2× oversampling), 2.6% with oversampling Off, 17% at the menu's 16× (every band driven), about 0.6% at any setting with no audio playing — 48 kHz stereo, 512-sample blocks, the panel closed (6.2% at the defaults with it open) |
| Parameters and presets | 47 parameters, 46 of them automatable (BANDS is set on the panel or by a preset); 30 factory presets in six categories, plus Default |
| Licensing | Free UDI DSP account, one-time online activation — no subscription, works offline for a week between checks |
Compatibility
- VST3, 64-bit — Windows 10/11 (a Standalone app is included in the installer). AU, AAX and macOS are coming soon.
- In active development — full per-host verification across DAWs is ongoing.
- Internet needed once, briefly, to activate (a short browser sign-in) — day-to-day use after that works offline for up to a week between checks.