Fluxwave is a tape machine plugin by UDI DSP.
01 What Fluxwave is
Fluxwave is a tape machine for your mix, inspired by tape rather than copied from one. It gives a sound what recording to analog tape gave it: the peaks round off, the top end softens a little as you print harder, the low end gains a gentle bump, and, if you want it, the speed of the tape wavers the way a real transport’s does. It leaves out what engineers only put up with, and where software can do better than tape, it does.
It is built to be the tape machine that shows its work.
- Calibrated in tape terms. DRIVE is how hot you print, in dB over the tape’s reference level, the way an engineer lines up a real machine. 0 dB is aligned; +6 is “running it hot”. More DRIVE always means more tape.
- Level-matched. AUTO GAIN holds the loudness while you turn DRIVE, so you judge the tone, not the volume.
- Built on how tape behaves, tuned by ear. The saturation, the EQ standards, the heads, the low-end bump and the speed variation start from how studio machines and tapes behave, then are voiced for music.
- It shows what the tape is doing. The visualizer draws your track as a ribbon that heats up as the tape does, from steel through amber to red past the tape’s own maximum, and shimmers with the transport. Beside it, three meters (the tape level, what the tape adds, mono safety), the machine’s frequency response measured live on your music and the curve the signal runs through. DRIVE’s ring glows with it.
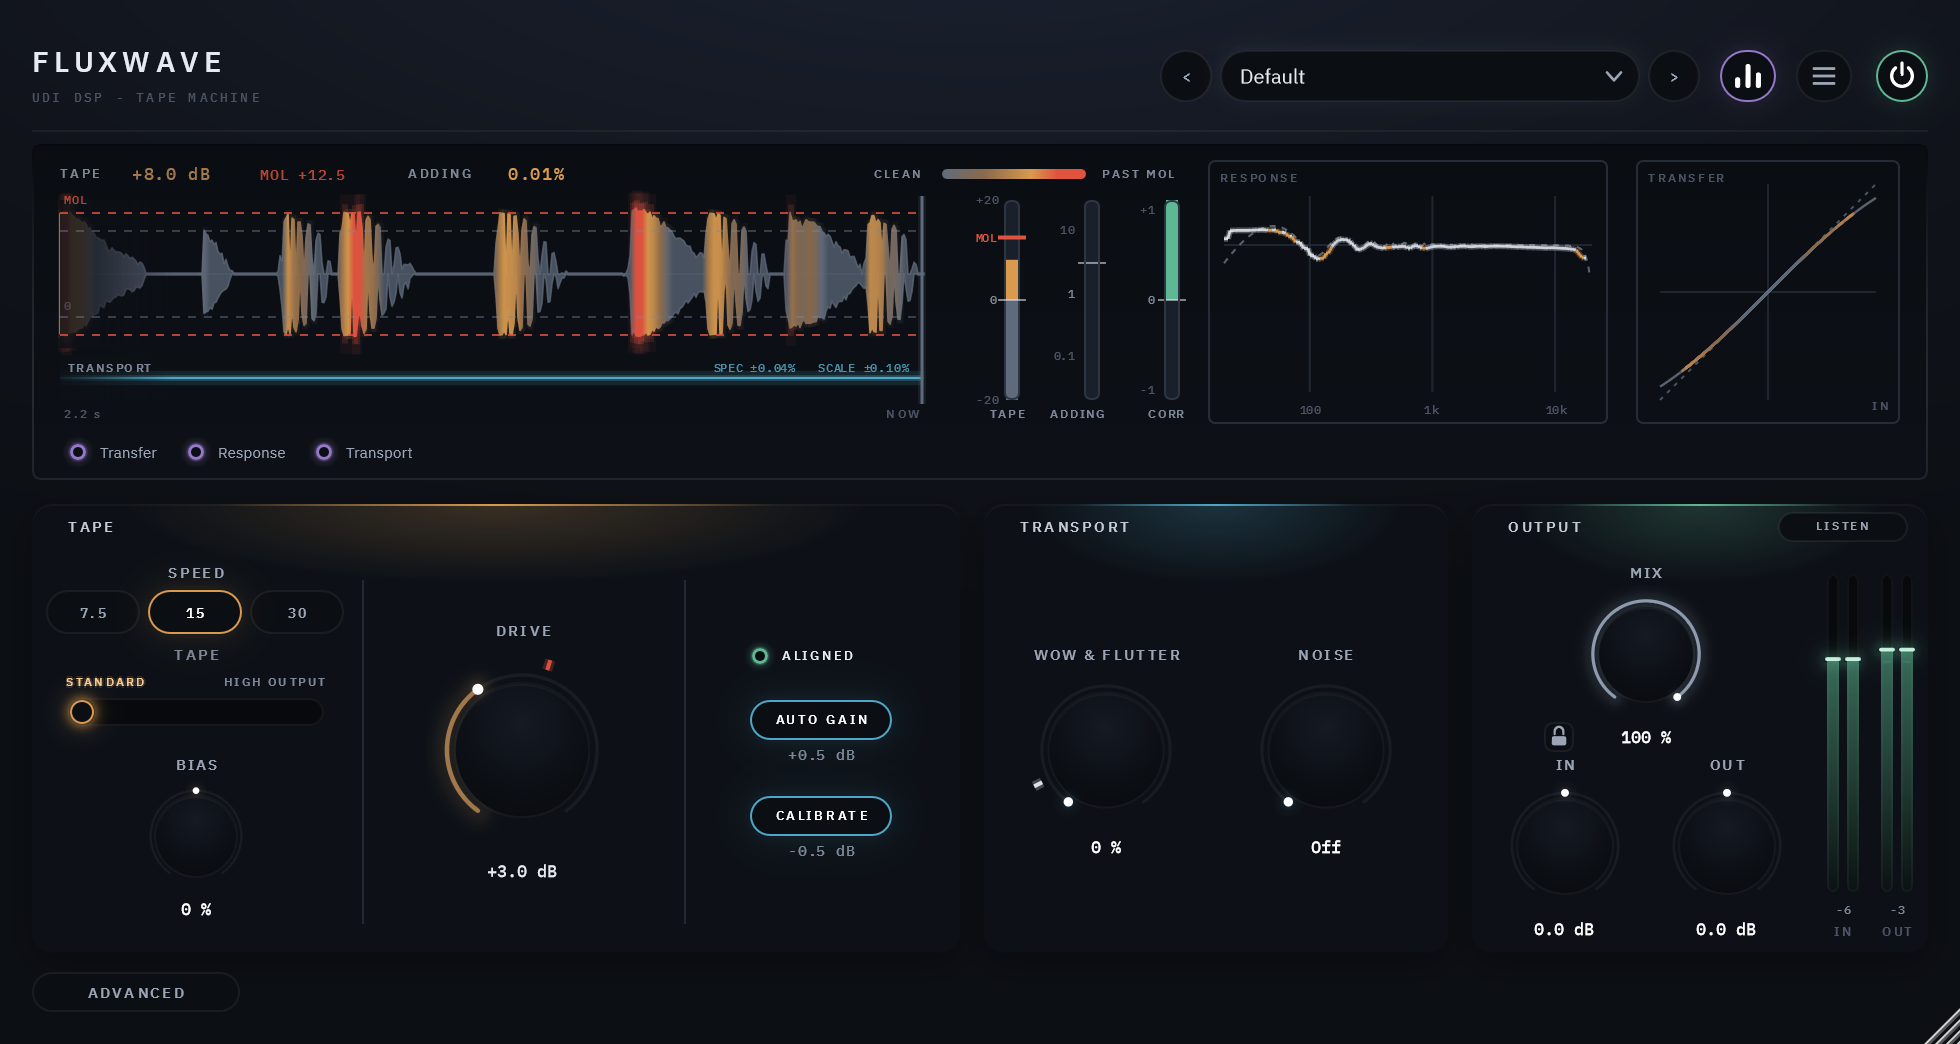
At a glance
- DRIVE, SPEED, TAPE, BIAS: how hot you print; 7.5, 15 or 30 inches per second; standard or high-output tape; the record bias, explained by its sound.
- WOW & FLUTTER: the tape’s speed variation, from a still transport to a machine that needs a service. Never a repeating wobble.
- NOISE: tape hiss at its real level for the tape and speed, rising with the music and fading in silence.
- Opens subtle: 15 in/s, the European EQ, standard tape, aligned bias, printed just above the reference level.
- The ADVANCED page: the EQ standard, the head bump, azimuth, crosstalk, each part of the speed variation on its own, scrape, modulation noise, the electronics without the tape, the output transformer, and Mid/Side.
- Light on the CPU: 1.2% of one core at the defaults (48 kHz, stereo), 1.7% with the panel open; free in silence.
- Low latency: 175 samples at 48 kHz at the default 8x oversampling. No control moves it.
02 The ideas behind Fluxwave
None of this is needed to use Fluxwave, but each idea explains why a control behaves the way it does.
Tape has a reference level
A real tape machine is lined up so that a tone at the studio’s operating level records at the tape’s reference level. How the tape behaves follows from where your signal sits against that line: a few dB over it is the classic warm print; well over it the tape saturates; at its maximum output level (MOL), the industry’s own definition of too hot, the tape adds 3% distortion to a 1 kHz tone. Fluxwave works in exactly those terms: DRIVE is dB over the reference, the TAPE figure reads in it, and the visualizer marks both the reference and MOL.
MOL depends on the tape and the speed (BIAS moves it a little):
| 7.5 in/s | 15 in/s | 30 in/s | |
|---|---|---|---|
| Standard | +10.0 dB | +12.5 dB | +13.0 dB |
| High Output | +11.5 dB | +14.0 dB | +14.0 dB |
CALIBRATE does what lining up a machine does: it brings your track’s own level to the tape’s reference, so one DRIVE setting means the same on a quiet track and a loud one.
The highs saturate first
On a tape machine the recording EQ boosts the highs before they reach the tape, and the playback EQ takes the boost back out. So the highs reach the tape’s limit first, and as you print harder the top end softens before the rest of the sound distorts. At 7.5 in/s, where the boost is largest, the effect is strongest. The visualizer’s RESPONSE strip shows the top of the curve sagging as you raise DRIVE.
Bias, by its sound
Bias is a high-frequency signal a tape machine records along with the music to make the tape behave linearly. Too little and the sound turns brighter and grittier, then breaks up around quiet notes; too much and it turns duller, cleaner and smoother. More bias is cleaner, not dirtier. (Some echo units teach the opposite; a studio tape machine behaves this way.) Under-biased, the tape’s curve opens into a loop, and the TRANSFER strip draws it.
Wow, flutter and drift: the speed of the tape
No transport runs at a perfectly constant speed. Drift wanders the pitch over seconds; wow is a gentle waver around once a second; flutter is faster and heard as a slight roughness. On a real machine they never repeat, and in Fluxwave neither do they: there is no LFO. At the ALIGNED point on the WOW & FLUTTER knob the speed holds to the specification of a studio machine at that speed, weighted the way the industry measures it: 0.06% at 7.5 in/s, 0.04% at 15 and 0.03% at 30.
The head bump
A playback head reads long wavelengths partly from the edges of its face, which adds a gentle bump in the low end, a small dip after it, then a roll-off below. The bump sits at a fixed wavelength, so its frequency moves an octave with each change of speed: deepest at 7.5 in/s, highest at 30.
03 The panel
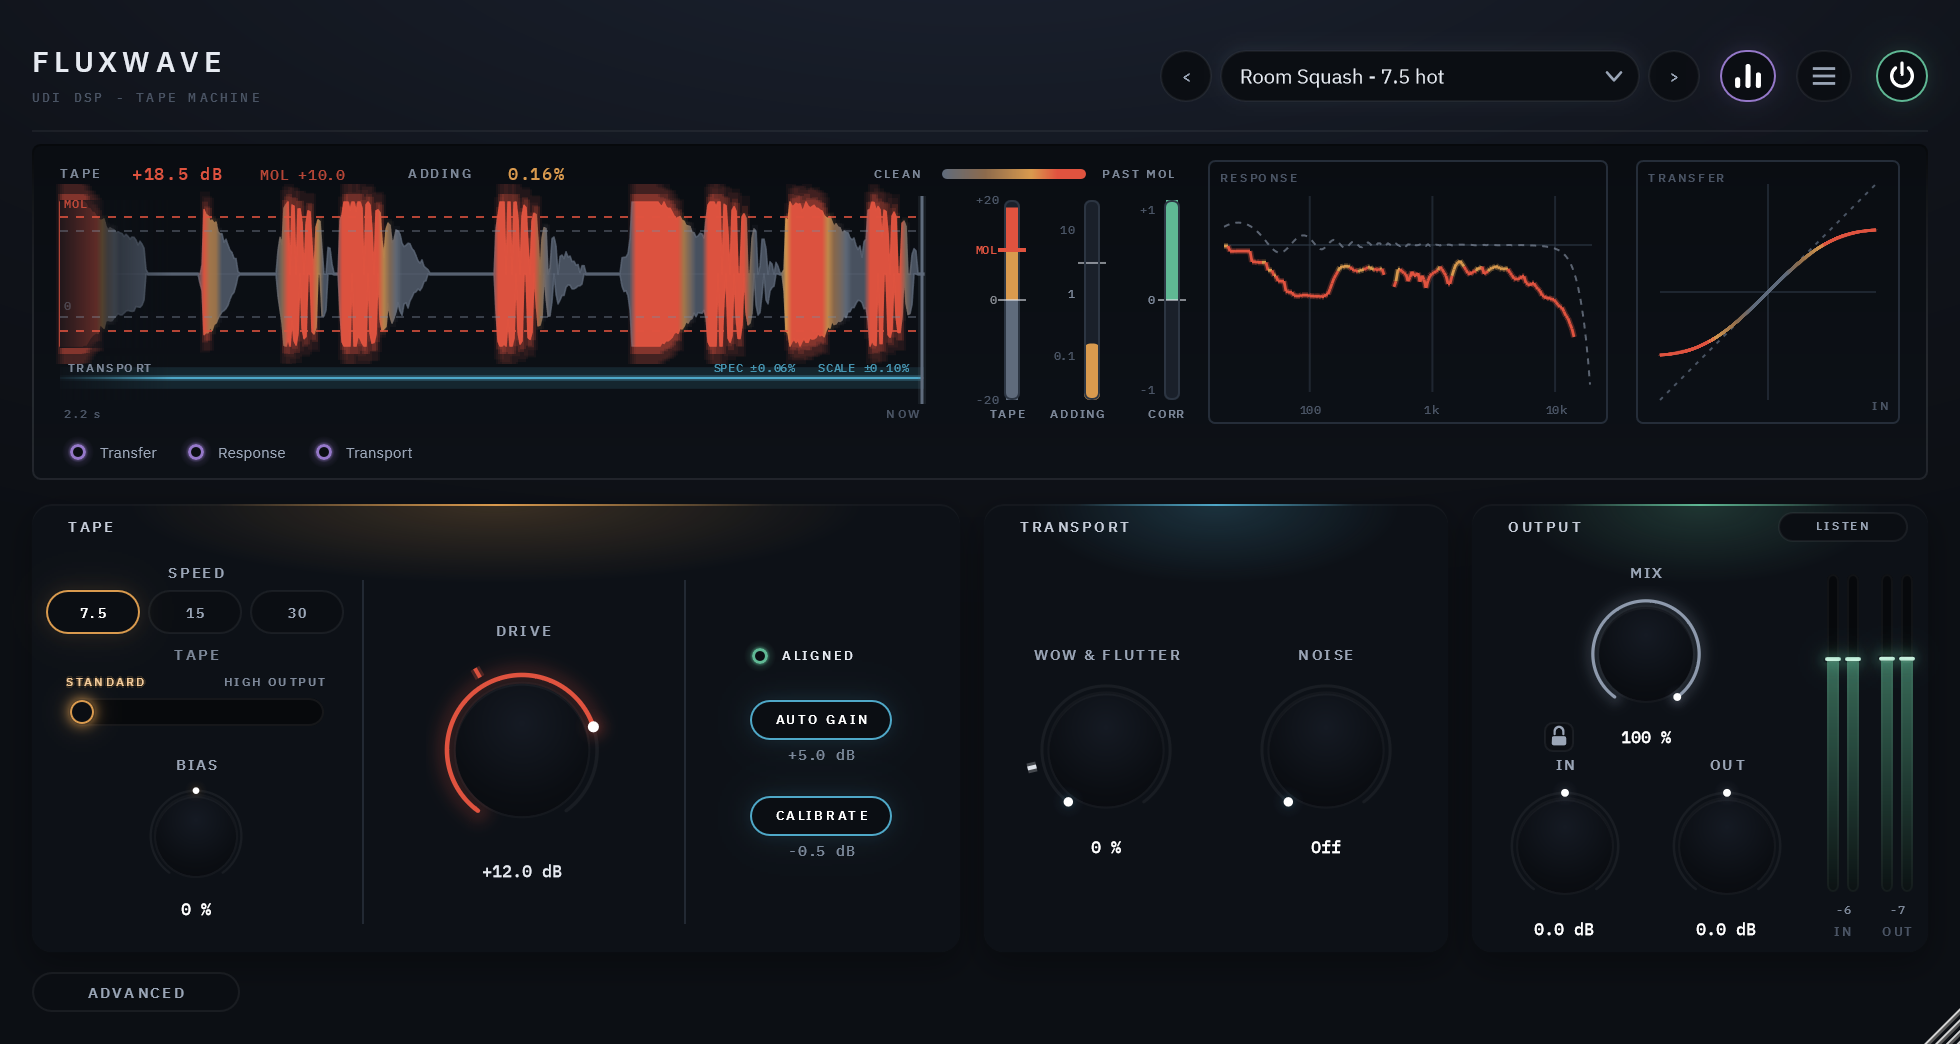
Across the top
The name; then, from the right, POWER (bypass, with a 20 ms crossfade), the menu, the visualizer button, and the preset field with its arrows. A dot in the preset field means you have changed something since the preset loaded.
The visualizer
- The ribbon, the large display: the tape’s own signal over the last seconds, flowing from NOW at the right. Each moment is as tall as the tape level it reached, and its colour runs with it: steel under the reference level, warming to amber as the tape saturates, red and glowing past MOL. The dashed lines are the reference (0) and MOL, and the NOW line takes the colour of what the tape is doing this moment.
- TAPE, a figure along the top and a meter at the ribbon’s right: how hard the tape is driven, in dB over the reference level, not dBFS, with the recent peak held. The meter marks the reference (0) and, in red, this tape’s MOL at this speed, whose figure is along the top too.
- ADDING, a figure along the top and a meter beside TAPE: the harmonic content the tape adds, as a share of what comes out, measured live with the machine’s own frequency response left out (so the head bump and the high-end loss are not counted as distortion). Red past 3%, MOL’s own figure.
- CORR, the third meter: mono safety. +1 when the two channels are the same, 0 when they are unrelated, below 0 (in red) when they start to cancel as the track is summed to mono.
- TRANSPORT, a lane under the ribbon on the same time line: the tape speed’s deviation, live, against this speed’s machine specification (the band), its scale following what is there. While it shows, the ribbon also shimmers with the deviation, magnified: more WOW & FLUTTER, more shimmer.
- RESPONSE: the machine’s frequency response measured live on your music (solid) over the response it has at low level (dashed). Amber where the tape is compressing the highs, red where it is well past it. It is measured before the transport, so the speed variation does not smear it.
- TRANSFER: the curve the tape runs the signal through, with the last fraction of a second traced along it, scaled to what is playing. Under-biased, it opens into a loop.
The checkboxes under the visualizer show or hide TRANSFER, RESPONSE and TRANSPORT; the ribbon widens into their room, and without TRANSPORT its lane goes, the ribbon grows taller and runs straight. They change how you look at the sound, not the sound, and are not saved. The visualizer button in the header hides it all, and the panel gets shorter.
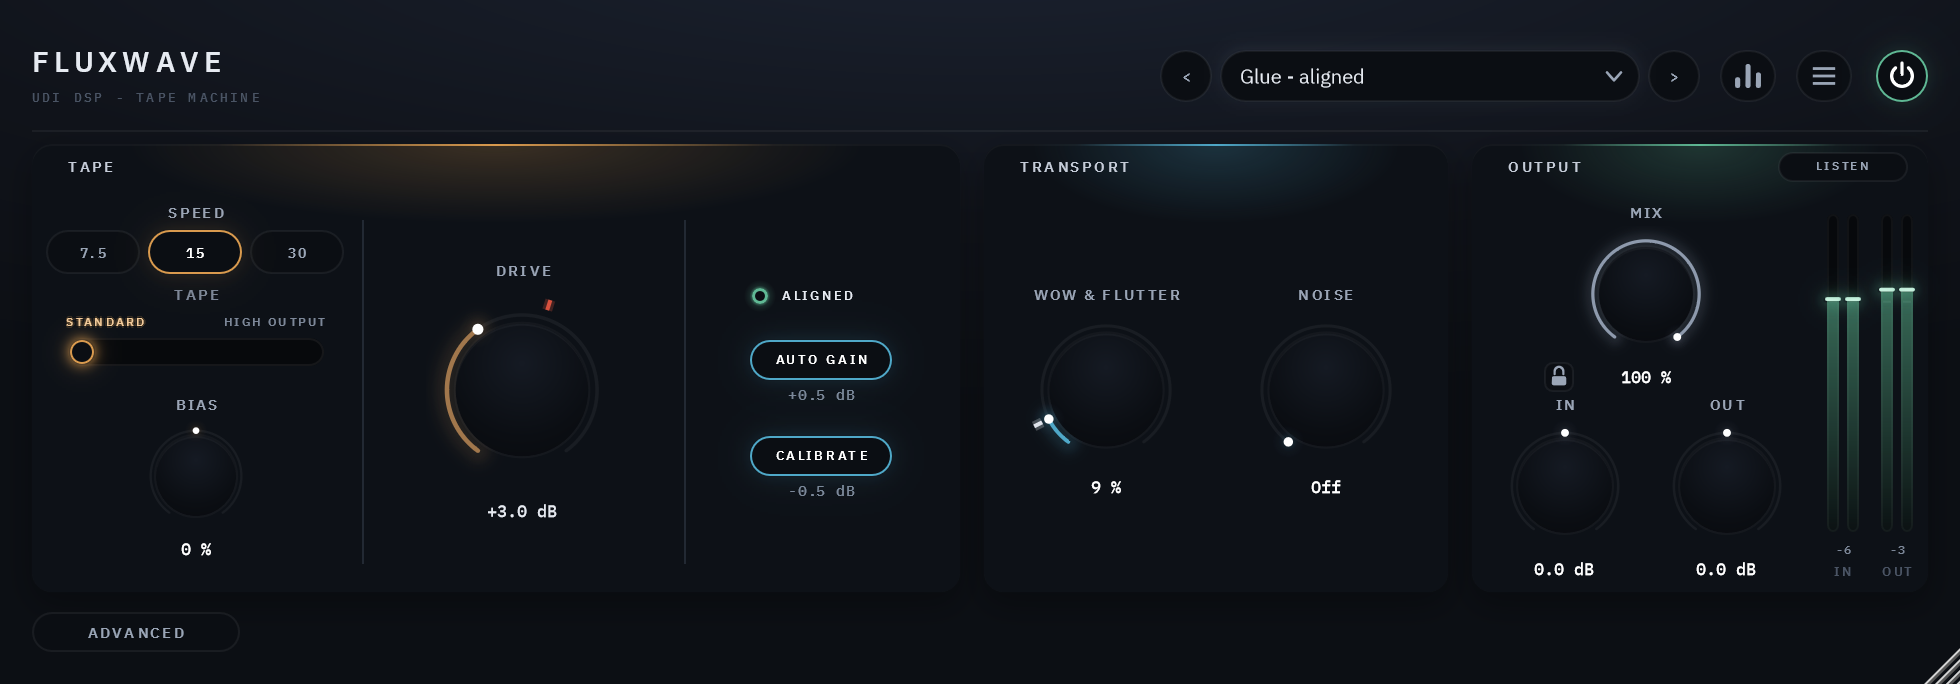
TAPE
| Control | What you hear | Values | Default |
|---|---|---|---|
| SPEED | 30: cleanest, the widest top, the least bump. 15: the classic mixing speed, a bump in the low end. 7.5: darker, bass-forward, the highs saturate early | 7.5 / 15 / 30 in/s | 15 |
| TAPE | STANDARD saturates sooner and rounder. HIGH OUTPUT has more headroom: cleaner and punchier at the same DRIVE | Standard / High Output | Standard |
| BIAS | Below centre: brighter, grittier, then breaking up on quiet notes. Above: duller, cleaner, smoother | -100% to +100%; the centre is aligned | 0 |
| DRIVE | How hot you print. More: denser, rounder peaks, the highs softening first, then audible distortion past MOL. Its ring glows amber while the tape saturates and red past MOL; the red tick is the DRIVE at which what is playing now would reach MOL | -6 to +18 dB over the reference | +3 dB |
| AUTO GAIN | Holds the loudness as DRIVE moves. The figure under it is the makeup it applies now | on / off | on |
| CALIBRATE | Brings the track’s level to the tape’s reference. The figure under it is how far, now | on / off | on |
DRIVE’s red tick is the DRIVE at which the peaks playing now would reach MOL: past it, the loudest moments of this track are past 3% distortion. It moves with the music and disappears in silence.
The ALIGNED lamp is lit while BIAS is centred and the transport is linked at or under its ALIGNED point. Click it to return there: a safe place to explore from.
TRANSPORT
| Control | What you hear | Values | Default |
|---|---|---|---|
| WOW & FLUTTER | The tape’s speed variation. 0 is a still transport; the tick, ALIGNED, is a serviced studio machine; 100% needs a service | 0-100%; the knob lands on ALIGNED as you pass it (Shift for fine moves) | 0 |
| NOISE | Tape hiss at its real level for this tape and speed, rising with the music and fading when it stops | Off, -30 to +12 dB over the real hiss | Off |
MIX and WOW & FLUTTER together make a chorus. Blending a wavering tape with the dry signal is how a chorus works. That can be what you want; if not, keep MIX at 100% while WOW & FLUTTER is up.
OUTPUT
MIX (dry and wet, latency-matched to the sample, so a parallel blend does not comb), IN and OUT, and their meters, as across the UDI DSP line. The padlock beside MIX holds MIX, IN and OUT where they are while you change presets.
LISTEN, at the top right of OUTPUT, changes what you hear, one click at a time:
| LISTEN | You hear |
|---|---|
| LISTEN | The output, as normal |
| ADDED | Only what the tape adds: the distortion and the squash on the peaks, exactly what the ADDING figure measures. The head bump, the high-end loss, the speed variation and the hiss are left out |
| DIFFERENCE | Everything Fluxwave changes: the output less the input. With WOW & FLUTTER up this is mostly the timing |
It is a way of listening, not a setting: it is never saved, MIX is set aside while it is on, and it returns to LISTEN when you close the panel.
04 The ADVANCED page
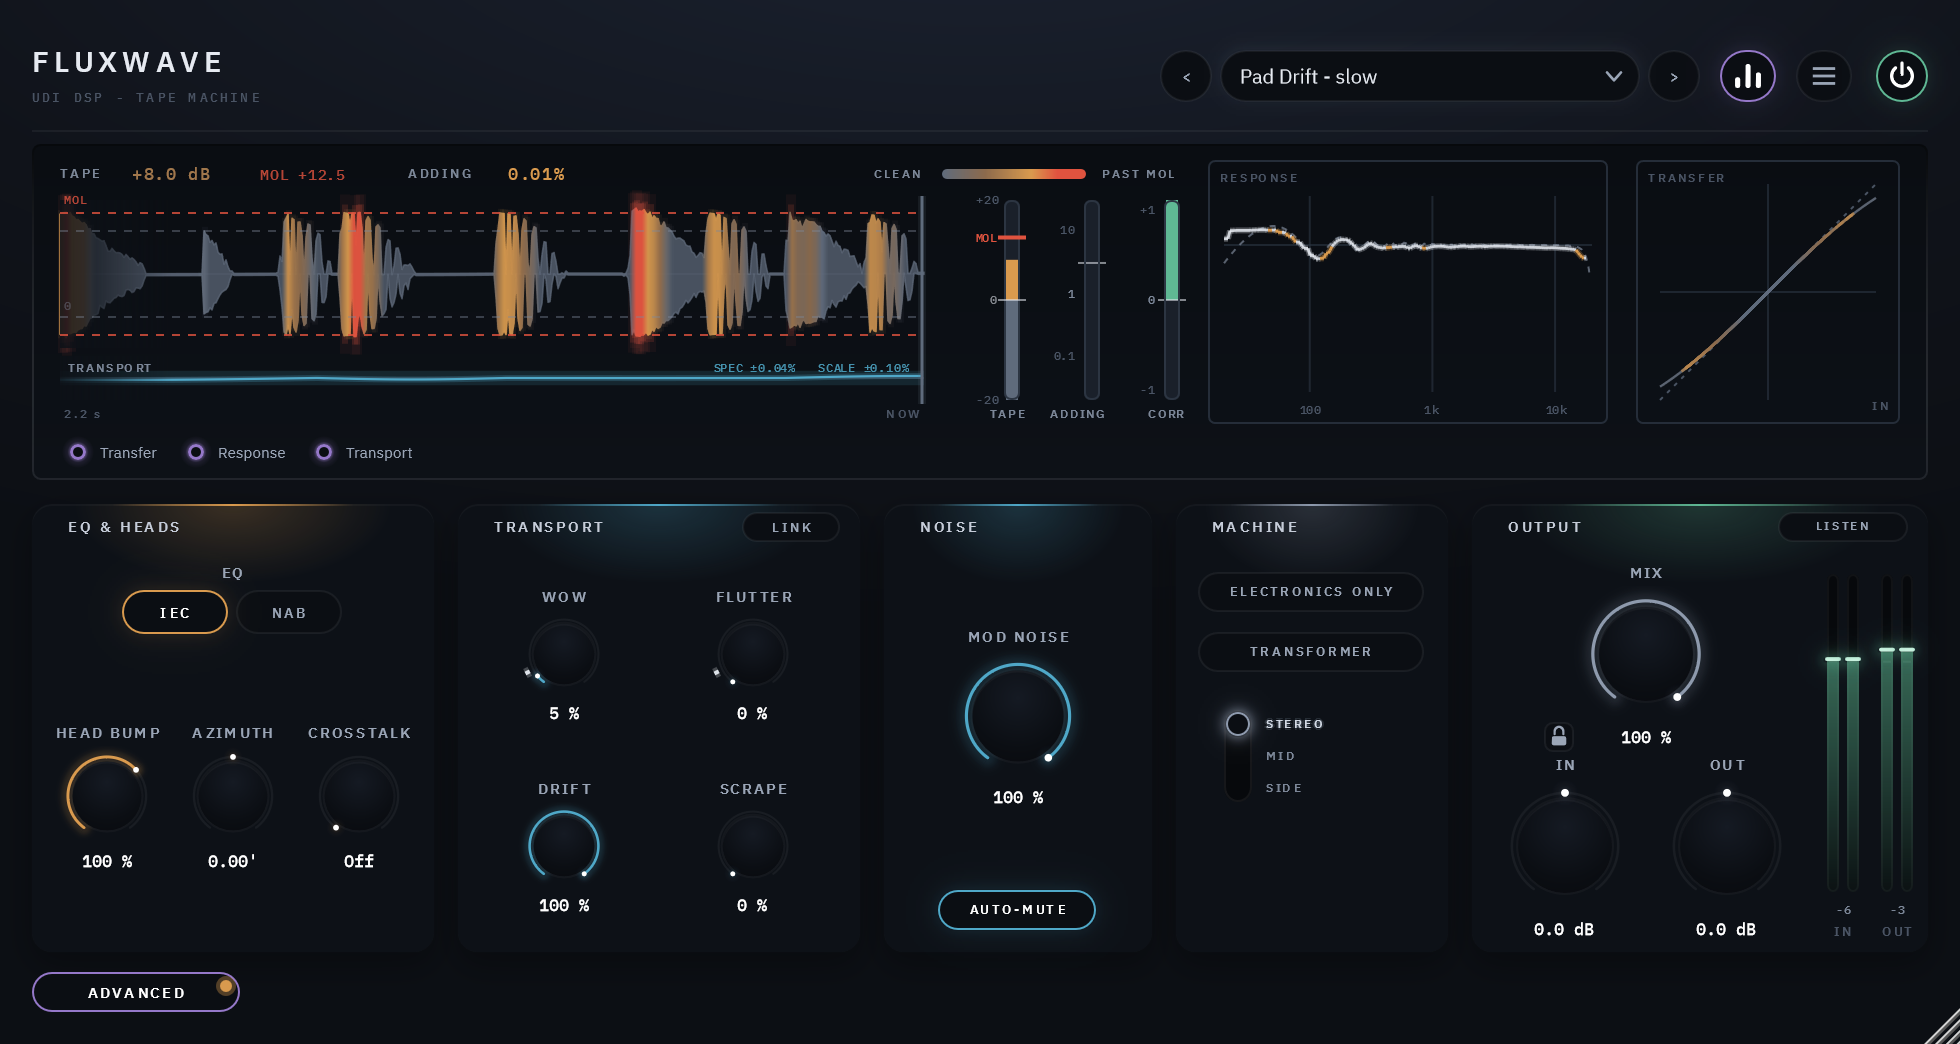
| Card | Control | What it does | Default |
|---|---|---|---|
| EQ & HEADS | EQ | The playback standard: IEC (flat in the lows) or NAB (a low-end lift that thickens the bottom when driven). At 30 in/s there is one standard, AES | IEC |
| HEAD BUMP | The size of the low-end bump, 0-150% of the voiced amount | 100% | |
| AZIMUTH | A tiny tilt of the playback head: the two channels’ highs drift apart in time, so the top softens and widens | 0’ | |
| CROSSTALK | Each track hears a little of its neighbour | Off | |
| TRANSPORT | WOW, FLUTTER, DRIFT | Each part of the speed variation on its own. With LINK on they follow WOW & FLUTTER and show it, dimmed; touch one and it goes its own way, starting where the macro had it, until you click LINK | follow |
| SCRAPE | A fine, fast roughness: the tape rubbing the heads | 0 | |
| NOISE | MOD NOISE | How much the hiss rises with the music: what makes tape hiss sound like tape | 100% |
| AUTO-MUTE | Fades the noise when the input goes silent. A convenience: no studio machine did it | On | |
| MACHINE | ELECTRONICS ONLY | The machine’s path without the tape: lets you hear which part of the sound is the tape | Off |
| TRANSFORMER | The output transformer: weight and softness in the lowest notes, growing as you drive it | Off | |
| M/S | Stereo, the middle only (the sides pass clean), or the sides only | Stereo |
A small mark on the ADVANCED button tells you when anything there is away from its default.
05 Menu settings
| Setting | Choices | Default |
|---|---|---|
| Oversampling: Playing | Off, 2x, 4x, 8x, 16x | 8x. Plain oversampling: the tape curve runs at the higher rate with no other anti-aliasing |
| Oversampling: Exporting | Same as Playing, or Off, 2x, 4x, 8x, 16x | Same as Playing |
| Panel Size | 75%, 100%, 125%, 150% | 100%. The menu sets this computer’s default; dragging the corner sets this session’s |
| Show Visualizer, Show Tooltips | on / off | on |
The oversampling settings are this session’s: a new instance always opens at 8x.
06 CPU and latency
Measured at 48 kHz, stereo, 512-sample blocks, on the development machine (one core):
| Setting | CPU |
|---|---|
| Defaults (8x) | 1.2% |
| Defaults, panel open | 1.7% |
| Oversampling off / 2x / 4x / 16x | 0.6% / 0.8% / 1.1% / 1.7% |
| Everything up at 16x | 2.8% (3.6% with the panel open) |
| Silence, after the tail | about 0.2% |
Latency is reported to the host and never moved by a control: Off 117, 2x 166, 4x 178, 8x 175, 16x 176 samples at 48 kHz. Playing and Exporting at different settings report the larger of the two, so the timing never jumps when an export starts.
07 Presets
Thirty presets plus Default, in six groups by where they go: Mix Bus, Drums, Bass, Vocals, Guitars & Keys and Character. Each name says what it is for and the speed or level that makes it: “Mix Bus/Glue - +6 hot”, “Drums/Room Squash - 7.5 hot”, “Character/Under-Biased Grit - BIAS -60”. Default returns every control to its factory value.
Save your own from the preset field: a forward slash in the name files it in a folder (“Drums/My Kit”). Presets are
.fwpreset files in %APPDATA%\udidsp\Fluxwave\Presets on Windows.
08 Technical specifications
| Formats | VST3 and AAX, 64-bit (Windows 10/11); AU, VST3 and AAX (Apple Silicon: macOS 11 Big Sur or later; Intel Mac: macOS 10.15 Catalina or later may work, please try the free 14-day trial to verify compatibility) |
| Channels | mono, mono in / stereo out, stereo |
| Speeds | 7.5, 15, 30 in/s |
| EQ standards | IEC and NAB at 7.5 and 15 in/s, AES at 30 |
| Latency | 175 samples at 48 kHz at the default 8x |
| Reported tail | worked out from the settings, about 1.5 s at the defaults |
| Bypass | 20 ms crossfade; bypassed, the input delayed by the reported latency |
09 Trial, activation and support
As across the UDI DSP line: start a trial from the badge in the header or Activate… in the menu; About in the menu shows the version and build. See the support page.